
Network Devices & Configuration
Network Devices
Section titled “Network Devices”Network devices such as Ethernet and wireless connections require careful configuration, especially when there are multiple devices of the same type. The question of consistent and persistent device naming can become tricky in such circumstances. Recently, the adoption of new schemes has made the naming more predictable. A number of important utilities are used to bring devices up and down, configure their properties, establish routes, etc., and system administrators must become adept at their use.
Unlike block and character devices, network devices are not associated with special device files, also known as device nodes. Rather than having associated entries in the /dev directory, they are known by their names.
These names usually consist of a type identifier followed by a number, as in:
eth0,eth1,eno1,eno2, etc., for ethernet devices.wlan0,wlan1,wlan2,wlp3s0,wlp3s2, etc., for wireless devices.br0,br1,br2, etc., for bridge interfaces.vmnet0,vmnet1,vmnet2, etc., for virtual devices for communicating with virtual clients.- Historically, multiple virtual devices could be associated with single physical devices; these were named with colons and numbers; so,
eth0:0would be the first alias on theeth0device. This was done to support multiple IP addresses on one network card. However, with the use ofipinstead ofifconfig, this method is deprecated and we will not pursue it. This is not compatible with IPv6. - The historical device naming conventions encountered difficulties, particularly when multiple interfaces of the same type were present. For example, suppose you have two network cards; one would be named
eth0and the othereth1. However, which physical device should be associated with each name? - The simplest method would be to have the first device found be
eth0, the secondeth1, etc. Unfortunately, probing for devices is not deterministic for modern systems, and devices may be located or plugged in an unpredictable order. Thus, you might wind up with the Internet interface swapped with the local interface. Even if hardware does not change, the order in which interfaces are located has been known to vary with kernel version and configuration. - Many system administrators have solved this problem in a simple manner, by hard-coding associations between hardware (MAC) addresses and device names in system configuration files and startup scripts. While this method has worked for years, it requires manual tuning and had other problems, such as when MAC addresses were not fixed; this can happen in both embedded and virtualized systems.
Predictable Network Interface Device Names
Section titled “Predictable Network Interface Device Names”The Predictable Network Interface Device Names (PNIDN) is connected to udev and integration with systemd. There are now 5 types of names that devices can be given:
- Incorporating Firmware or BIOS provided index numbers for onboard devices. Example:
eno1 - Incorporating Firmware or BIOS provided PCI Express hotplug slot index numbers. Example:
ens1 - Incorporating physical and/or geographical location of the hardware connection. Example:
enp2s0 - Incorporating the MAC address. Example:
enx7837d1ea46da - Using the old classic method. Example:
eth0
For example, on a machine with two onboard PCI network interfaces that would have been eth0 and eth1 (commands and outputs below):
ip link show | grep enp2: enp4s2: <NO-CARRIER,BROADCAST,MULTICAST,UP> mtu 1500 qdisc pfifo_fast state DOWN mode DEFAULT qlen 10003: enp2s0: <BROADCAST,MULTICAST,UP,LOWER_UP> mtu 1500 qdisc pfifo_fast state UP mode DEFAULT qlen 1000
ifconfig | grep enpenp2s0: flags=4163<UP,BROADCAST,RUNNING,MULTICAST> mtu 1500enp4s2: flags=4099<UP,BROADCAST,MULTICAST mtu> 1500
#These names are correlated with the physical locations of the hardware on the PCI system (command and output below):lspci | grep Ethernet02:00.0 Ethernet controller: Marvell Technology Group Ltd. 88E8056 PCI-E Gigabit Ethernet Controller (rev 12)04:02.0 Ethernet controller: Marvell Technology Group Ltd. 88E8001 Gigabit Ethernet Controller (rev 14)
#The triplet of numbers at the beginning of each line from the lspci output is the bus, device (or slot), and function of the device; hence it reveals the physical location.
#Likewise, for a wireless device that previously would have been simply named wlan0 (commands and outputs below):ip link show | grep wl3: wlp3s0: <BROADCAST,MULTICAST,UP,LOWER_UP> mtu 1500 qdisc mq state UP mode DORMANT qlen 1000
lspci | grep Centrino03:00.0 Network controller: Intel Corporation Centrino Advanced-N 6205 [Taylor Peak] (rev 34)
Network Configuration Files
Section titled “Network Configuration Files”Each distribution has its own set of files and/or directories, and they may be slightly different, depending on your distribution version.
#Red Hat/etc/sysconfig/network/etc/sysconfig/network-scripts/ifcfg-ethX/etc/sysconfig/network-scripts/ifcfg-ethX:Y/etc/sysconfig/network-scripts/route-ethX
#Debian/etc/network/interfaces
#SUSE/etc/sysconfig/network
Network Manager Configuration Files
Section titled “Network Manager Configuration Files”Network Manager can use the traditional network files from several distributions. The networking profiles are supported by plugins. The key-value is the preferred file format.
There are several optional plugins for traditional configuration compatibility:
ifupdownfor/etc/network/interfacesifcfg-rhfor/etc/sysconfig/network-scriptsifcfg-suseis for simple compatibility for SUSE and openSUSEkey-fileis a generic replacement for system specific configuration files
There is a configuration option in /etc/NetworkManager/NetworkManager.conf in the [main] section that lists which plugins for configuration processing are to be used in a comma-separated list. For more details, see the NetworkManager.conf documentation.
Network Manager
Section titled “Network Manager”- Once upon a time, network connections were almost all wired (Ethernet) and did not change unless there was a significant change to the system.
- As a system was booted, it consulted the network configuration files in the
/etcdirectory subtree in order to establish the interface properties such as static or dynamic (DHCP) address configuration, whether the device should be started at boot, etc. - If there were multiple network devices, policies had to be established as to what order they would be brought up, which networks they would connect to, what they would be called, etc.
As wireless connections became more common (as well as hotplug network devices such as on USB adapters), configuration became much more complicated, both because of the transient nature of the hardware and that of the specific networks being connected to.
However, modern systems often have dynamic configurations:
- Networks may change as a device is moved from place to place
- Wireless devices may have a large choice of networks to hook into
- Devices may change as hardware, such as wireless devices, are plugged in or turned on and off
The previously discussed configuration files were created to deal with more static situations and are very distribution-dependent. A step away from distribution-dependent interfaces and configuration files was a big advance.
While Network Manager still uses configuration files, it is usually best to rely on its various utilities for manipulating and updating them. Network Manager should be almost the same on different systems.
Network Manager Interfaces
Section titled “Network Manager Interfaces”Graphical Interface: If you are using your laptop we use whatever graphical interface Linux distribution’s desktop offers. Every Linux desktop (GNOME, KDE, XFCE, etc.) has one, usually reached by clicking on something in the horizontal panel. You can use this to select between different networks, configure security and passwords, turn devices off and on, etc.
nmtui and ncurses : If you are making a configuration change on your system that is likely to last for a while, you are likely to use nmtui (network manager text user interface), as it has almost no learning curve and will edit the underlying configuration files for you. It uses the ncurses library interface.
nmcli : If you need to run scripts that change the network configuration, you will want to use nmcli (network manager command line interface). Or, if you are a command line junkie, you may want to use this instead of nmtui.
nmtui is rather straightforward to use. You can navigate with either the arrow keys or the tab key.
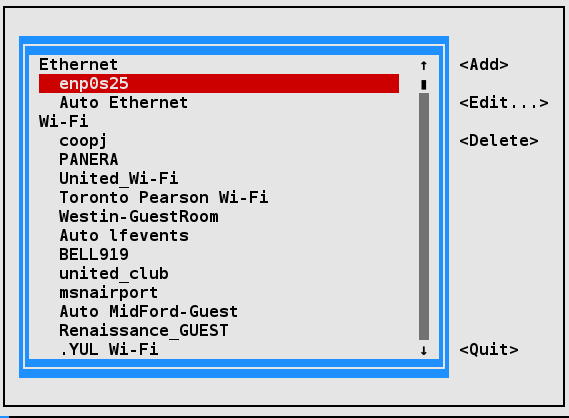
The nmtui menu for wireless networks should look similar to the GUI interface. Sometimes it’s useful to use this interface to view configurations for other wireless networks while configuring a new one.
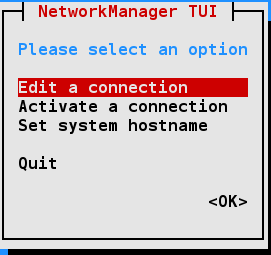

Besides activating or editing connections, you also set the system hostname. However, some operations, such as this, cannot be done by normal users and you will be prompted for the root password to go forward.
nmcli is the command line interface to Network Manager. You can issue direct commands, but it also has an interactive mode.
Routing
Section titled “Routing”Routing is the process of selecting paths in a network along which to send network traffic. The routing table is a list of routes to other networks managed by the system. It defines paths to all networks and hosts; local packets are sent directly, while remote traffic is sent to routers.
To see the current routing table, you can use either route (deprecated) or the ip command:
route -nKernel IP routing tableDestination     Gateway         Genmask         Flags Metric Ref    Use Iface0.0.0.0         192.168.0.1     0.0.0.0         UG    600    0        0 wlp3s0192.168.0.0     0.0.0.0         255.255.255.0   U     600    0        0 wlp3s0
ip routedefault via 192.168.0.1 dev wlp3s0 proto dhcp src 192.168.0.101 metric 200192.168.0.0/16 dev wlp2s0 proto kernel scope link src 192.168.0.101 metric 200
Default Route
Section titled “Default Route”The default route is the way packets are sent when there is no other match in the routing table for reaching the specified network.
It can be obtained dynamically using DHCP. However, it can also be manually configured (static). With the nmcli command it can be done via:
sudo nmcli con mod virbr0 ipv4.routes 192.168.10.0/24 +ipv4.gateway 192.168.122.0sudo nmcli con up virbr0or you can modify configuration files directly, thus avoiding to modify files in /etc by hand.
On Red Hat-derived systems, you can modify the /etc/sysconfig/network file by putting in the line:
vi /etc/sysconfig/networkGATEWAY=x.x.x.xor alternatively in /etc/sysconfig/network-scripts/ifcfg-ethX on a device-specific basis in the configuration file for the individual NIC.
On either system, you can set the default gateway at runtime with these commands:
sudo ip route add default via 192.168.1.10 dev enp2s0
ip routedefault via 192.168.1.10 dev enp2s0default via 192.168.1.1 dev enp2s0 metric 1024192.168.1.0/24 dev enp2s0 proto kernel scope link src 192.168.1.100
Note that this might wipe out your network connection! You can restore either by resetting the network, or in the above example by running this command:
sudo ip route add default via 192.168.1.1 dev enp2s0These changes are not persistent and will not survive a system restart.
Static Routes
Section titled “Static Routes”Static routes are used to control packet flow when there is more than one router or route. They are defined for each interface and can be either persistent or non-persistent.
When the system can access more than one router, or perhaps there are multiple interfaces, it is useful to selectively control which packets go to which router.
Either the route or ip command can be used to set a non-persistent route as in:
sudo ip route add 10.5.0.0/16 via 192.168.1.100On a Red Hat-based system, a persistent route can be set by editing the /etc/sysconfig/network-scripts/route-ethX file as shown by the following command and its output:
cat /etc/sysconfig/network-scripts/route-eth010.5.0.0/16 via 172.17.9.1Teaming and Bonding Network Interfaces
Section titled “Teaming and Bonding Network Interfaces”Teaming and Bonding interfaces allow dynamic network interface configuration to provide higher throughput and additional robustness to the network.
- Bonding : Uses a kernel module to provide aggregation of network links to provide fail-over, redundancy and performance enhancements
- Teaming : Is similar to bonding, except teaming uses a userspace service named teamed. The Teaming configuration method has been listed as deprecated and is scheduled to be removed in the future.
To facilitate a smooth conversion from Teaming to Bonding, the team2bond utility is available to convert configuration files.
Bonding Network Interfaces
Section titled “Bonding Network Interfaces”There are several methods for configuring Bonding interfaces:
sysfs: Direct changes to the/syspseudo-filesystem. Changes are not saved.iproute2: Supports bonding via theipcommand; seeman 8 ip-linkfor details. Changes are not saved.Network Manager: All Network Manager user interfaces support bonding. Changes are saved. The Network Manager configuration files can also be edited with your favorite text editor.
For more details on the /sys interface to bonding, check the online documentation.
Creating Bonding Network Interface with nmcli
Section titled “Creating Bonding Network Interface with nmcli”Creating a configuration for a bonding interface with nmcli involves a few steps. Minimal steps are:
- Identify adapters: Use
nmcli device status - Create bonding device: Use
nmcli connection add - Attach interface to the bond: Create a connection from the adapter to the bond device using
nmcli connection add - Set the bond adapter online: Issue an
nmcli connection upcommand for the bond adapter - Reboot: Although the reboot is not absolutely required, it is strongly recommended. A reboot will clean up any configuration fragments left around
For more information on nmcli, check the nmcli documentation.
You can see a bonding example using nmcli below. On the command line:
nmcli connection add type bond \     con-name bond0 \     ifname bond0 \     bond.options "mode=active-backup,miimon=1000"
nmcli connection add type ethernet slave-type bond \     con-name bond0-port1 \     ifname enp0s20u1u1 \     master bond0
nmcli connection add type ethernet slave-type bond \     con-name bond0-port2 \     ifname enp0s20u1u2 \     master bond0
nmcli connection up bond0
nmcli device status
reboot
nmcli device status
/etc/hosts
Section titled “/etc/hosts”The /etc/hosts file holds a local database of hostnames and IP addresses. It contains a set of records (each taking one line) which map IP addresses with corresponding hostnames and aliases.
A typical file looks like:
vi /etc/hosts127.0.0.1 localhost localhost.localdomain localhost4 localhost4.localdomain4::1 localhost localhost.localdomain localhost6 localhost6.localdomain6192.168.1.100 hans hans7 hans64192.168.1.150 bethe bethe7 bethe64192.168.1.2 hp-printer192.168.1.10 test32 test64 oldpcSuch static name resolution is primarily used for local, small, isolated networks. It is generally checked before DNS is attempted to resolve an address; however, this priority can be controlled by the /etc/nsswitch.conf file, but it is not often used today.
Command:
ls -l /etc/host*-rw-r--r-- 1 root root 92 Oct 22 2015 host.conf-rw-r--r-- 1 root root 7 Apr 21 08:46 hostname-rw-r--r-- 1 root root 221 Apr 21 08:46 hosts-rw-r--r-- 1 root root 411 Apr 20 17:14 hosts.allow-rw-r--r-- 1 root root 711 Apr 20 17:14 hosts.denyThe other host-related files in /etc are /etc/hosts.deny and /etc/hosts.allow. These are self-documenting and their purpose is obvious from their names. The allow file is searched first and the deny file is only searched if the query is not found there.
/etc/host.conf contains general configuration information; it is rarely used.
LDAP (Lightweight Directory Access Protocol)
Section titled “LDAP (Lightweight Directory Access Protocol)”LDAP (Lightweight Directory Access Protocol) is a derivative of the x.500 specification for providing directory services (think phone book) via the IP protocol.
LDAP provides database-style functionality specifically engineered to be fast, computationally lightweight, and robust.
The LDAP application protocol details transport, directory layout (organization), and methods of access to the data for operations such as read, write, delete, etc.
LDAP can provide both authentication and authorization data. However, it is primarily used for authorization alone, with Kerberos (trusted third party authentication) being a popular choice for authentication. Interestingly, Microsoft’s Active Directory service (at least for auth/auth) is little more than LDAP and Kerberos coupled together.
LDAP is used in many Single Sign On and Identity Management solutions.
LDAP Authentication
Section titled “LDAP Authentication”- LDAP (Lightweight Directory Access Protocol) is an industry standard protocol for using and administering distributed directory services over the network, and is meant to be both open and vendor-neutral.
- When using LDAP for centralized authentication, each system (or client) connects to a centralized LDAP server for user authentication. LDAP is TLS (Transport Layer Security) and SSL (Secure Sockets Layer) aware. TLS/SSL will provide a secure encrypted connection.
- The client configuration only needs to specify a minimum amount of information to connect to an LDAP server. Elements such as LDAP server IP address, search base DN (domain name), and optionally TLS are required for authentication.
- Additional user space programs are provided by the
openldap-clientspackage.
LDAP Client Authentication Process
Section titled “LDAP Client Authentication Process”The graphic shows the information path used by LDAP/SSSD. Connecting to an LDAP server starts with PAM, the pluggable authentication module.
PAM is the default authentication mechanism for Linux; LDAP and SSSD are extension modules added to the default authentication configuration.
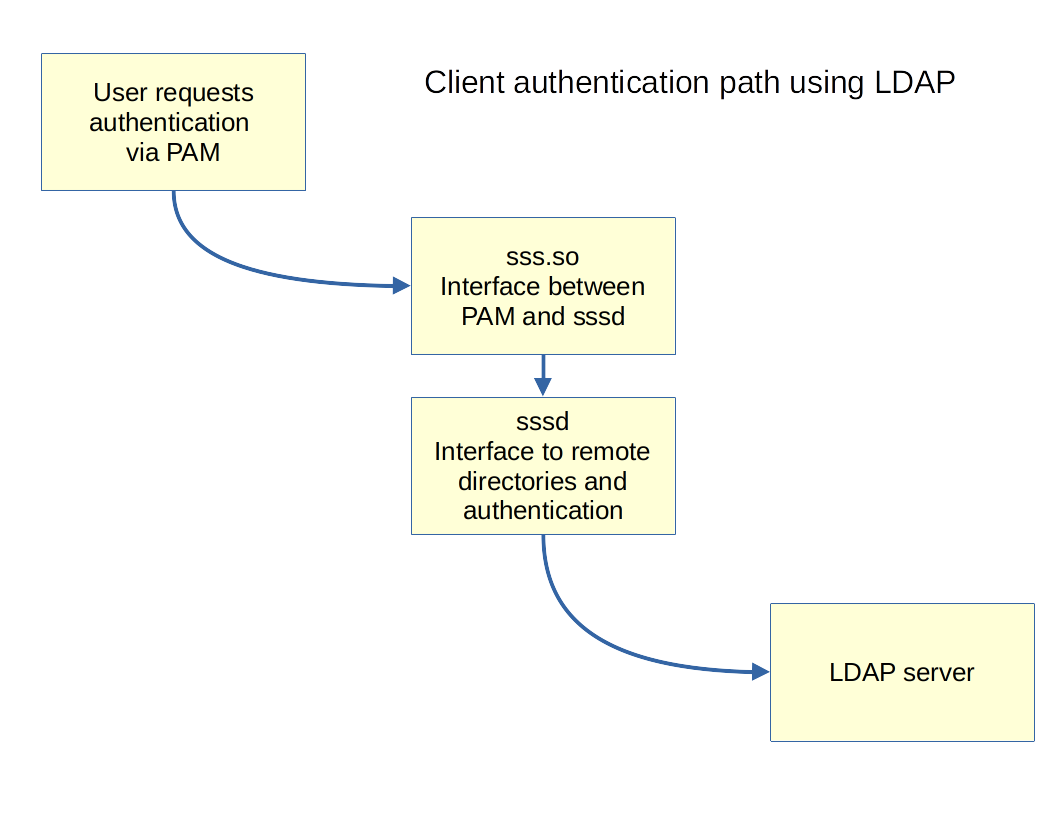
- PAM is configured to use the pam.sss.so module
- sss.so and sssd use a combined sssd and LDAP configuration file.
vi /etc/sssd/conf.d/00-sssd.conf[sssd]config_file_version = 2domains = example.comservices = nss, pam,autofs
[domain/example.com]enumerate = trueid_provider = ldapautofs_provider = ldapauth_provider = ldapchpass_provider = ldapldap_uri = ldap://192.168.122.154/ldap_search_base = dc=example,dc=comldap_id_use_start_tls = truecache_credentials = Trueldap_tls_reqcert =allow
LDAP and sssd Packages
Section titled “LDAP and sssd Packages”When you configure a client system for LDAP authentication, the following files are changed:
/etc/sssd/conf.d/00-sssd.conf/etc/pam.d/common-session.conf
The /etc/sssd/conf.d/00-sssd.conf file has a 2 digit prefix to allow for sequencing if more than one configuration file is being used.
The /etc/pam.d configuration files may be different depending on your distribution:
- CentOS 8:
/etc/pam.d/system-auth - Ubuntu 22.04:
/etc/pam.d/common-session.conf
You can edit these files manually.
In previous distribution releases, there were specific utilities used for configuration. The adoption of sssd (System Security Services Daemon) and friends has greatly reduced the complexity of the client configuration and eliminated the need for specialized configuration tools. Text file configuration information may be configured with your favorite text editor.