
Network Devices & Configuration
Network Devices
Section titled “Network Devices”Network devices such as Ethernet and wireless connections require careful configuration, especially when multiple devices of the same type are present. The question of consistent and persistent device naming is critical - historically it was problematic.
Unlike block and character devices, network devices are not associated with special device files in /dev. Instead they are known by their names.
Traditional naming (eth0, eth1, wlan0) had a serious flaw: probing for devices on modern hardware is not deterministic. Two network cards might be detected in differing order across reboots or after kernel upgrades - meaning your “internet” interface could swap with your “local” interface silently. Some admins hardcoded MAC → name mappings in /etc/udev/rules.d/, but this required manual maintenance.
Predictable Network Interface Device Names (PNIDN)
Section titled “Predictable Network Interface Device Names (PNIDN)”The Predictable Network Interface Device Names scheme, part of udev + systemd, solves this by deriving names from hardware location. There are 5 naming schemes (in priority order):
- Firmware/BIOS-provided index for onboard devices -
eno1 - Firmware/BIOS PCI Express hotplug slot index -
ens1 - Physical/geographical PCI location -
enp2s0(bus 2, slot 0) - MAC address -
enx7837d1ea46da - Classic fallback -
eth0(last resort if above unavailable)
| Prefix | Type |
|---|---|
en | Ethernet |
wl | Wi-Fi (WLAN) |
ww | WWAN (mobile broadband) |
lo | Loopback |
# View interfaces and their predictable namesip link show | grep -E "^[0-9]"
# Map name to physical location (PCI bus:device.function)lspci | grep -i ethernet# 02:00.0 Ethernet controller: Marvell 88E8056 PCI-E ...# 04:02.0 Ethernet controller: Marvell 88E8001 Gigabit ...# → enp2s0 (bus 2, slot 0) and enp4s2 (bus 4, slot 2)
# Wireless exampleip link show | grep wl# 3: wlp3s0: <BROADCAST,MULTICAST,UP,LOWER_UP> ...lspci | grep -i centrino# 03:00.0 Network controller: Intel Centrino Advanced-N 6205
Network Configuration Files
Section titled “Network Configuration Files”Configuration file locations vary by distribution:
| Distribution | Config location |
|---|---|
| RHEL/Fedora (legacy) | /etc/sysconfig/network-scripts/ifcfg-* |
| RHEL/Fedora (modern) | NetworkManager keyfile: /etc/NetworkManager/system-connections/ |
| Debian/Ubuntu | /etc/network/interfaces or NetworkManager/netplan |
| SUSE | /etc/sysconfig/network |
NetworkManager
Section titled “NetworkManager”NetworkManager was created to solve the complexity introduced by dynamic networking: wireless connections that change, hotplug USB adapters, VPN connections, and devices that move between networks. It replaced the older static configuration file approach.
NetworkManager supports multiple configuration plugins for compatibility:
ifupdown- for/etc/network/interfaces(Debian/Ubuntu)ifcfg-rh- for/etc/sysconfig/network-scripts(RHEL legacy)key-file- generic, cross-distro format (modern default)
Main config: /etc/NetworkManager/NetworkManager.conf
While NetworkManager still uses files, always use its utilities (nmcli, nmtui) to modify them rather than editing directly - they validate syntax and handle reload automatically.
NetworkManager Interfaces
Section titled “NetworkManager Interfaces”| Interface | Use case |
|---|---|
| GUI | Desktop environments (GNOME, KDE, XFCE) - network applet in panel |
nmtui | Text UI (ncurses); almost no learning curve; good for persistent changes |
nmcli | Command line; required for scripting and automation |
nmtui - Text User Interface
Section titled “nmtui - Text User Interface”Navigate with arrow keys or Tab. Good for interactive one-off configuration without learning nmcli syntax.
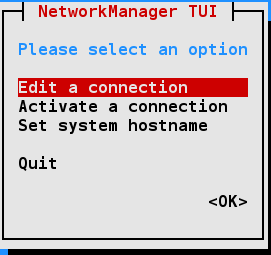
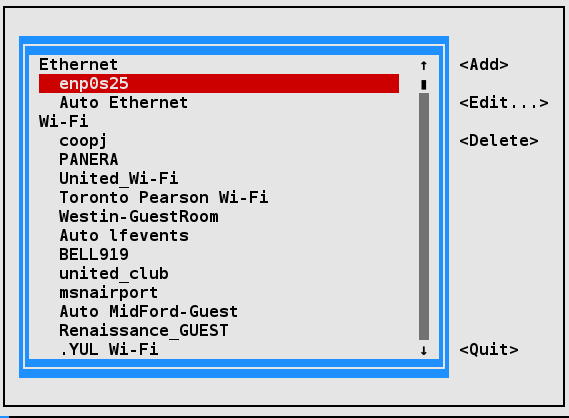

Options:
- Edit a connection - IP, DNS, gateway, Wi-Fi password
- Activate a connection - enable/disable interfaces
- Set system hostname - requires root password
nmcli - Command Line Interface
Section titled “nmcli - Command Line Interface”nmcli is the command-line interface to NetworkManager. Changes persist across reboots.
Connections and Devices
Section titled “Connections and Devices”nmcli device status # list devices and statenmcli device show eth0 # detailed info for one devicenmcli connection show # list all saved connectionsnmcli connection show --active # only active connections
nmcli connection up "Wired connection 1"nmcli connection down "Wired connection 1"nmcli device disconnect eth0 # disconnect without forgettingConfigure a Static IP
Section titled “Configure a Static IP”nmcli connection add \ type ethernet \ con-name static-eth0 \ ifname eth0 \ ipv4.method manual \ ipv4.addresses 192.168.1.100/24 \ ipv4.gateway 192.168.1.1 \ ipv4.dns "8.8.8.8,1.1.1.1"
nmcli connection up static-eth0
# Modify an existing connectionnmcli connection modify static-eth0 ipv4.dns "1.1.1.1,8.8.8.8"nmcli connection reload && nmcli connection up static-eth0Switch Back to DHCP
Section titled “Switch Back to DHCP”nmcli connection modify static-eth0 ipv4.method auto ipv4.addresses "" ipv4.gateway ""nmcli connection up static-eth0Routing
Section titled “Routing”Routing is the process of selecting paths in a network along which to send network traffic. The routing table defines paths to all networks and hosts - local packets go directly, remote traffic goes to routers.
# View routing tableip route                        # preferredroute -n                        # deprecated; output format: Destination / Gateway / Genmask / Flags / Iface
# Example output:# ip route# default via 192.168.0.1 dev wlp3s0 proto dhcp src 192.168.0.101 metric 200# 192.168.0.0/24 dev wlp3s0 proto kernel scope link src 192.168.0.101
Default Route
Section titled “Default Route”The default route (0.0.0.0/0) is where packets go when no more specific route exists. It’s usually your gateway/router.
# Set default gateway at runtime (temporary - lost on reboot)sudo ip route add default via 192.168.1.1 dev eth0Persistent default route via nmcli:
sudo nmcli con mod "Wired connection 1" ipv4.gateway 192.168.1.1sudo nmcli connection up "Wired connection 1"Static Routes
Section titled “Static Routes”Static routes control packet flow when multiple routers or paths exist:
# Runtime (temporary)sudo ip route add 10.5.0.0/16 via 192.168.1.100
# Persistent via nmclisudo nmcli connection modify "Wired connection 1" \    +ipv4.routes "10.5.0.0/16 192.168.1.100"sudo nmcli connection up "Wired connection 1"
# RHEL legacy (persistent file)cat /etc/sysconfig/network-scripts/route-eth0# 10.5.0.0/16 via 172.17.9.1
Bonding Network Interfaces
Section titled “Bonding Network Interfaces”Bonding and Teaming allow aggregating multiple NICs into a single logical interface for redundancy or throughput.
Bonding is implemented as a kernel module. Configuration methods:
sysfs- direct writes to/sys; changes not savediproute2- viaip link; changes not savedNetworkManager- changes saved; recommended
| Bonding Mode | Description | Requirements |
|---|---|---|
active-backup | One link active; falls back to backup on failure | None |
802.3ad (LACP) | Both links active; requires switch LACP support | Managed switch |
balance-rr | Round-robin; no switch config needed | None |
Create Bond with nmcli
Section titled “Create Bond with nmcli”Minimal steps:
- Identify adapters:
nmcli device status - Create bonding device
- Attach interfaces (slaves/ports)
- Bring bond up
- Reboot (strongly recommended to clean up fragments)
# 1. Create the bond devicenmcli connection add type bond \    con-name bond0 \    ifname bond0 \    bond.options "mode=active-backup,miimon=100"
# 2. Attach first slavenmcli connection add type ethernet slave-type bond \    con-name bond0-port1 ifname enp2s0 master bond0
# 3. Attach second slavenmcli connection add type ethernet slave-type bond \    con-name bond0-port2 ifname enp3s0 master bond0
# 4. Bring upnmcli connection up bond0nmcli device status
# 5. Verifycat /proc/net/bonding/bond0     # shows active slave and mode
/etc/hosts - Local Name Resolution
Section titled “/etc/hosts - Local Name Resolution”The /etc/hosts file is a local database of hostname → IP mappings. It’s checked before DNS (per /etc/nsswitch.conf).
127.0.0.1 localhost localhost.localdomain localhost4 localhost4.localdomain4::1 localhost localhost.localdomain localhost6 localhost6.localdomain6192.168.1.100 hans hans7 hans64192.168.1.150 bethe bethe7 bethe64192.168.1.2 hp-printer192.168.1.10 test32 test64 oldpcRelated files in /etc/:
ls -l /etc/host*# host.conf - general resolver config; rarely used# hostname - current hostname (read by hostnamectl)# hosts - the main local DNS database# hosts.allow - TCP wrappers access control (allow list; checked first)# hosts.deny - TCP wrappers access control (deny list; checked if not in allow)Check resolution order:
cat /etc/nsswitch.conf | grep hosts# hosts: files dns myhostname# "files" = /etc/hosts checked first, then DNSLDAP (Lightweight Directory Access Protocol)
Section titled “LDAP (Lightweight Directory Access Protocol)”LDAP is a derivative of the X.500 specification for providing directory services (think a distributed phone book) over IP. It’s fast, lightweight, and provides database-style functionality for operations like read, write, delete, and search.
LDAP can provide both authentication and authorization data, but is primarily used for authorization (who is this user, what groups do they belong to), with Kerberos handling authentication (proving identity). This combination is exactly what Microsoft Active Directory implements under the hood.
LDAP is central to:
- Single Sign-On (SSO) systems
- Identity management platforms (FreeIPA, OpenLDAP, AD)
- Centralized user account management
How LDAP Authentication Works on Linux
Section titled “How LDAP Authentication Works on Linux”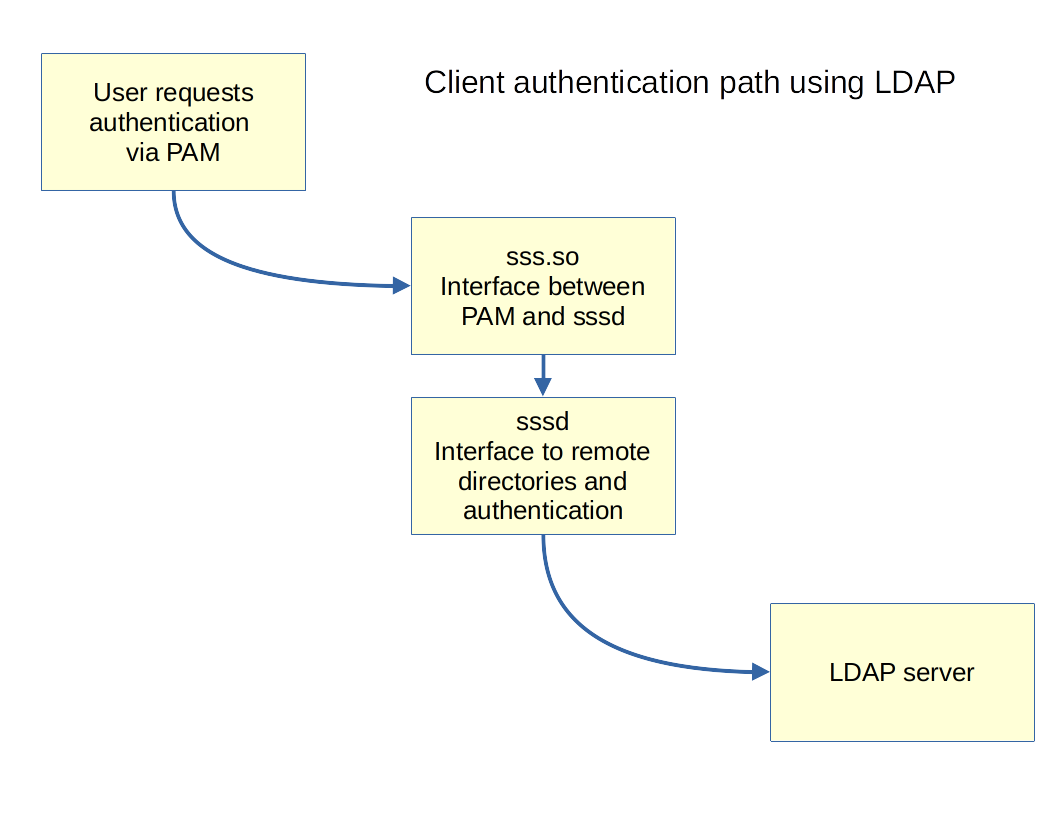
When a user logs in:
- The application calls PAM (Pluggable Authentication Module) - Linux’s standard auth interface
- PAM is configured to use the
pam_sss.somodule pam_sss.socalls SSSD (System Security Services Daemon)- SSSD queries the LDAP/AD server for user credentials and group membership
- SSSD caches results locally - users can still log in even if the LDAP server is temporarily unreachable
LDAP Client Configuration
Section titled “LDAP Client Configuration”[sssd]config_file_version = 2domains = example.comservices = nss, pam, autofs
[domain/example.com]enumerate = trueid_provider = ldapauth_provider = ldapautofs_provider = ldapchpass_provider = ldapldap_uri = ldaps://ldap.example.com/ # ldaps:// for TLSldap_search_base = dc=example,dc=comldap_id_use_start_tls = trueldap_tls_reqcert = demandcache_credentials = trueFiles changed when configuring LDAP auth:
/etc/sssd/conf.d/00-sssd.conf- main SSSD config (2-digit prefix allows sequencing)/etc/pam.d/common-session.conf(Ubuntu) or/etc/pam.d/system-auth(CentOS)
sudo systemctl enable --now sssdgetent passwd username # test NSS lookupLDAP and sssd Packages
Section titled “LDAP and sssd Packages”# Required packages (RHEL/Fedora)sudo dnf install sssd openldap-clients
# Required packages (Debian/Ubuntu)sudo apt install sssd ldap-utilsActive Directory Integration with realmd
Section titled “Active Directory Integration with realmd”For joining Windows AD domains, realmd is the simplest approach:
sudo realm discover example.com # discover domainsudo realm join -U Administrator example.com # join
sudo realm list # show joined domainssudo realm leave # leave the domain