
Docker Networking
- Containers are not exposed to the outside world by default. Each container gets its own network namespace with a private IP address that is only reachable within Docker’s virtual network.
- To expose a container to the host or internet, you must explicitly publish ports:
docker run -p 8080:80 nginx
Docker networking is built on three layered components: the Container Network Model (design spec) → Libnetwork (control plane implementation) → Drivers (data plane for each topology).
Network scopes define the reach of a Docker network:
- local - confined to a single host. Containers on other hosts cannot join or route into it.
- global - provisioned on every Swarm node, but traffic is not routed between nodes automatically.
- swarm - spans all Swarm hosts with transparent cross-host routing. Used by overlay networks.
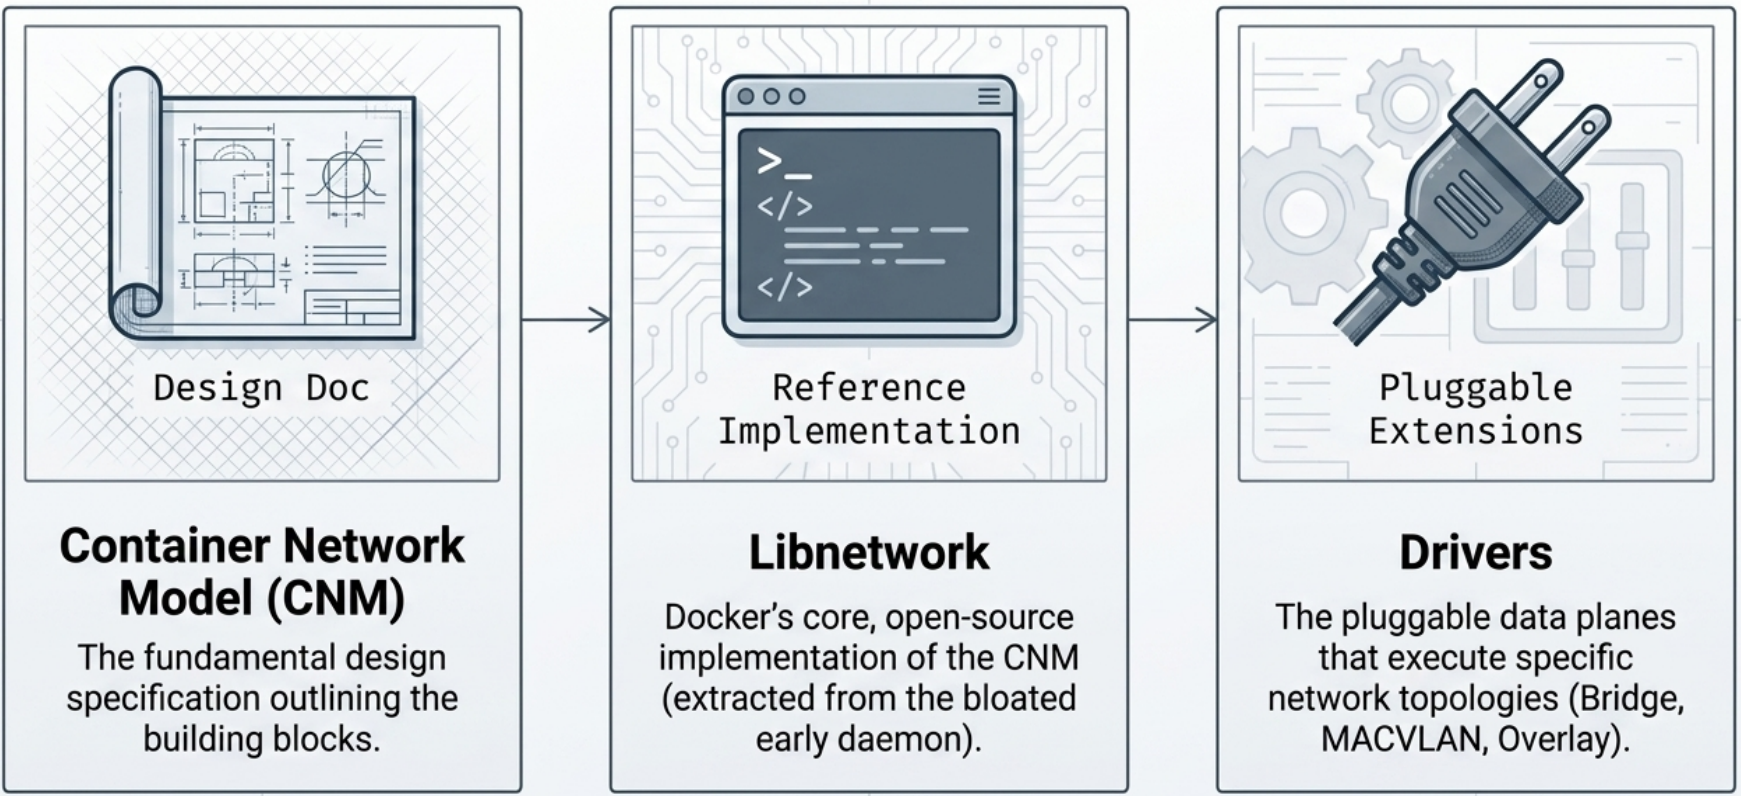
Container Network Model (CNM)
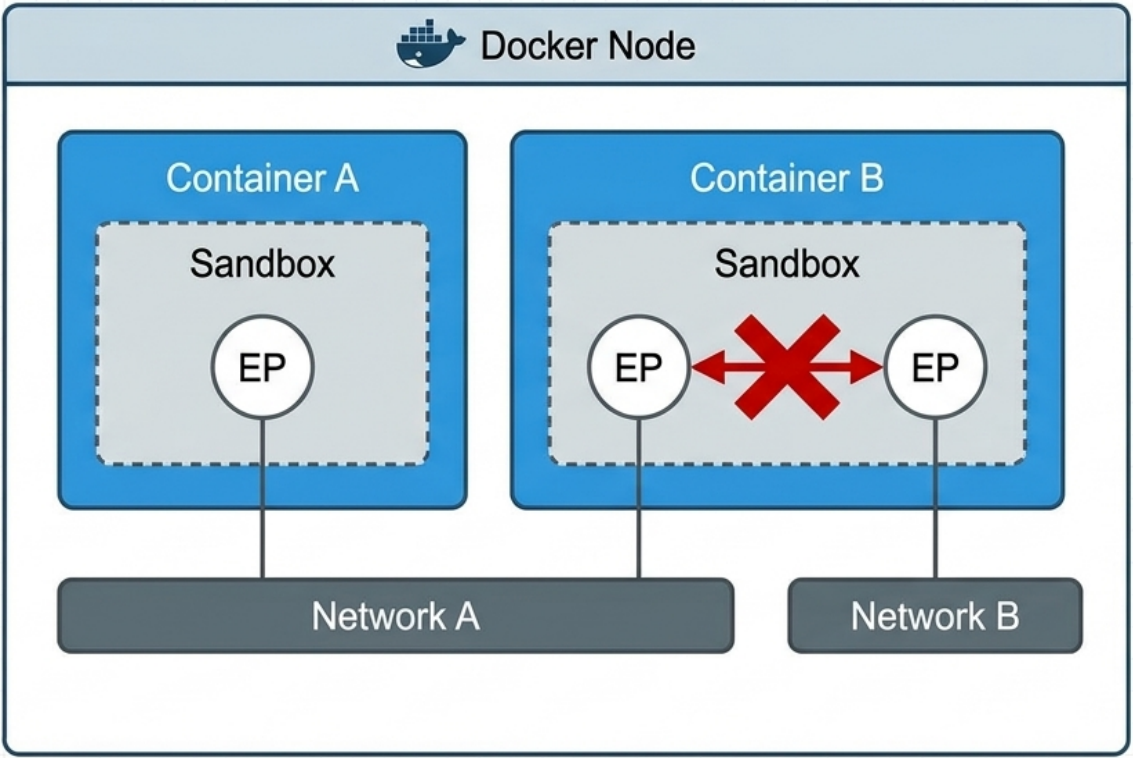
Section titled “Container Network Model (CNM)”The CNM is the formal design specification for Docker networking. It defines three constructs that map directly to Linux primitives:
| CNM Concept | Linux Primitive | Role |
|---|---|---|
| Sandbox | Network namespace | Isolated network stack per container (interfaces, routing table, iptables, DNS config) |
| Endpoint | veth pair | Virtual cable connecting a sandbox to a network. One endpoint per network the container joins. |
| Network | Linux bridge (docker0) | Groups endpoints for communication; isolates them from other networks |
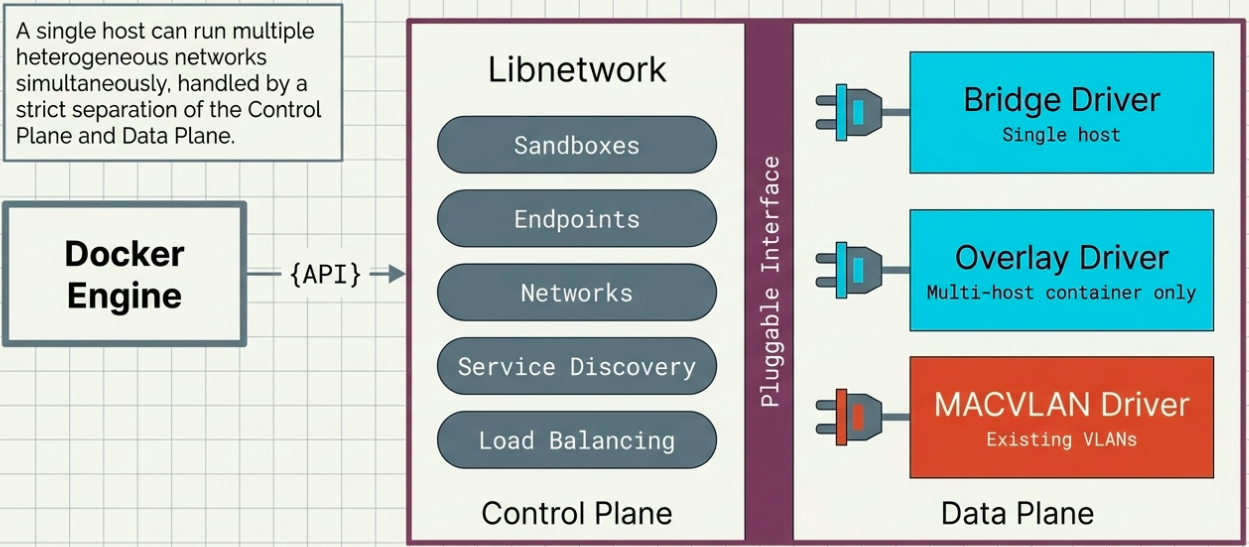
Libnetwork is the open-source control plane implementation of the CNM (originally embedded in the Docker daemon, later extracted to reduce coupling). Drivers implement the data plane - each driver type realizes the CNM constructs for a specific topology (bridge, overlay, macvlan).
Network Drivers
Section titled “Network Drivers”- Libnetwork implements the control plane, but it relies on drivers to implement the data plane.
Docker ships with several built-in network drivers:
| Driver | Use Case |
|---|---|
| bridge | Default. Containers on the same host communicate via a virtual bridge. Isolated from host network. |
| host | Container shares the host’s network stack directly. No port mapping needed. Loses network isolation. |
| none | Disables all networking. Container has only a loopback interface. |
| overlay | Multi-host networking for Docker Swarm. Creates a virtual network spanning multiple Docker hosts. |
| macvlan | Assigns a real MAC address to the container. Container appears as a physical device on the LAN. |
| ipvlan | Like macvlan but shares the host’s MAC. Useful where MAC proliferation is a problem. |
Bridge Network (default)
Section titled “Bridge Network (default)”A bridge is an interface that connects multiple networks so that they can function as a single network. Bridges work by selectively forwarding traffic between the connected networks based on another type of network address.
-
It uses Linux namespaces, virtual Ethernet devices, and the Linux firewall to build a specific and customizable virtual network topology.
-
The default bridge is named
bridge, but it’s recommended to create user-defined bridge networks for better isolation and DNS resolution. -
Docker automatically registers container names with an internal DNS service and allows containers on the same network to find each other by name. The exception to this rule is the built-in bridge network that does not support DNS resolution.
Terminal window # Containers on the default bridge can reach each other by IP, NOT by namedocker run -d --name app1 nginxdocker run -d --name app2 nginx# User-defined bridge networks support DNS resolution by namedocker network create my-netdocker run -d --name app1 --network my-net nginxdocker run -d --name app2 --network my-net nginx# Now app2 can ping app1 by name: ping app1 -
Always use user-defined bridge networks in production. The default bridge lacks DNS name resolution between containers.
Host Network
Section titled “Host Network”# Container uses host networking - no port mappingdocker run -d --network host nginx# nginx is now accessible on host port 80 directly- Useful for performance-sensitive applications or when the container needs to manage host interfaces.
- Instructs Docker not to create any special networking namespace or resources for attached containers. Containers on the host network interact with the host’s network. Whatever software is running inside the resulting container will have the same degree of access to the host network as it would running outside the container.
- Not available on Docker Desktop (macOS/Windows) - the VM boundary prevents direct host network access.
None Network
Section titled “None Network”The none driver gives a container a completely isolated network namespace with no external interfaces - only a loopback (127.0.0.1). The container cannot reach or be reached from anywhere outside itself.
-
Principle of least privilege: If a workload doesn’t need network access, it should have none. Unnecessary network exposure is an attack surface.
-
Sensitive operations: The
nonenetwork is ideal for tasks where network isolation must be guaranteed - e.g., generating a random password or encryption key. Any data exfiltration over the network is physically impossible. -
Foundation for external orchestration: Containers on
nonecan have custom network interfaces added by third-party orchestrators (e.g., Kubernetes CNI plugins) after startup, without Docker’s networking being involved at all.Terminal window docker run --rm --network none alpine sh -c "echo 'no network, no risk'"
MACVLAN Network
Section titled “MACVLAN Network”MACVLAN assigns a real MAC address and IP address from an external physical network to each container, making them appear as distinct physical servers or VMs on the LAN. The underlying network has no awareness of Docker - it sees normal MAC/IP pairs.
-
Use case: Partially containerized environments where containers must communicate directly with traditional VMs or physical servers on an existing VLAN.
-
Sub-interfaces: The driver creates Linux sub-interfaces (e.g.,
eth0.100) tagged with 802.1q VLAN IDs. -
VLAN trunking: A single host can run multiple MACVLAN networks, each mapped to a different underlying VLAN.
Terminal window # Create a MACVLAN network mapped to VLAN 100docker network create \-d macvlan \--subnet 10.0.0.0/24 \--gateway 10.0.0.1 \--ip-range 10.0.0.128/25 \-o parent=eth0.100 \my-macvlan-net -
Always use
--ip-rangeto carve out a reserved block of IPs for Docker. The MACVLAN driver has no ARP-based collision detection - without it, Docker may assign an IP already in use on the physical network.
How Docker Implements Networking
Section titled “How Docker Implements Networking”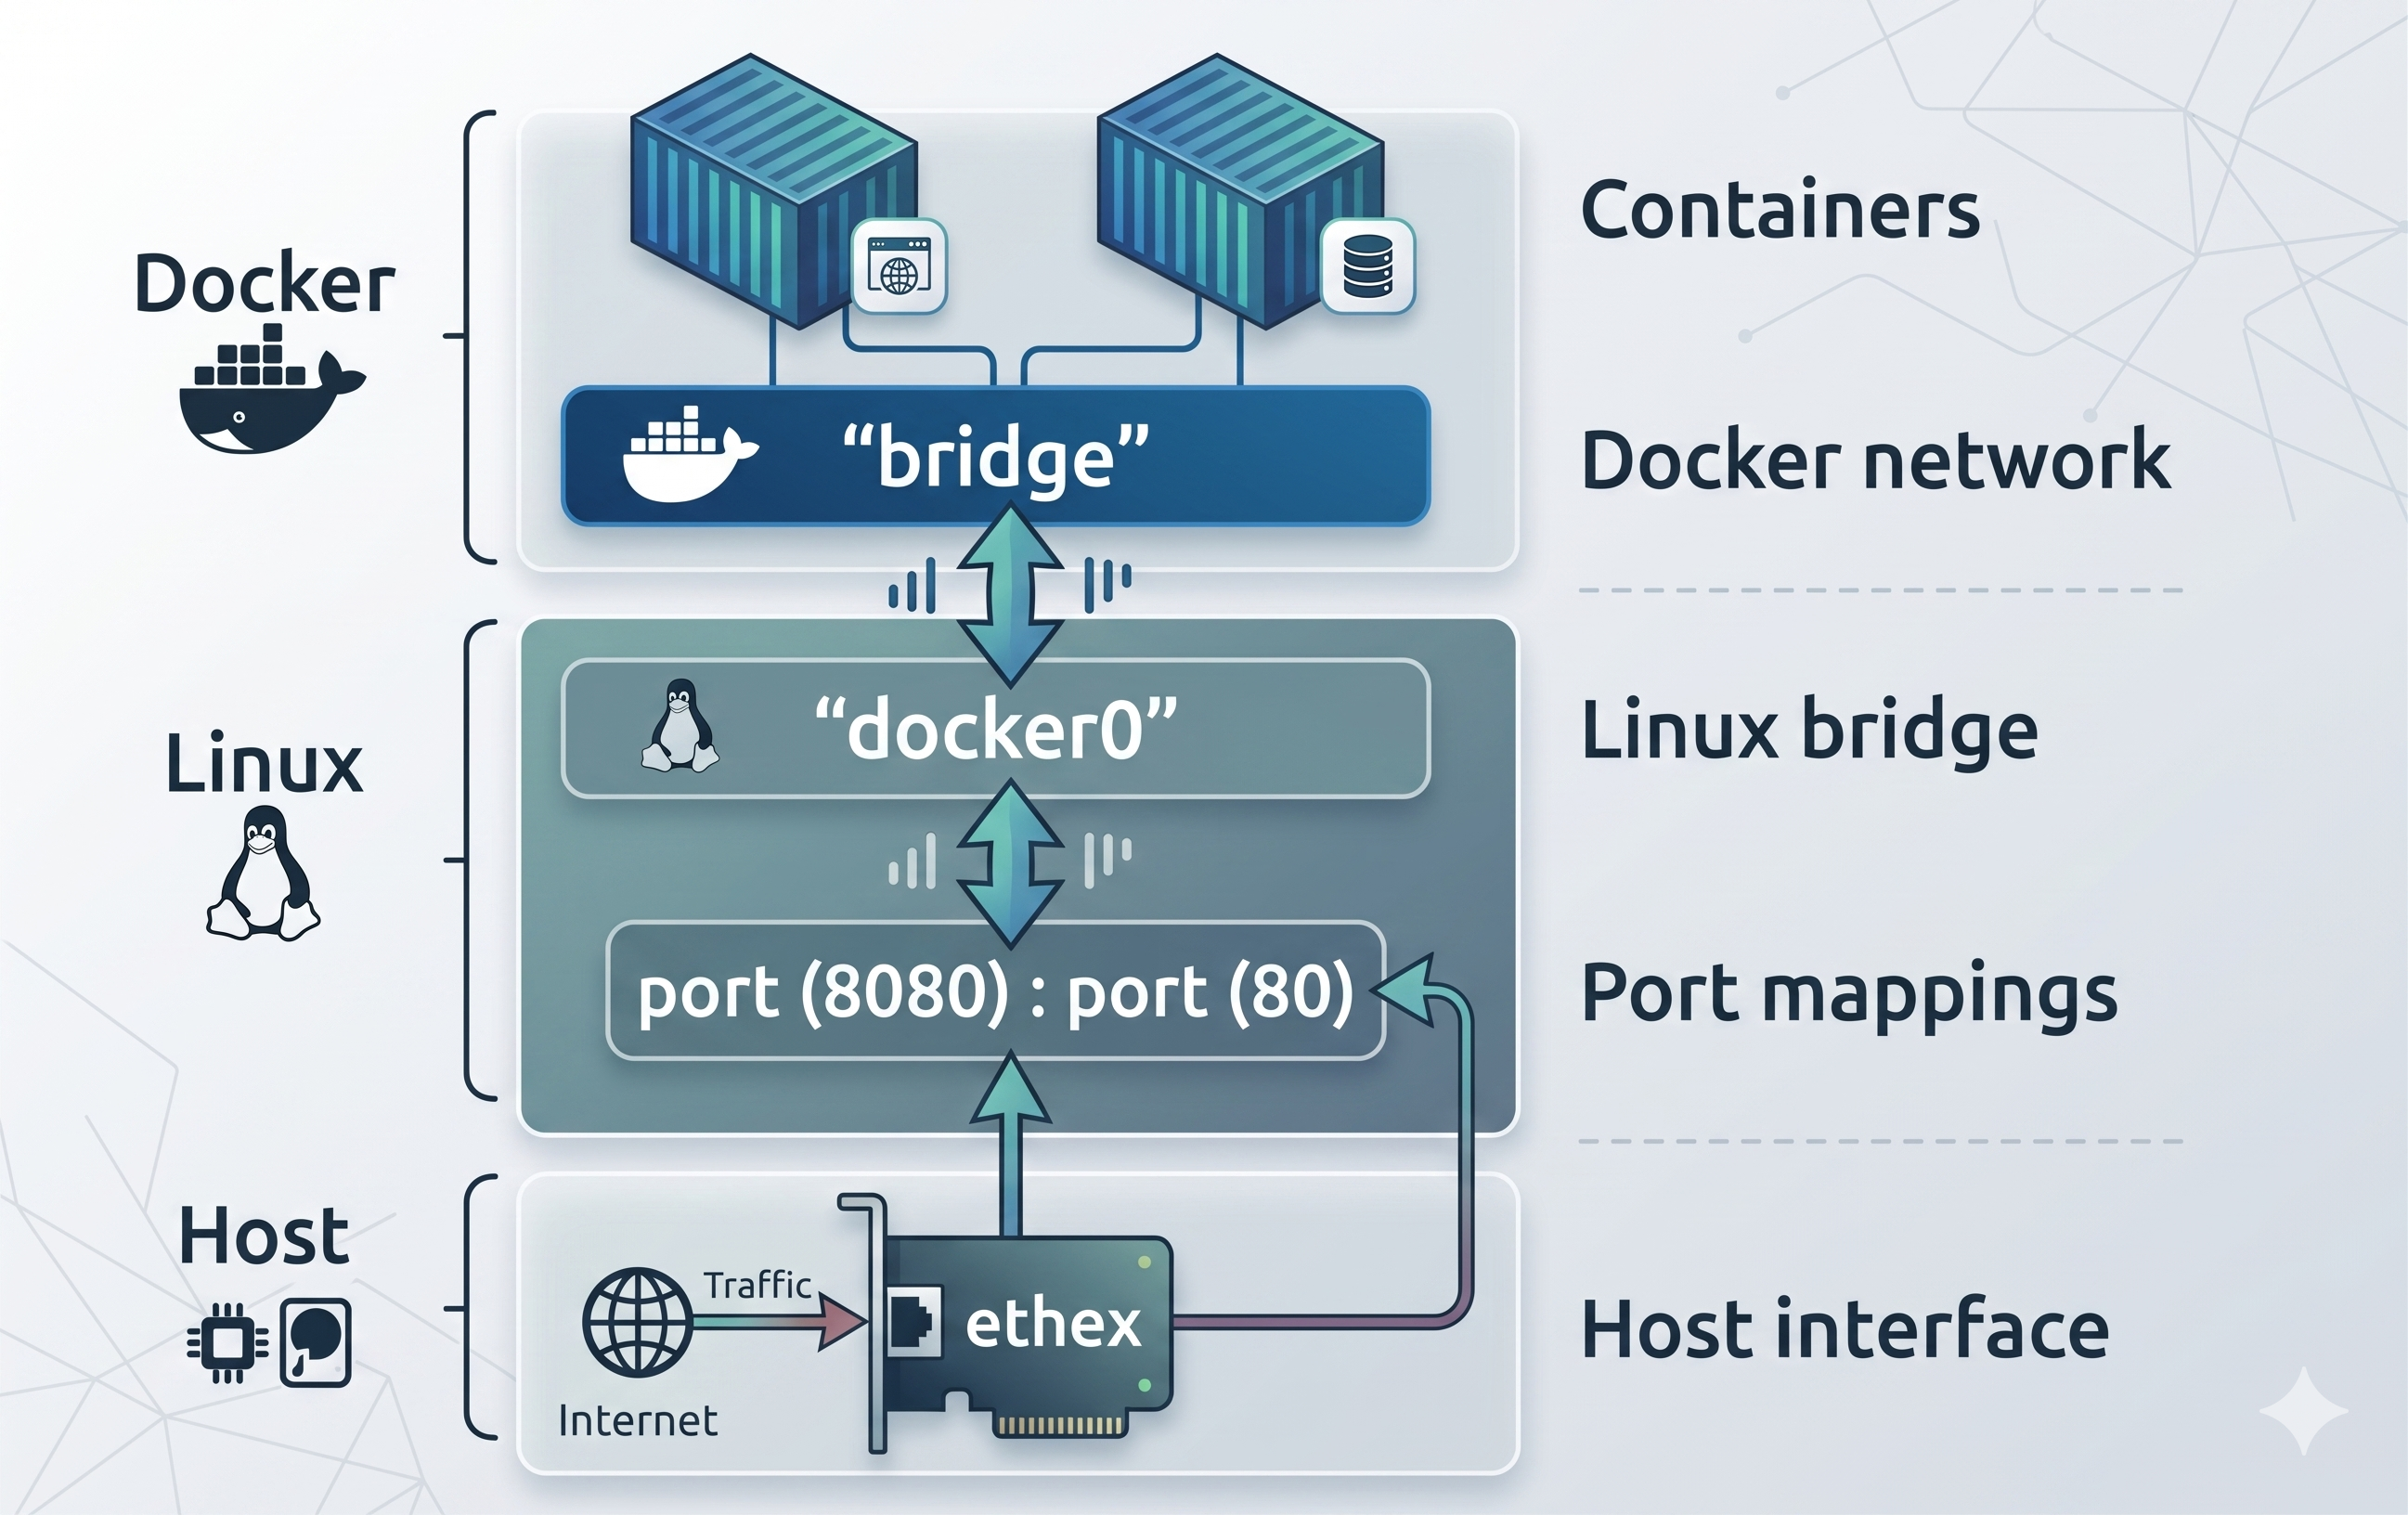
Under the hood, Docker uses three Linux primitives:
Network Namespaces
Section titled “Network Namespaces”- Each container gets its own network namespace with its own interfaces, IP address, routing table, and iptables rules.
- The namespace is created by the Docker daemon when the container starts.
veth Pairs (Virtual Ethernet)
Section titled “veth Pairs (Virtual Ethernet)”-
Docker creates a veth pair - two virtual interfaces linked together at the kernel level.
-
One end goes inside the container namespace (appears as
eth0inside the container). -
The other end attaches to a virtual bridge on the host (
docker0for the default bridge). -
Traffic flows: container → veth → bridge → host/internet.
Terminal window # See the docker0 bridge and its connected veth interfacesip addr show docker0ip link show | grep veth
iptables Rules
Section titled “iptables Rules”- Docker manages iptables rules on the host to handle port publishing, NAT, and inter-container firewall policies.
docker run -p 8080:80adds an iptables DNAT rule: traffic arriving on host port 8080 gets forwarded to the container’s port 80.- nftables gotcha (Debian 12+, RHEL 9+): These distros default to nftables. Docker still writes iptables rules (via
iptables-nftcompatibility layer). If you mix rawnftrules with Docker, verify rules aren’t silently dropped. Check withiptables -L -nandnft list rulesetto see both views.
Network Commands
Section titled “Network Commands”# List networksdocker network ls
# Create a custom bridge networkdocker network create my-net
# Create with a specific subnetdocker network create --driver bridge --subnet 192.168.50.0/24 my-net
# Allow already-running containers to join/leave dynamically at any timedocker network create --attachable my-net
# Attach metadata labels for easier querying and infrastructure managementdocker network create --label project=web --label env=prod my-net
# Full example: subnet, reserved IP range, and attachabledocker network create \ --driver bridge \ --subnet 10.0.42.0/24 \ --ip-range 10.0.42.128/25 \ --attachable \ my-net
# Connect a running container to a networkdocker network connect my-net my-container
# Disconnect a container from a networkdocker network disconnect my-net my-container
# Inspect network details (connected containers, IPs, etc.)docker network inspect my-net
# Remove a specific network (fails if containers are still connected)docker network rm my-net
# Remove all unused networksdocker network prunePort Publishing
Section titled “Port Publishing”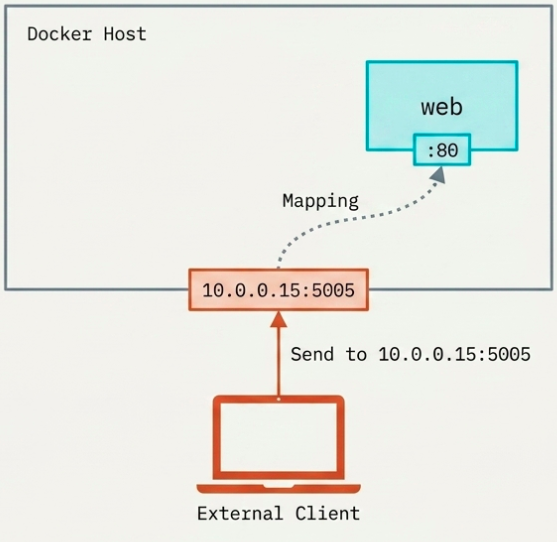
# Publish a single port: host:containerdocker run -p 8080:80 nginx
# Publish on a specific host interfacedocker run -p 127.0.0.1:8080:80 nginx   # Only accessible from localhost
# Publish all EXPOSE'd ports to random host portsdocker run -P nginx
# View published ports for a containerdocker port my-nginx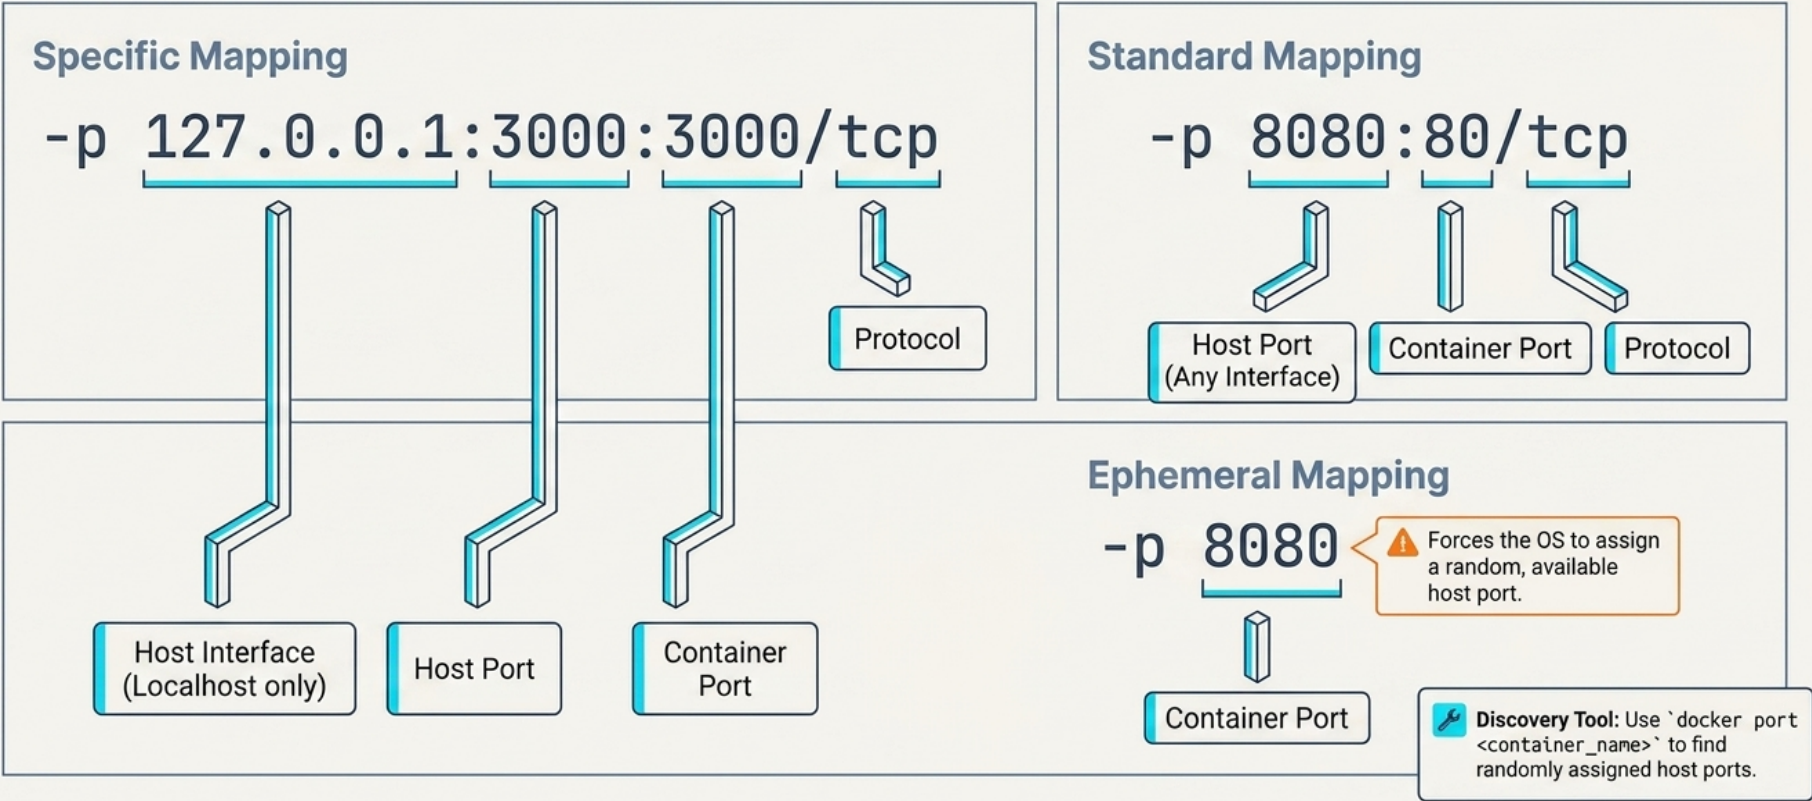
Service Discovery & DNS
Section titled “Service Discovery & DNS”- Every user-defined network includes an embedded DNS server at
127.0.0.11. All containers are pre-configured to use it. - When a container is created with
--nameor--net-alias, Docker automatically registers that name and its current IP with the embedded DNS.
Resolution flow (container A resolves container B by name):
- A’s local resolver checks its local cache
- Cache miss → recursive query sent to
127.0.0.11 - Embedded DNS looks up the name-to-IP mapping
- Returns B’s IP address (only if both are on the same Docker network)
- A sends traffic directly to B’s IP
Rules:
- Network-scoped: DNS resolution only works between containers on the same network. Different networks cannot resolve each other’s names.
- Default bridge exception: The default
bridgenetwork does not support DNS name resolution - only user-defined networks do. --net-alias: Assigns an additional DNS alias to a container. Multiple containers can share the same alias, enabling simple round-robin DNS across them.
DNS Customization Flags
Section titled “DNS Customization Flags”Docker provides four flags to customize a container’s name resolution stack at creation time:
--hostname - sets the container’s internal identity (added to its own DNS override):
docker run --hostname web-server-1 my-app# Container can resolve its own name to its IP, but neighbors don't auto-learn this nameUseful for applications that must self-identify. Neighboring containers do not automatically discover this hostname unless paired with an external DNS server.
--dns - specifies external DNS servers. Can be passed multiple times to add backup servers:
# Primary + fallback DNSdocker run --dns 8.8.8.8 --dns 1.1.1.1 my-appEngine-level defaults can be set in /etc/docker/daemon.json - but already-running containers retain old settings until restarted.
--dns-search - sets a default domain suffix appended to unqualified hostnames. Writes to /etc/resolv.conf:
# Resolve "myservice" → "myservice.dev.mycompany.com"docker run --dns-search dev.mycompany.com my-app
# Swap to test environment without code changesdocker run --dns-search test.mycompany.com my-app
This is the recommended pattern for environment agnosticism - applications look up short names (e.g., myservice) and Docker resolves the full environment-specific FQDN automatically.
--add-host - manually maps a hostname to an IP by writing directly to /etc/hosts. Most granular option:
# Map "db" to a specific IP inside the containerdocker run --add-host db:10.0.0.5 my-app
# Block a domain by routing it to loopback (useful for ad/tracking blocking)docker run --add-host analytics.badsite.com:127.0.0.1 my-app
# Force traffic through a local proxy or SSH tunneldocker run --add-host api.example.com:127.0.0.1 my-app
Unlike --dns and --dns-search, --add-host cannot be configured as an engine-level default - it must be set per container.
Swarm Networking
Section titled “Swarm Networking”Multihost Networking Approaches
Section titled “Multihost Networking Approaches”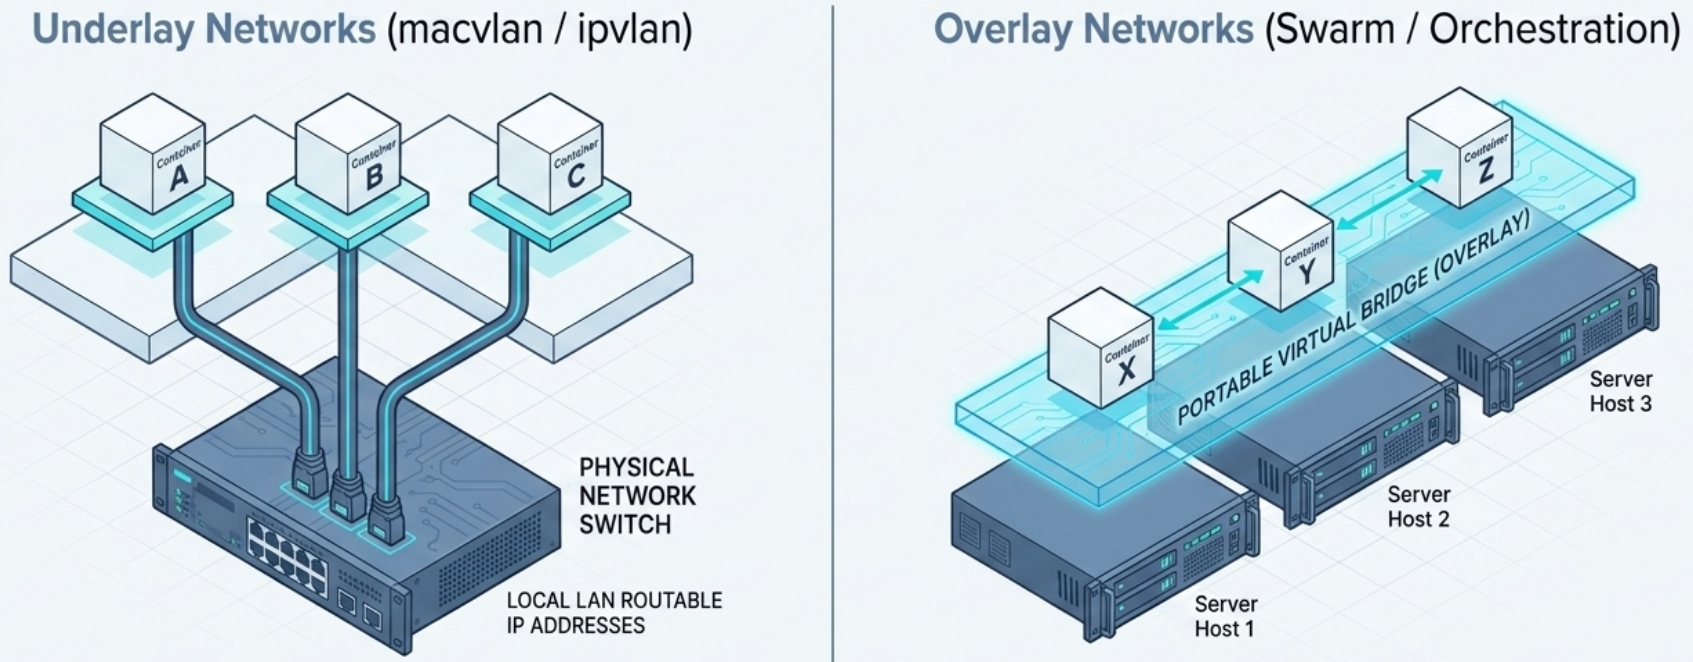
When containers must communicate across different physical hosts, two approaches are available:
| Approach | Drivers | How it works | Limitation |
|---|---|---|---|
| Underlay | macvlan, ipvlan | Assigns routable IPs directly to containers - appear as physical nodes on the LAN | Host-network dependent, rarely portable, blocked on managed clouds |
| Overlay | overlay | Cluster-aware virtual bridge spanning all Swarm nodes | Containers not routable externally without port publishing |
Overlay networks are the standard choice for Swarm deployments - definitions are portable and independent of the underlying host network.
Ingress vs Host Mode
Section titled “Ingress vs Host Mode”In Docker Swarm, services can be published to external clients in two modes:
| Mode | Accessible via | Trade-off |
|---|---|---|
| Ingress (default) | Any swarm node, including those without a replica | High availability - routing mesh distributes traffic |
| Host | Only nodes actively running a replica | Higher throughput, but no automatic failover |
How ingress mode works:
- An external client hits any swarm node on the published port
- The node forwards traffic to the ingress network (a swarm-wide overlay created automatically on
docker swarm init) - The ingress network routes to a node running a service replica
- Swarm load-balances across all healthy replicas automatically
Publishing in host mode requires the long-form syntax - the short form always uses ingress:
# Ingress mode (default - short form)docker service create -p 5005:80 nginx
# Host mode - long-form syntax requireddocker service create \  --publish published=5005,target=80,mode=host \  nginx
Practical Patterns
Section titled “Practical Patterns”Sidecar Network Pattern
Section titled “Sidecar Network Pattern”# Two containers sharing the same network namespace (used in service mesh sidecars)docker run -d --name app my-appdocker run -d --network container:app \ --name sidecar envoy:latest# "sidecar" sees the same network interfaces, IP, and ports as "app"This is how Envoy/Istio sidecars intercept traffic without modifying the application container.
External Network Management
Section titled “External Network Management”For complex infrastructures requiring custom service discovery, load balancing, or CNI plugins beyond Docker’s native capabilities (e.g., Kubernetes):
- Deploy containers on the
nonenetwork - Docker provisions only the isolated network namespace - A third-party orchestrator (e.g., Kubernetes + a CNI plugin) takes over - creating virtual interfaces, registering with service discovery, and managing port publishing
# Start a container with no networking - hand namespace to external orchestratordocker run -d --network none my-appTroubleshooting Connectivity
Section titled “Troubleshooting Connectivity”Daemon Logs
Section titled “Daemon Logs”The Docker daemon log location depends on the OS init system:
| OS / Init | Location |
|---|---|
| Linux (systemd) | journalctl -u docker.service |
| Linux (upstart, Ubuntu) | /var/log/upstart/docker.log |
| Linux (RHEL / rpm-based) | /var/log/messages |
| Linux (Debian, others) | /var/log/daemon.log |
| Windows | Windows Event Viewer or ~\AppData\Local\Docker |
To increase verbosity, edit /etc/docker/daemon.json and restart Docker:
{ "debug": true, "log-level": "debug"}Log levels: debug (most verbose) → info (default) → warn → error → fatal.
Container Logs
Section titled “Container Logs”Container logging relies on the application running as PID 1 writing to STDOUT/STDERR. The configured log driver captures and forwards that output.
# View logs for a containerdocker logs my-app
# Follow logs from a Swarm servicedocker service logs my-service| Log Driver | Notes |
|---|---|
json-file | Default. Compatible with docker logs. Stored on host filesystem. |
journald | Routes to systemd journal. Compatible with docker logs. |
syslog, splunk, awslogs, etc. | Platform-specific. Not compatible with docker logs - must use native tooling. |
Set a default log driver in /etc/docker/daemon.json:
{ "log-driver": "journald"}Override per container or service at runtime:
docker run --log-driver journald --log-opt tag="my-app" my-app:latest