
Docker Security
-
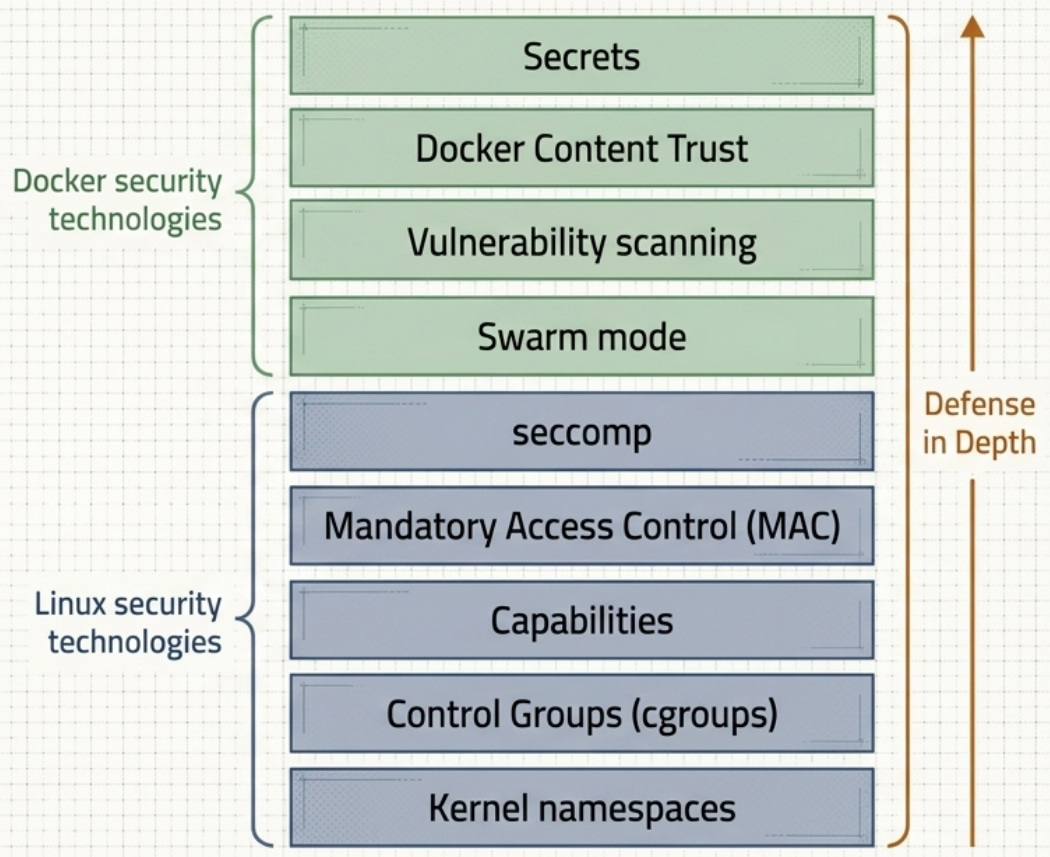
Docker’s security model is defense in depth - no single layer is sufficient on its own. Namespace isolation, resource limits, capability restrictions, syscall filtering, and MAC policies all stack together.
-
Containers share the host kernel - unlike VMs, which virtualize hardware. A kernel exploit can break container isolation. The layered model exists specifically to compensate for this shared-kernel risk.
Defense-in-Depth Overview
Section titled “Defense-in-Depth Overview”| Layer | Technology | What It Does |
|---|---|---|
| Isolation | Kernel Namespaces | Gives each container its own view of processes, network, filesystem |
| Limits | cgroups | Caps CPU, RAM, and I/O consumption per container |
| Least Privilege | Linux Capabilities | Strips unnecessary root powers at container startup |
| Policy Enforcement | AppArmor / SELinux | Restricts process access at the OS level |
| Syscall Filtering | seccomp | Limits which kernel syscalls a container can invoke |
| Supply Chain | Docker Scout / DCT / cosign | Vulnerability scanning and cryptographic image signing |
Kernel Namespaces
Section titled “Kernel Namespaces”Namespaces virtualize OS constructs (process trees, filesystems, network stacks) - not physical hardware. Docker provisions a fresh set of six namespaces per container:
| Namespace | Isolates |
|---|---|
| pid | Process tree. Container gets its own PID 1; cannot see host or sibling container processes |
| net | Network stack. Each container gets its own eth0, IP, port range, and routing table |
| mnt | Root filesystem. Each container has its own /, /etc, /var, /dev |
| ipc | Shared memory. Containers cannot access each other’s shared memory segments |
| user | User/group IDs. Maps container users (including root) to unprivileged host UIDs |
| uts | Hostname. Each container has its own hostname |
IPC Namespace Sharing
Section titled “IPC Namespace Sharing”By default each container has its own isolated IPC namespace. For latency-sensitive apps that must communicate via shared memory (e.g., PostgreSQL, scientific computing), you can join namespaces:
# Share IPC namespace with a specific containerdocker run --ipc container:my-producer my-consumer
# Share the HOST's IPC namespace (strongly discouraged)docker run --ipc=host my-appControl Groups (cgroups)
Section titled “Control Groups (cgroups)”cgroups enforce resource limits - not isolation. While namespaces control what a container can see, cgroups control how much it can consume.
- Prevent a rogue or compromised container from exhausting all host CPU, RAM, or I/O - effectively a denial-of-service against co-located containers and the host.
# Hard memory cap (limits ≠ reservations - doesn't guarantee the memory is available)docker run -d --memory=512m --memory-swap=512m my-app
# Hard CPU quota via CFS - at most 1.5 cores, enforced every 100msdocker run -d --cpus=1.5 my-app
# Relative CPU weight - enforced only during contention; idle CPU is never wasteddocker run -d --cpu-shares=1024 app-a   # Gets 2× time vs app-bdocker run -d --cpu-shares=512  app-b
# CPU pinning - restrict to specific cores (reduces context-switching overhead)docker run -d --cpuset-cpus=0,1 my-app   # Cores 0 and 1 onlydocker run -d --cpuset-cpus=0-3 my-app   # Cores 0 through 3
# Expose a specific host device into the container (webcam, USB drive, GPU)docker run -d --device /dev/video0:/dev/video0 my-app
# Monitor live resource consumption across all containersdocker stats
# Inspect configured limits on a containerdocker inspect <id> | grep -E "Memory|CpuQuota|NanoCpus|CpuShares|CpusetCpus"
See Docker Engine for the full architectural role of cgroups.
User Management
Section titled “User Management”Containers default to the user defined in the image - frequently root. Running as root is dangerous: a process exploit gains full container-level root which, without user namespaces, maps directly to host root.
# Check what user an image defaults to (blank output = defaults to root)docker inspect --format "{{.Config.User}}" my-image
# Verify actual runtime user (bypasses any entrypoint that may switch users)docker container run --rm --entrypoint "" my-image id
# Run as a named user (must exist in the container's /etc/passwd)docker run --user nobody my-app
# Run as explicit UID:GID - works even without a matching /etc/passwd entrydocker run --user 10000:20000 my-app- Shared UID space: Container UIDs and host UIDs share the same numerical space. A file owned by host
root(UID 0) is unreadable by a container running asnobody(UID 65534). - Volume permission alignment: If a container writes to a bind-mounted host directory, run the container with the same UID that owns that directory - avoids
Permission deniedwithout relaxing permissions. - Docker socket risk: Mounting
/var/run/docker.sockinto a container grants full Docker API access - equivalent to hostroot. Treat it as a host-level privilege escalation vector.
UID Remapping (userns-remap)
Section titled “UID Remapping (userns-remap)”By default, Docker does not use the user namespace for UID mapping - a container’s UID 0 acts as UID 0 on the host. Enabling userns-remap in the daemon maps container UIDs to a range of unprivileged host UIDs:
{ "userns-remap": "default" }// Also define ranges in /etc/subuid and /etc/subgid- Effect: Container
root(UID 0) → host unprivileged user (e.g., UID 5000). Even a complete container breakout yields no host admin privileges.
Linux Capabilities
Section titled “Linux Capabilities”Root is all-or-nothing in traditional Unix - far too dangerous for containers. Linux capabilities break the root permission into ~40 discrete, individually grantable permissions.
Docker’s model: drop all root capabilities at container startup, then add back only the specific ones the container needs.
| Capability | Grants |
|---|---|
CAP_CHOWN | Change file ownership |
CAP_NET_BIND_SERVICE | Bind to privileged ports (< 1024) |
CAP_SETUID | Change process UID (elevate privilege) |
CAP_NET_ADMIN | Configure network interfaces |
CAP_SYS_BOOT | Reboot the system |
CAP_SYS_ADMIN | Broad admin operations - nearly equivalent to full root |
# Drop a specific capability (use lowercase, no CAP_ prefix)docker run --cap-drop net_raw my-app
# Drop everything, then add back only what's neededdocker run --cap-drop ALL --cap-add net_bind_service my-app
# Grant only what a network daemon needs - no full root requireddocker run --user nobody --cap-add net_admin my-network-daemon
# Verify capabilities inside a running containerdocker exec <id> capsh --print
# Inspect what CapAdd/CapDrop were applied at container creationdocker inspect <id> | grep -E "CapAdd|CapDrop"Privileged Mode
Section titled “Privileged Mode”The --privileged flag grants a container full system capabilities plus direct access to all host devices and shared memory - removing most Docker security restrictions.
# Run a privileged container (e.g., OS tuning, Docker-in-Docker)docker run --privileged my-admin-tool
# Privileged + no network isolation (for tasks needing host networking too)docker run --privileged --net host my-admin-tool
# View all host devices from inside a privileged containerdocker run --rm --privileged ubuntu:24.04 ls /dev- Use cases: Docker-in-Docker (DinD), OS-tuning programs, tasks where direct host access is unavoidable and installing on the host is disallowed.
- Remaining isolation: Privileged containers still maintain filesystem and network namespace isolation by default (unless
--net hostis also passed).
Mandatory Access Control (MAC)
Section titled “Mandatory Access Control (MAC)”AppArmor and SELinux are kernel-level MAC policy engines that define which files, directories, sockets, and operations a process may access - independent of standard Unix permissions. Docker automatically applies a default profile to every new container.
| AppArmor (Ubuntu/Debian) | SELinux (RHEL/CentOS) | |
|---|---|---|
| Enforcement | File-path based | Label (context) based |
| Ease of use | Easier - has a training mode that auto-generates profiles from observed behavior | Stricter - every file, user, and process gets a label; rules evaluated on interaction |
# Apply a custom AppArmor profiledocker run --security-opt apparmor=my-profile my-app
# Disable AppArmor confinement (not recommended)docker run --security-opt apparmor=unconfined my-app
# SELinux - set specific label fieldsdocker run --security-opt label=user:system_u my-appdocker run --security-opt label=role:system_r my-appdocker run --security-opt label=type:container_t my-appdocker run --security-opt label=level:s0 my-app
# Disable SELinux confinement for a containerdocker run --security-opt label=disable my-app
# Check the active AppArmor profile on a running containerdocker inspect <id> | grep AppArmorseccomp
Section titled “seccomp”seccomp (secure computing mode) restricts which kernel syscalls a container process may invoke. The Linux kernel exposes 300+ syscalls; most are unnecessary for typical applications.
- Docker’s default profile blocks exactly 44 dangerous syscalls (including
clock_settime,unshare,kexec_load,reboot) while explicitly permitting 260+ safe ones.
# Disable seccomp filtering entirely (not recommended)docker run --security-opt seccomp=unconfined my-app
# Apply a custom seccomp profile (JSON format)docker run --security-opt seccomp=/path/to/profile.json my-app
# Prevent privilege escalation after container start (blocks suid binary exploits)docker run --security-opt no-new-privileges my-appDocker Swarm Security
Section titled “Docker Swarm Security”Running docker swarm init automatically configures a full security stack - no additional setup needed:
- Cryptographic node IDs
- Mutual TLS authentication between all nodes
- Encrypted join tokens
- Internal Certificate Authority (CA) with automatic rotation
- Encrypted distributed cluster store (etcd)
- Encrypted overlay networks
Join Tokens
Section titled “Join Tokens”Every node joining a swarm requires a join token. Token structure:
SWMTKN - 1 - <swarm-id-hash> - <role-specific-secret> │ │ │ │prefix version cluster hash differs per role (manager/worker)The SWMTKN prefix prevents accidental public exposure (e.g., a commit to GitHub). Manager and worker tokens share the same swarm hash but differ in the last field.
# View current join tokensdocker swarm join-token managerdocker swarm join-token worker
# Rotate a compromised token (existing nodes are unaffected)docker swarm join-token --rotate managerdocker swarm join-token --rotate worker
Mutual TLS and Certificate Authority
Section titled “Mutual TLS and Certificate Authority”Each manager and worker receives a client certificate for mutual authentication. The certificate Subject field encodes node identity:
| Field | Contains |
|---|---|
| O (Organization) | Swarm ID |
| OU (Organizational Unit) | Node role (manager or worker) |
| CN (Canonical Name) | Node’s cryptographic ID |
The swarm runs an internal CA with a 90-day default certificate rotation. Nodes renew early in a staggered pattern so all nodes never rotate simultaneously.
# Change the cert rotation interval (e.g., every 30 days)docker swarm update --cert-expiry 720h
# Use an external CA instead of the built-in onedocker swarm init --external-ca protocol=cfssl,url=https://ca.example.com
Encrypted Cluster Store
Section titled “Encrypted Cluster Store”- Built on etcd, replicated across all manager nodes.
- Encrypted at rest and in transit automatically.
- Worker nodes join the swarm but have no access to the cluster store.
- Required for overlay networks and Docker Secrets.
Vulnerability Scanning
Section titled “Vulnerability Scanning”Image scanning generates a Software Bill of Materials (SBOM) - a full inventory of every package inside an image - then cross-references it against CVE databases to identify known vulnerabilities.
Docker Scout is Docker’s native scanner. It performs deep binary-level scans (not just package name matching) and integrates with the CLI, Docker Desktop, and Docker Hub.
# High-level summary: package count + vulnerability breakdown by severitydocker scout quickview my-image:latest
# Detailed CVE report: exact vulnerable packages, CVE IDs, affected versions, and fix versionsdocker scout cves my-image:latest
# Filter to critical and high severity onlydocker scout cves --only-severity critical,high my-image:latest
# Compare two image versions to see what changeddocker scout compare --to my-image:v1.0 my-image:v2.0
Other scanners: Trivy (trivy image my-image), Grype (grype my-image), Harbor (self-hosted registry with built-in scanning and RBAC).
See Docker Image Optimization for build-time security practices (non-root user, minimal base images, layer hygiene).
Scout Policies (Policy-as-Code)
Section titled “Scout Policies (Policy-as-Code)”Beyond scanning, Docker Scout supports policies — declarative rules that codify your organization’s security and compliance requirements. Rather than asking “does this image have CVEs?”, policies ask “does this image meet our standard?”
Built-in policy types:
| Policy | What it checks |
|---|---|
| No critical or high CVEs | Blocks images with unfixed critical/high severity vulnerabilities |
| No fixable CVEs | Flags any vulnerability that has a known fix available |
| Approved base images | Enforces that FROM must use images from an approved list (e.g., only Chainguard or internal registry) |
| No AGPL licenses | Flags packages with copyleft licenses that may affect commercial distribution |
| Up-to-date base image | Checks that the base image is within N days of its latest release |
| Non-root user | Verifies the image does not run as root by default |
# View policy evaluation results for an imagedocker scout policy my-image:latest
# View results against a specific policy by namedocker scout policy my-image:latest --only-policy "No critical or high CVEs"
# Evaluate against a policy and fail with exit code 1 if policy is violated# (use in CI/CD to block non-compliant builds)docker scout policy my-image:latest --exit-code
CI/CD enforcement pattern:
# .github/workflows/build.yml (excerpt)- name: Evaluate Scout policy run: | docker scout policy ${{ env.IMAGE }}:${{ github.sha }} --exit-code # Non-zero exit code fails the pipeline — image never reaches productionThe --exit-code flag is what transforms Scout from an advisory tool into a hard enforcement gate. Without it, violations are reported but do not block the pipeline.
Docker Content Trust
Section titled “Docker Content Trust”Docker Content Trust (DCT) provides cryptographic signing and verification of images using Docker Notary (Notary v1). Publishers sign images on push; consumers verify on pull.
# Generate a signing key pair (protected by passphrase, stored in local trust store)docker trust key generate my-signing-key
# Associate the key with a repositorydocker trust signer add --key my-signing-key.pub my-signer \  myregistry.io/my-app
# Sign and push an imagedocker trust sign myregistry.io/my-app:v1.0
# Inspect existing signatures on an imagedocker trust inspect --pretty myregistry.io/my-app:v1.0
# Enforce signatures system-wide - all unsigned image operations are blockedexport DOCKER_CONTENT_TRUST=1- Contextual signing: Publishers can sign to certify an image for a specific environment (e.g.,
prod-approved) or mark an image as stale/superseded. DOCKER_CONTENT_TRUST=1blocksdocker pull,docker run, anddocker build FROMfor any unsigned image.
Modern Alternative: Sigstore / cosign
Section titled “Modern Alternative: Sigstore / cosign”Sigstore is a CNCF project providing free, open infrastructure for software signing. cosign is its primary tool for container image signing.
Key advantages over DCT:
- Keyless signing via OIDC identity (GitHub Actions, GitLab CI, GCP, etc.) - no long-lived private keys to manage
- Transparency log (Rekor) - every signature is publicly recorded and auditable
- Native CI/CD integration with GitHub Actions, Tekton, Flux, and others
- Used by default in many OCI registries and Kubernetes admission controllers (Kyverno, OPA Gatekeeper)
# Install cosignbrew install cosign                   # macOScurl -sL https://github.com/sigstore/cosign/releases/latest/download/cosign-linux-amd64 -o cosign && chmod +x cosign  # Linux
# Sign an image (keyless - uses OIDC browser flow or CI identity)cosign sign myregistry.io/my-app:v1.0
# Verify a signaturecosign verify myregistry.io/my-app:v1.0 --certificate-identity-regexp='.*' --certificate-oidc-issuer='https://token.actions.githubusercontent.com'
# Inspect attached signatures and attestationscosign tree myregistry.io/my-app:v1.0
Supply Chain Maturity: SLSA Framework
Section titled “Supply Chain Maturity: SLSA Framework”Scout detects vulnerabilities, cosign signs artifacts — but SLSA (Supply-chain Levels for Software Artifacts, pronounced “salsa”) is the framework that answers a harder question: how trustworthy is the build process that produced the artifact in the first place?
SLSA is a CNCF-hosted specification developed originally at Google. It defines four levels of build integrity, each progressively harder for an attacker to subvert.
SLSA Levels
Section titled “SLSA Levels”| Level | Name | What It Guarantees |
|---|---|---|
| SLSA 0 | None | No requirements. Baseline/unrated. |
| SLSA 1 | Documented | Build process is scripted and produces provenance (a record of what was built, from what source, by what process). Provenance may be unsigned. |
| SLSA 2 | Authenticated | Provenance is signed by the build service itself. Build runs on a hosted, version-controlled CI platform (GitHub Actions, GitLab CI). Prevents tampering after the build. |
| SLSA 3 | Hardened | The build platform itself is verified and audited. Builds are isolated and cannot be influenced by other builds. The provenance is non-forgeable — even a malicious insider cannot produce a valid SLSA 3 provenance without access to the build platform’s signing key. |
SLSA 4 (Hermetic + reproducible builds) exists as a research target but is not yet a practical requirement for most organizations.
What Each Level Requires in Practice
Section titled “What Each Level Requires in Practice”SLSA 1 — Scripted build + provenance generation:
- name: Build and push image  uses: docker/build-push-action@v5  with:    push: true    tags: myregistry.io/my-app:${{ github.sha }}
- name: Generate SLSA provenance  uses: slsa-framework/slsa-github-generator/.github/workflows/generator_container_slsa3.yml@v1  with:    image: myregistry.io/my-app    digest: ${{ steps.build.outputs.digest }}
SLSA 2 — Signed provenance via cosign + GitHub Actions OIDC:
# cosign signing in CI automatically produces SLSA 2-compatible provenance# The signing certificate embeds the GitHub Actions workflow identitycosign sign --yes myregistry.io/my-app@sha256:<digest>
# Verify provenance — confirms image was built by a specific workflowcosign verify-attestation \  --type slsaprovenance \  --certificate-oidc-issuer https://token.actions.githubusercontent.com \  --certificate-identity-regexp 'https://github.com/myorg/myrepo/.github/workflows/build.yml' \  myregistry.io/my-app@sha256:<digest>
SLSA 3 — Use the SLSA GitHub Generator (reusable workflow):
The SLSA GitHub Generator is a set of reusable GitHub Actions workflows that produce SLSA 3-compliant provenance automatically. It runs builds in an isolated job with a non-forgeable identity.
How Scout, cosign, and SLSA Fit Together
Section titled “How Scout, cosign, and SLSA Fit Together”| Tool | Role in SLSA |
|---|---|
| Docker Scout | Generates SBOMs (Software Bill of Materials) — a prerequisite for provenance. Identifies what’s in the artifact. |
| cosign (keyless) | Signs the image and attaches provenance as an OCI artifact. Keyless signing via GitHub Actions OIDC satisfies SLSA 2 authentication requirements. |
| SLSA GitHub Generator | Produces non-forgeable SLSA 3 provenance using GitHub’s OIDC token in an isolated workflow job. |
| Rekor (Sigstore) | Transparency log — every signature and attestation is publicly recorded, making retrospective tampering detectable. |
Docker Secrets
Section titled “Docker Secrets”Secrets provide end-to-end encrypted distribution of sensitive data (passwords, API keys, TLS certificates, SSH keys) to Swarm services - without ever embedding them in images or environment variables.
Requires Swarm mode. Backed by the encrypted etcd cluster store.
# Create a secret from stdinecho "s3cr3tpassword" | docker secret create db_password -
# Create a secret from a filedocker secret create tls_cert ./server.crt
# List secrets (values are never displayed)docker secret ls
# Grant a service access to a secretdocker service create \  --name my-app \  --secret db_password \  --secret tls_cert \  my-image# Secrets available inside the container at: /run/secrets/<secret-name>
# Remove a secret (fails if any service currently uses it)docker secret rm db_password
How secrets are delivered end-to-end:
- Secret created → stored encrypted at rest in the etcd cluster store
- Service granted access → secret transmitted encrypted in transit (over TLS) to the assigned node
- Secret mounted as a plain file in an in-memory filesystem at
/run/secrets/ - Application reads the secret like a normal file - no decryption code required
- When the service replica stops, Docker immediately destroys the in-memory mount and flushes the secret from the node
Security by Container Role
Section titled “Security by Container Role”The safest approach: start maximally isolated and only relax specific restrictions when justified. The role of the container determines the appropriate security profile.
| Role | Examples | Security Profile |
|---|---|---|
| General applications | Web servers, API services, browsers | Non-root user, minimal caps (--cap-drop ALL --cap-add ...), memory/CPU limits, explicit device allowlist |
| High-level system services | sshd, cron, syslogd, Docker daemon | May run as root; restrict to specific required capabilities only - never full --privileged |
| Low-level system services | Firewall, network stack, filesystem tools | Avoid containerizing; if unavoidable, use short-lived privileged containers for config tasks only |