
Deployments
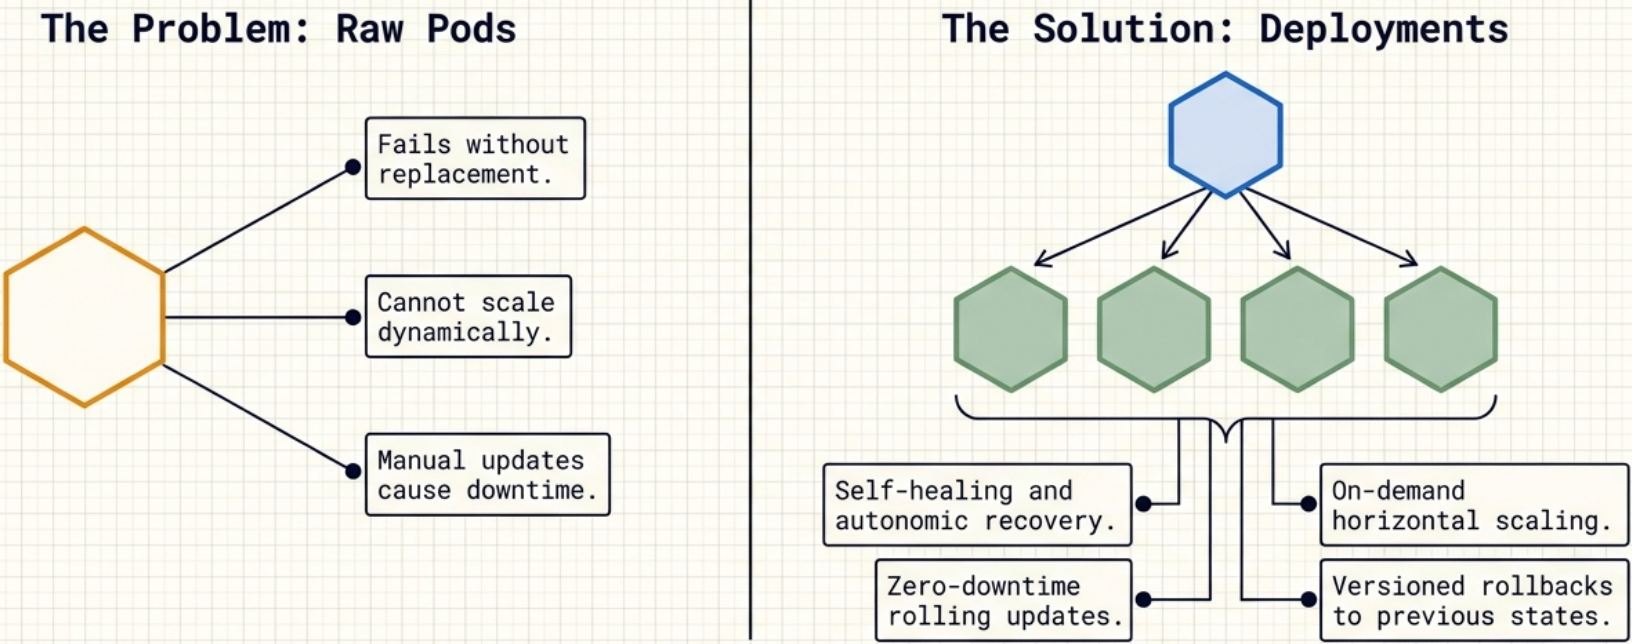
Deployments are the standard way to run stateless applications in Kubernetes. By wrapping Pods in a Deployment, it gains self-healing, on-demand scaling, zero-downtime rolling updates, and versioned rollbacks — all managed automatically by the control plane.
Architecture
Section titled “Architecture”Resource and Controller
Section titled “Resource and Controller”Every Kubernetes object is built from two cooperating components:
| Component | Role |
|---|---|
| Resource | Defines the object — the Deployment resource lives in apps/v1 and describes all supported attributes, configurations, and capabilities |
| Controller | Manages the object — the Deployment controller runs as a control plane service, watches Deployment objects, and continuously reconciles observed state with desired state |
You interact with the resource (via manifests or kubectl); the controller does the operational work in the background without any manual input.
The Three-Tier Hierarchy
Section titled “The Three-Tier Hierarchy”Kubernetes separates concerns across three layers of objects:
| Layer | Object | Responsibility |
|---|---|---|
| Top | Deployment | Governs rollouts, rollbacks, and update strategy |
| Middle | ReplicaSet | Ensures the correct number of Pods are running (self-healing + scaling) |
| Bottom | Pod | Runs the actual containerised application |
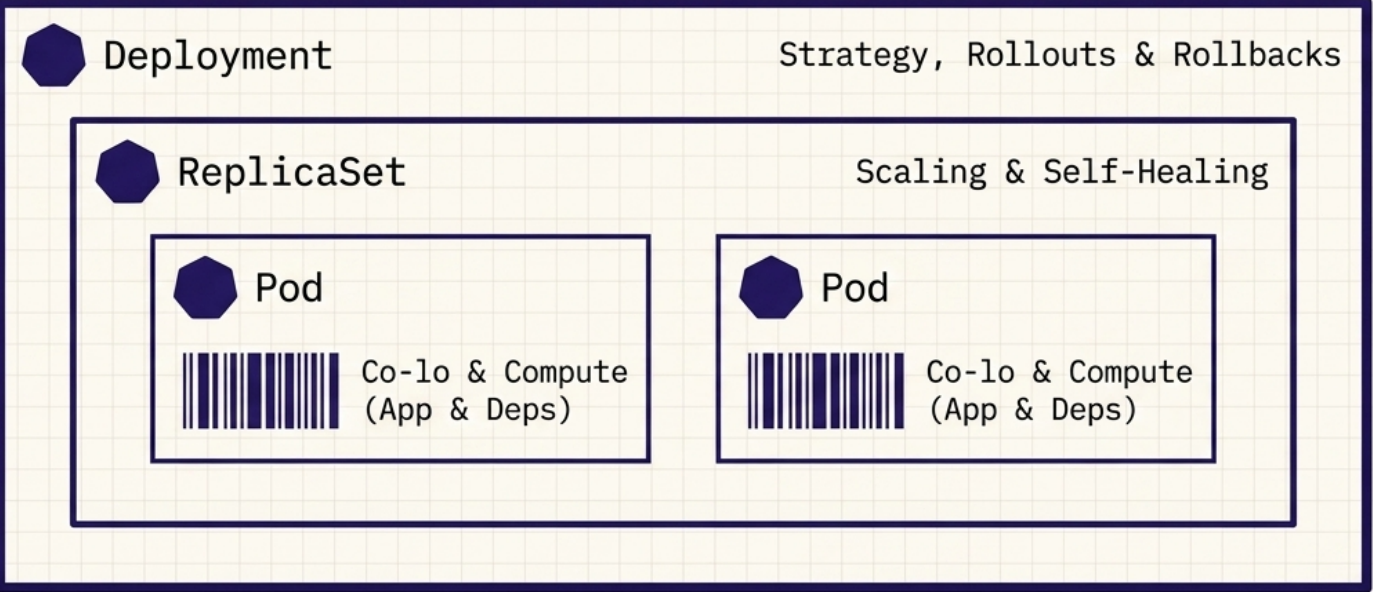
When you kubectl apply a Deployment manifest, a cascading creation occurs: the Deployment creates a ReplicaSet, which creates and manages the individual Pods.
ReplicaSets
Section titled “ReplicaSets”A ReplicaSet is the object that provides self-healing and scaling. It replaces the older, now-deprecated ReplicationController. Even for a single Pod, deploying via a ReplicaSet (or Deployment) is strongly preferred over creating a standalone Pod — if the node fails, the ReplicaSet reschedules the Pod on a healthy node automatically; a standalone Pod simply disappears.
The Reconciliation Loop
Section titled “The Reconciliation Loop”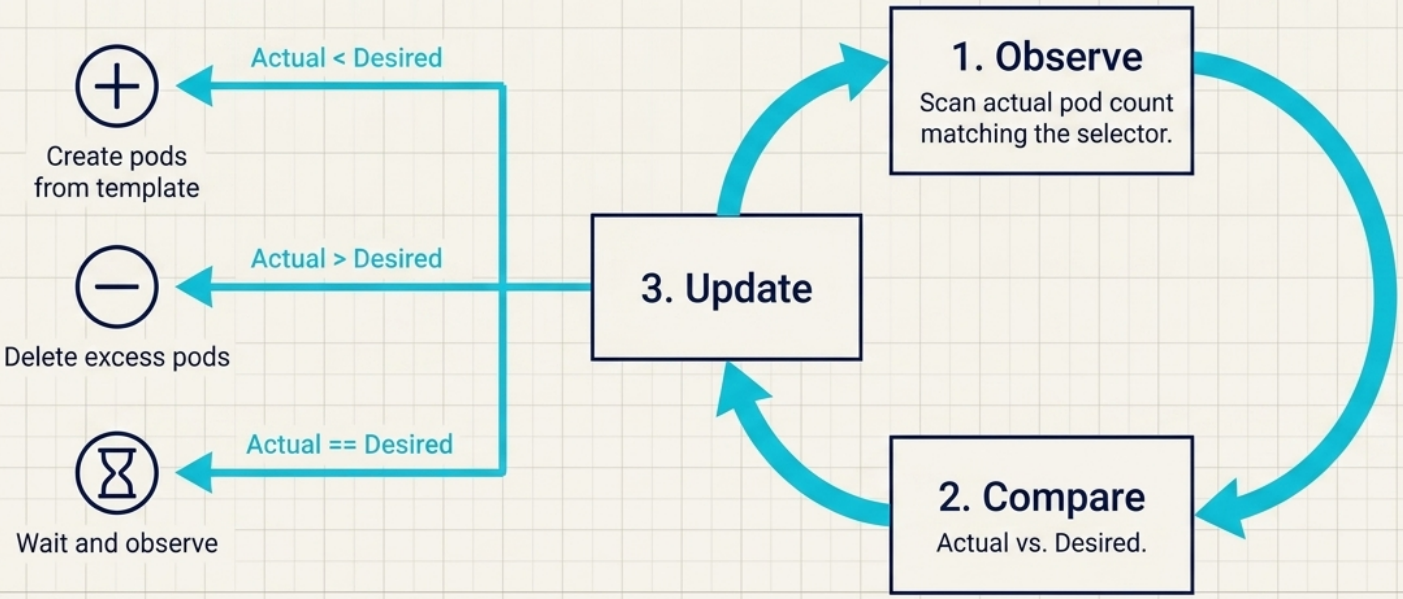
The ReplicaSet controller runs a continuous observe → compare → act loop:
- Observe — watch the ReplicaSet and its dependent Pods
- Compare — count Pods matching the selector against
spec.replicas - Act — create missing Pods or delete excess ones to restore balance
This loop handles failures automatically with no human intervention.
| Trigger | Controller reaction |
|---|---|
| Pod crashes or is deleted | Immediately creates a replacement |
| Extra Pod matching the selector appears | Terminates the excess to restore the desired count |
Node goes NotReady | Marks Pods for deletion, spins up replacements on healthy nodes |
ReplicaSet Spec
Section titled “ReplicaSet Spec”ReplicaSets live in the apps/v1 API group and require three fields in spec:
apiVersion: apps/v1kind: ReplicaSetmetadata: name: my-appspec: replicas: 3 # desired Pod count (default: 1) selector: matchLabels: app: my-app # which Pods this RS manages template: # blueprint for new Pods metadata: labels: app: my-app # must be a superset of selector labels spec: containers: - name: app image: my-app:1.0Critical rule: the labels in template.metadata.labels must be a superset of the labels in selector.matchLabels. If they don’t match, the API server rejects the object — the ReplicaSet would create Pods it cannot see.
Immutability Constraints
Section titled “Immutability Constraints”| Field | Mutable? | Notes |
|---|---|---|
spec.selector | ❌ No | Delete and recreate to change |
spec.replicas | ✅ Yes | Immediate effect |
spec.template | ✅ Yes | Only affects new Pods — existing Pods are not updated |
Pod Naming
Section titled “Pod Naming”Pods in a ReplicaSet are fungible — there is no concept of order. Kubernetes uses the generateName field to produce names like my-app-x7k2p (ReplicaSet name + 5 random characters).
Scale-Down Priority
Section titled “Scale-Down Priority”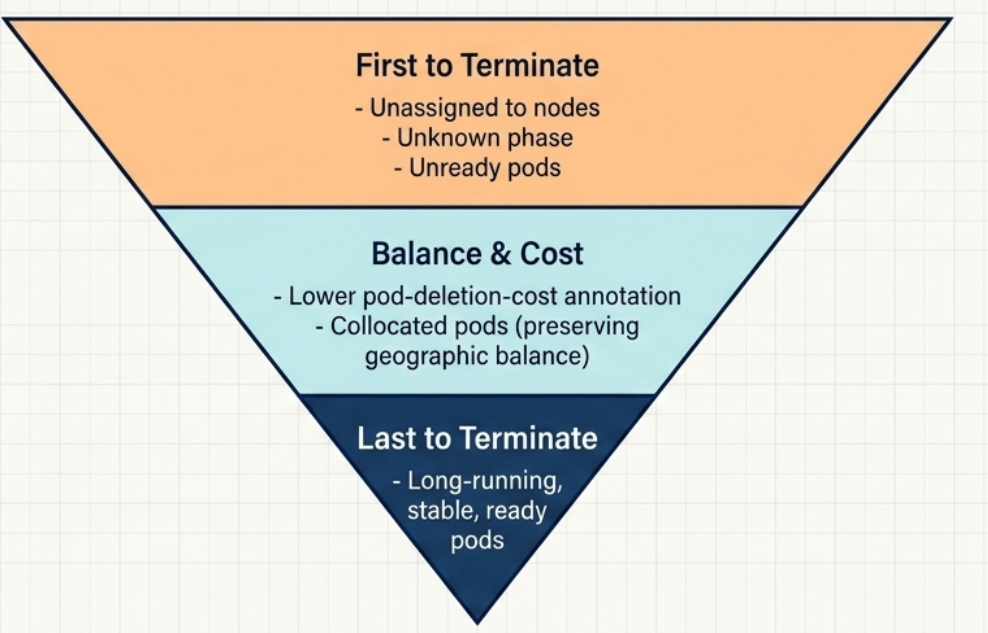
When you reduce replicas, Kubernetes doesn’t terminate Pods randomly. It follows this ordered priority:
- Pods not yet assigned to a node
- Pods with an unknown phase
- Pods that are not ready
- Pods with a lower
controller.kubernetes.io/pod-deletion-costannotation - Pods on nodes with more replicas of this ReplicaSet (promotes even distribution)
- Pods ready for a shorter time
- Pods with more container restarts
- Most recently created Pods
Pod Ownership and Garbage Collection
Section titled “Pod Ownership and Garbage Collection”When a ReplicaSet creates Pods, it becomes their owner, recorded in each Pod’s metadata.ownerReferences field. Deleting the ReplicaSet triggers cascading deletion of all its Pods via the garbage collector.
To delete the ReplicaSet while keeping Pods running (e.g., to recreate it with a changed selector):
kubectl delete rs <name> --cascade=orphanThe surviving Pods become independent orphans. If you later create a new ReplicaSet whose selector matches those orphaned Pods, it will adopt them automatically.
Debugging: Isolating a Failing Pod
Section titled “Debugging: Isolating a Failing Pod”If a Pod is continuously failing but you need to keep your service up and debug without destroying evidence:
-
Change one of the failing Pod’s labels so it no longer matches the selector:
Terminal window kubectl label pod <failing-pod> rel=debug --overwrite -
The ReplicaSet detects a missing replica and immediately spins up a healthy replacement.
-
The isolated Pod continues running independently for inspection.
-
After debugging, delete it manually — the garbage collector won’t touch it since it’s now an orphan.
Common Failure Modes
Section titled “Common Failure Modes”| Symptom | Root cause | Fix |
|---|---|---|
| Desired count reached, but service is unavailable | RS guarantees count, not health — Pods in CrashLoopBackOff or failing readiness probes still count as “existing” replicas | Isolate the failing Pod by changing its labels; the RS spawns a healthy replacement automatically |
| A crashlooping Pod is never replaced | The Pod object still exists — the RS only acts on missing Pods, not unhealthy ones | Remove the Pod from the RS selector (change its labels); a fresh Pod is created in its place |
| Extra Pods are unexpectedly terminated | A manually created Pod or stray Pod has labels matching the RS selector — the RS adopts it and then culls excess replicas to restore the desired count | Ensure no external Pods share the RS’s selector labels; never create Pods with matching labels by hand |
Pods are stuck in Pending indefinitely | The RS created the Pods — the scheduler cannot place them (insufficient CPU/memory, taint mismatch, affinity constraint) | kubectl describe pod <name> → Events reveals the scheduler’s reason; fix node resources or constraints |
kubectl apply fails with “field is immutable” | spec.selector cannot be changed after the ReplicaSet is created | Delete the RS with --cascade=orphan to preserve running Pods, then re-apply with the corrected selector |
The Deployment Object
Section titled “The Deployment Object”A Deployment sits above the ReplicaSet and adds the machinery for rollouts and rollbacks. In practice, you should always use Deployments rather than bare ReplicaSets — they handle version management automatically.
The Declarative Model
Section titled “The Declarative Model”The declarative model is the foundation of Deployment management:
| Approach | How | Kubernetes can self-heal? |
|---|---|---|
| Declarative | Describe the desired end state in YAML; Kubernetes figures out how to get there | ✅ Yes |
| Imperative | Issue step-by-step commands | ❌ No — no concept of desired state |
Deployment Spec
Section titled “Deployment Spec”apiVersion: apps/v1kind: Deploymentmetadata: name: my-app # valid DNS name (alphanumerics, dots, dashes)spec: replicas: 3 selector: matchLabels: app: my-app # must match template labels exactly template: metadata: labels: app: my-app spec: containers: - name: app image: my-app:1.0 ports: - containerPort: 8080 strategy: type: RollingUpdate rollingUpdate: maxUnavailable: 1 # max Pods offline during update maxSurge: 1 # max extra Pods during update revisionHistoryLimit: 5 # how many old ReplicaSets to retain minReadySeconds: 10 # wait before marking a replica available progressDeadlineSeconds: 300 # timeout before marking rollout as stalledGolden rule: spec.selector.matchLabels and spec.template.metadata.labels must match exactly. If they don’t, Kubernetes rejects the object. The top-level metadata.labels (the Deployment’s own labels) are irrelevant to this mapping.
Labels in Three Places
Section titled “Labels in Three Places”When inspecting a Deployment YAML, you’ll see labels appear three times:
| Location | Purpose |
|---|---|
metadata.labels | Labels on the Deployment object itself |
spec.selector.matchLabels | How the Deployment finds its Pods |
spec.template.metadata.labels | Labels stamped onto each new Pod |
The pod-template-hash Safeguard
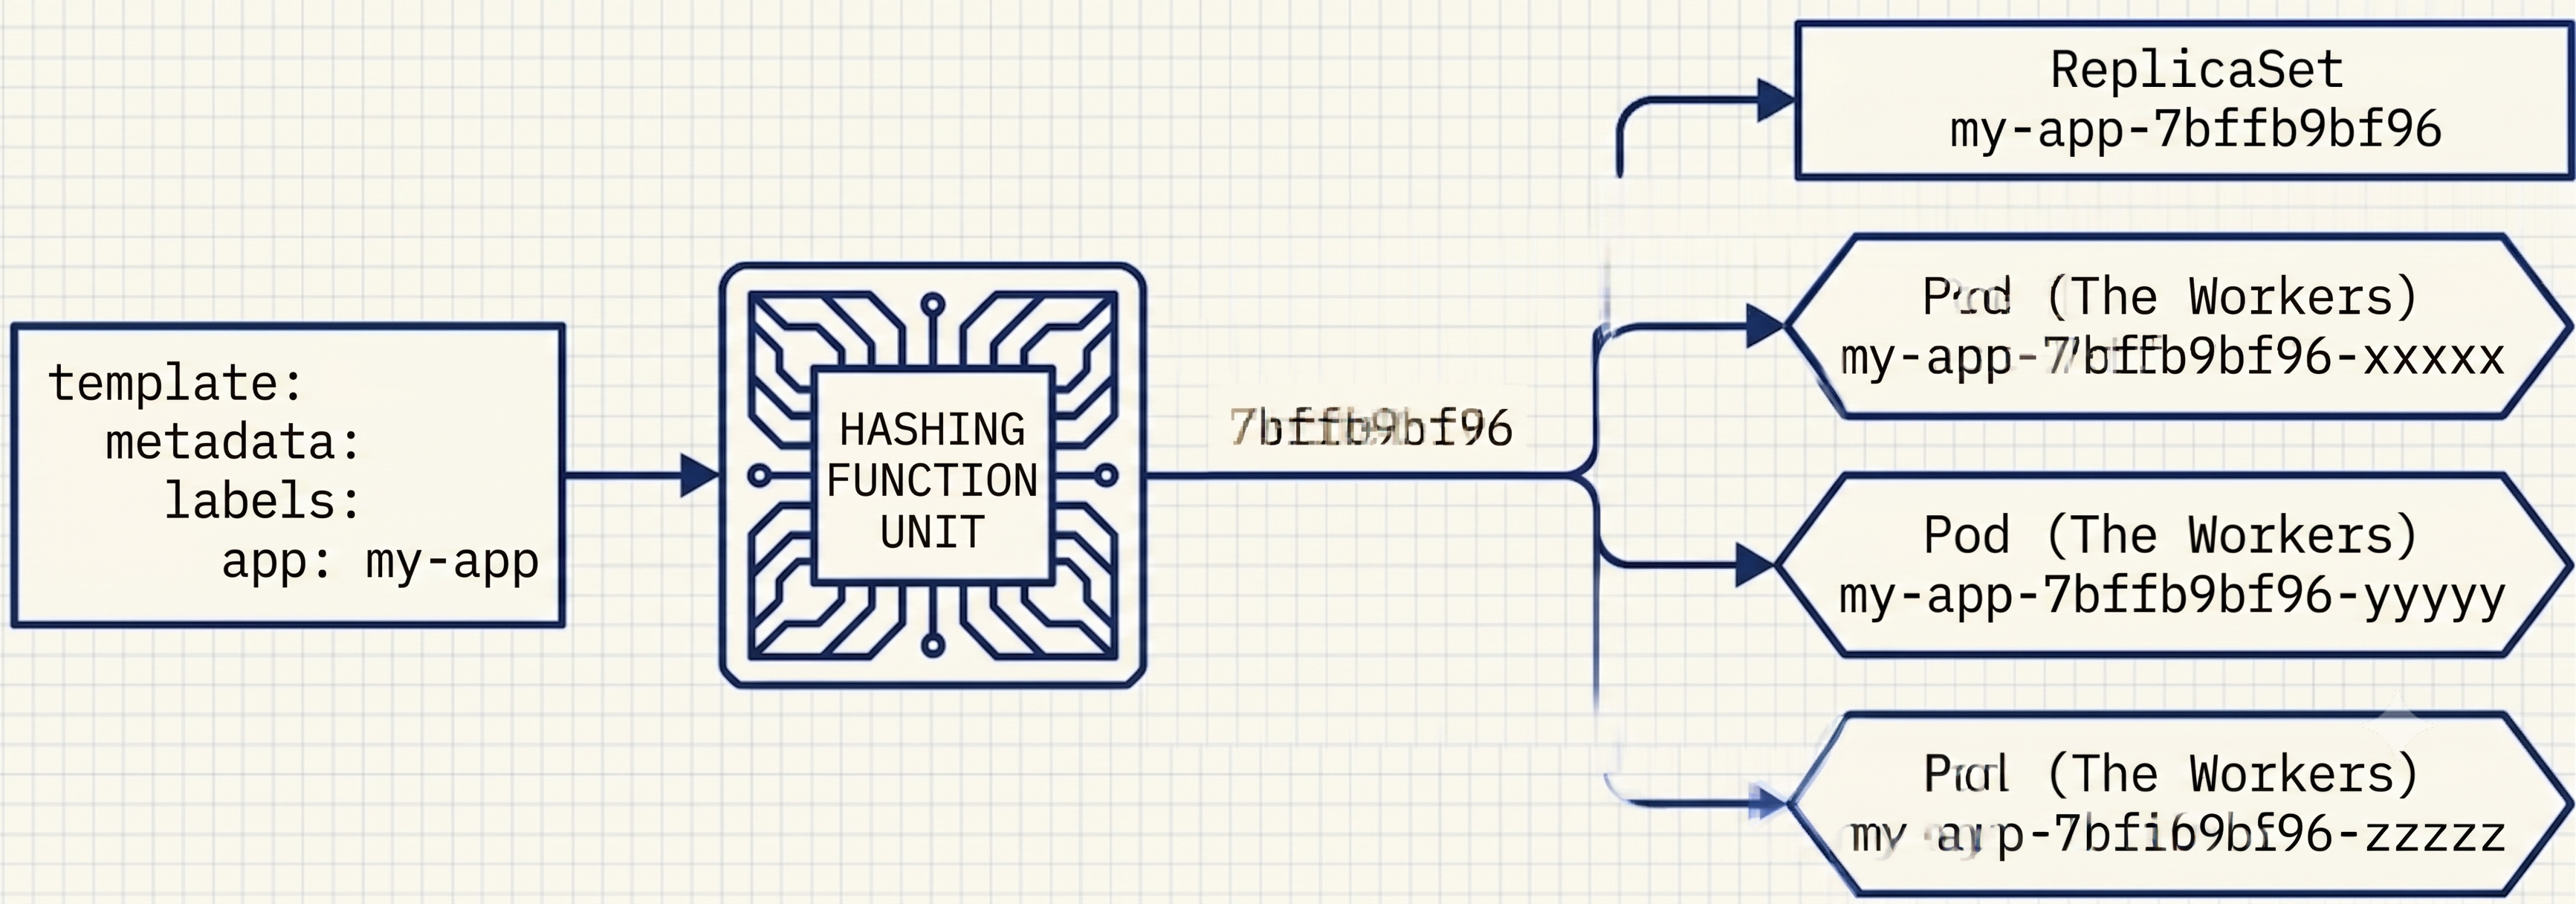
Section titled “The pod-template-hash Safeguard”When a Deployment creates its ReplicaSet, Kubernetes automatically injects a pod-template-hash label (a cryptographic hash of the Pod template) into the ReplicaSet’s selector and into every Pod it creates. This prevents a ReplicaSet from accidentally adopting unrelated Pods that happen to share a primary label.
Creating Deployments
Section titled “Creating Deployments”Imperatively
Section titled “Imperatively”# Minimum required: name + imagekubectl create deployment my-app --image=my-app:1.0
# With replicas and portkubectl create deployment my-app --image=my-app:1.0 --replicas=3 --port=8080
# Generate YAML without applyingkubectl create deployment my-app --image=my-app:1.0 --dry-run=client -o yaml > deployment.yamlDeclaratively
Section titled “Declaratively”kubectl apply -f deployment.yamlOnce applied, the Deployment and ReplicaSet controllers start their reconciliation loops immediately, scheduling Pods onto healthy worker nodes.
Inspecting Deployments
Section titled “Inspecting Deployments”# High-level status (READY, UP-TO-DATE, AVAILABLE columns)kubectl get deploy <name>
# Full configuration + events (use when troubleshooting label mismatches)kubectl describe deploy <name>
# List ReplicaSets — names are prefixed with the Deployment name + a hashkubectl get rs
# List Pods with their labelskubectl get pods --show-labels
# List Pods belonging to a ReplicaSet by selectorkubectl get pods -l app=my-appReplicaSet naming: the Deployment name + a crypto-hash of the Pod template, e.g., my-app-54f5d46964. If you update the Pod template, a brand-new ReplicaSet with a new hash is created.
# View logs from all Pods in a ReplicaSet at oncekubectl logs rs/<name>kubectl logs rs/<name> --all-pods --all-containersScaling in Practice
Section titled “Scaling in Practice”Delegation Chain
Section titled “Delegation Chain”When you scale a Deployment, the Deployment controller does not create or delete Pods directly — it only updates the replicas count on the underlying ReplicaSet. The ReplicaSet controller then executes the actual Pod additions or removals. Any manual changes to a Deployment-owned ReplicaSet’s replica count are immediately overwritten.
The Replicas Field Trap
Section titled “The Replicas Field Trap”A common production mishap when mixing imperative scaling with declarative manifests:
- You imperatively scale to handle traffic:
kubectl scale deployment my-app --replicas=50 - Later, you apply an updated manifest that still has
replicas: 3hardcoded - The manifest overwrites the live scale — 47 Pods terminate immediately
The fix: omit replicas from your manifest entirely. Kubernetes defaults to 1 on creation; scale via kubectl scale or HPA afterwards. Future kubectl apply runs will never overwrite the live count.
# Repair an existing Deployment whose last-applied annotation already contains replicaskubectl apply edit-last-applied deploy <name># Delete the replicas field from the annotation and save — future applies will skip itUpdating Deployments
Section titled “Updating Deployments”A rolling update replaces Pods incrementally — old Pods are terminated and new ones created until all replicas are running the new version. In Kubernetes, all updates are replacement operations — Pods are immutable, so “updating” a Pod means deleting it and creating a new one.
Prerequisites for Zero Downtime
Section titled “Prerequisites for Zero Downtime”For rolling updates to be truly zero-downtime, your application should be:
- Loosely coupled — services communicate via well-defined APIs
- Backward and forward compatible — during a rollout, old and new versions run simultaneously; clients hitting either version must get a valid response
Mechanism
Section titled “Mechanism”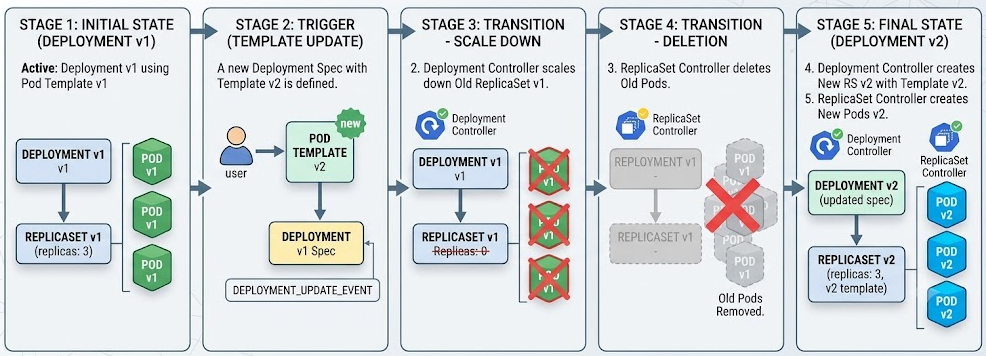
- You update the Pod template (e.g., change the image tag) and
kubectl apply - The Deployment controller creates a new ReplicaSet for the new version
- The controller incrementally scales up the new RS while scaling down the old one
- The rollout completes when the old RS reaches 0 Pods and the new RS reaches the full replica count
Recreate Strategy
Section titled “Recreate Strategy”All existing Pods are deleted simultaneously, and only after they are fully terminated does Kubernetes start creating the new Pods — guaranteeing a period of zero availability between versions.
spec: strategy: type: Recreate # no rollingUpdate block — no configuration options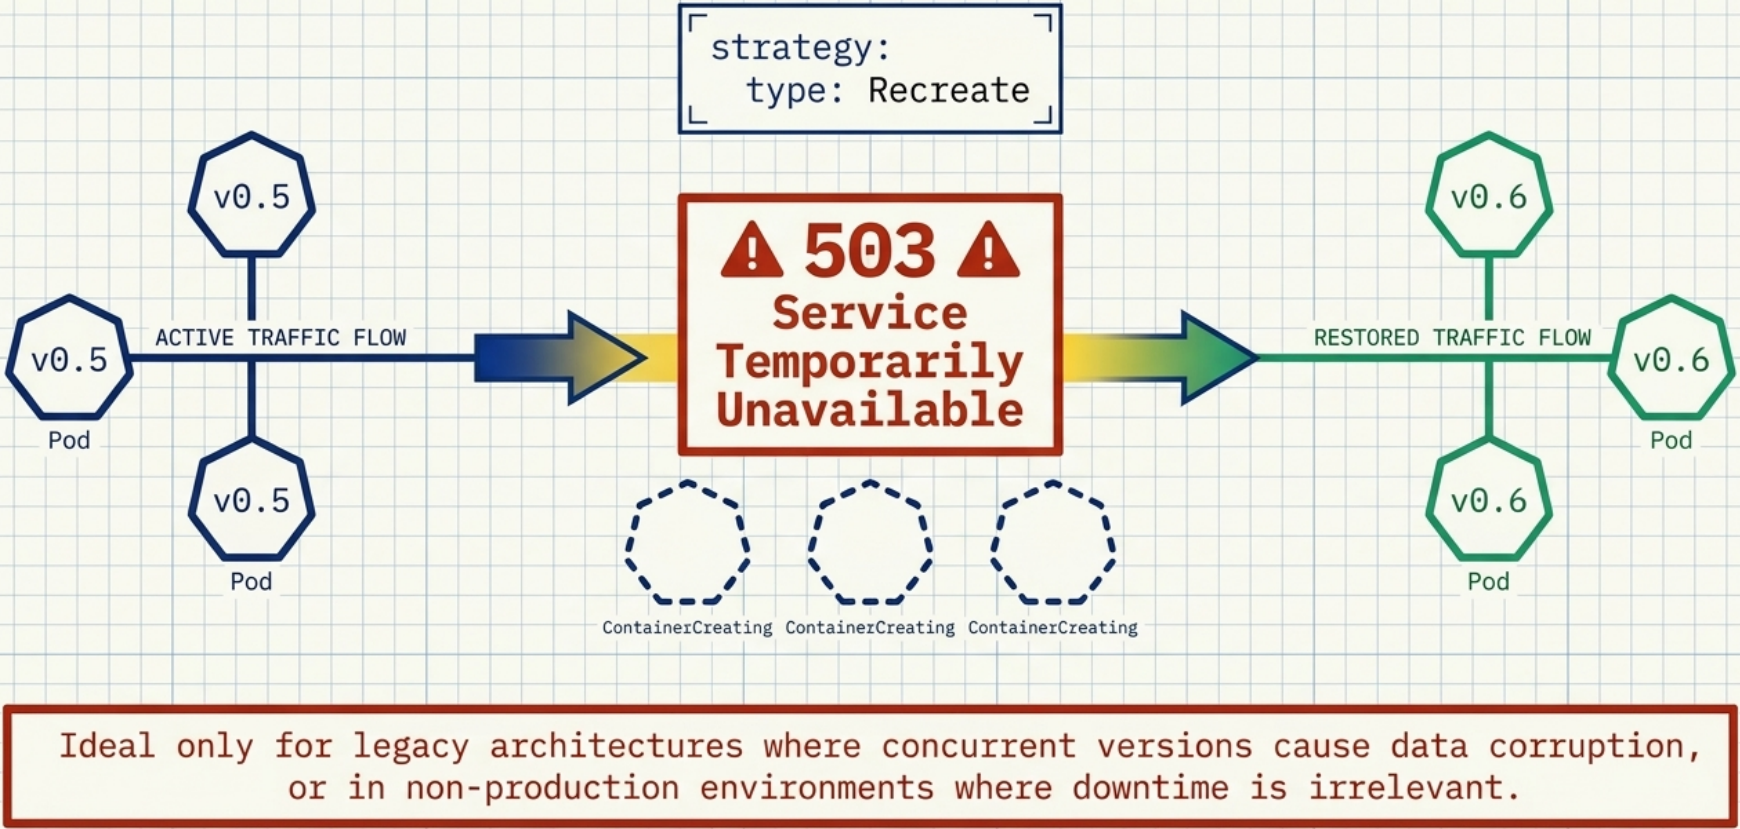
| Aspect | Detail |
|---|---|
| Configuration options | None |
| Client experience during update | 503 Service Temporarily Unavailable via Ingress; connection rejected via ClusterIP |
| When to use | Applications that cannot run two versions simultaneously (e.g., database schema migrations that are not backward compatible) |
RollingUpdate Strategy
Section titled “RollingUpdate Strategy”The default strategy. Gradually replaces old Pods with new ones, keeping the application continuously accessible throughout the update.
spec: strategy: type: RollingUpdate rollingUpdate: maxSurge: 1 # absolute number or percentage (default: 25%) maxUnavailable: 1 # absolute number or percentage (default: 25%)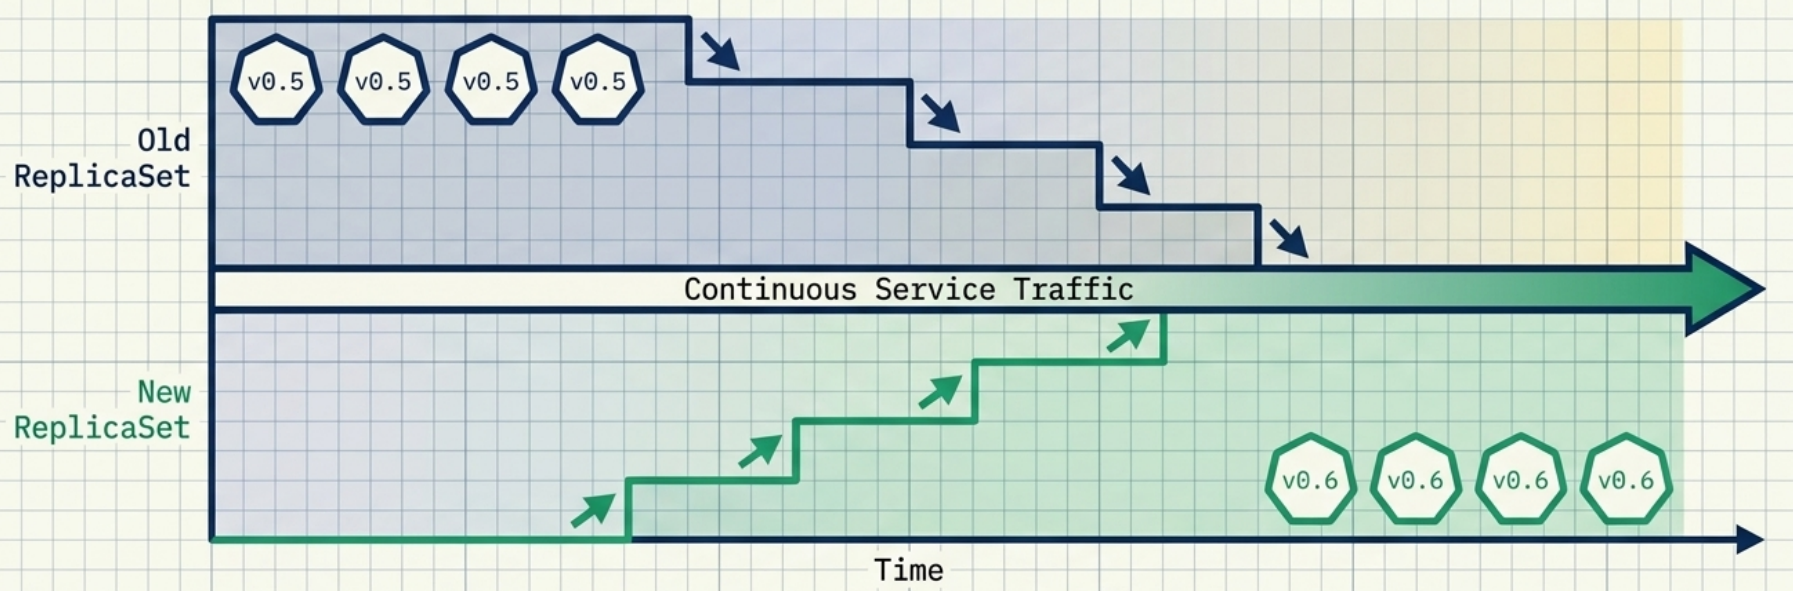
| Parameter | What it controls |
|---|---|
maxSurge | Maximum extra Pods allowed above the desired count during the update |
maxUnavailable | Maximum Pods allowed below the desired count (unavailable) during the update |
Constraint: both cannot be 0 simultaneously — the controller would be unable to add new Pods or remove old ones.
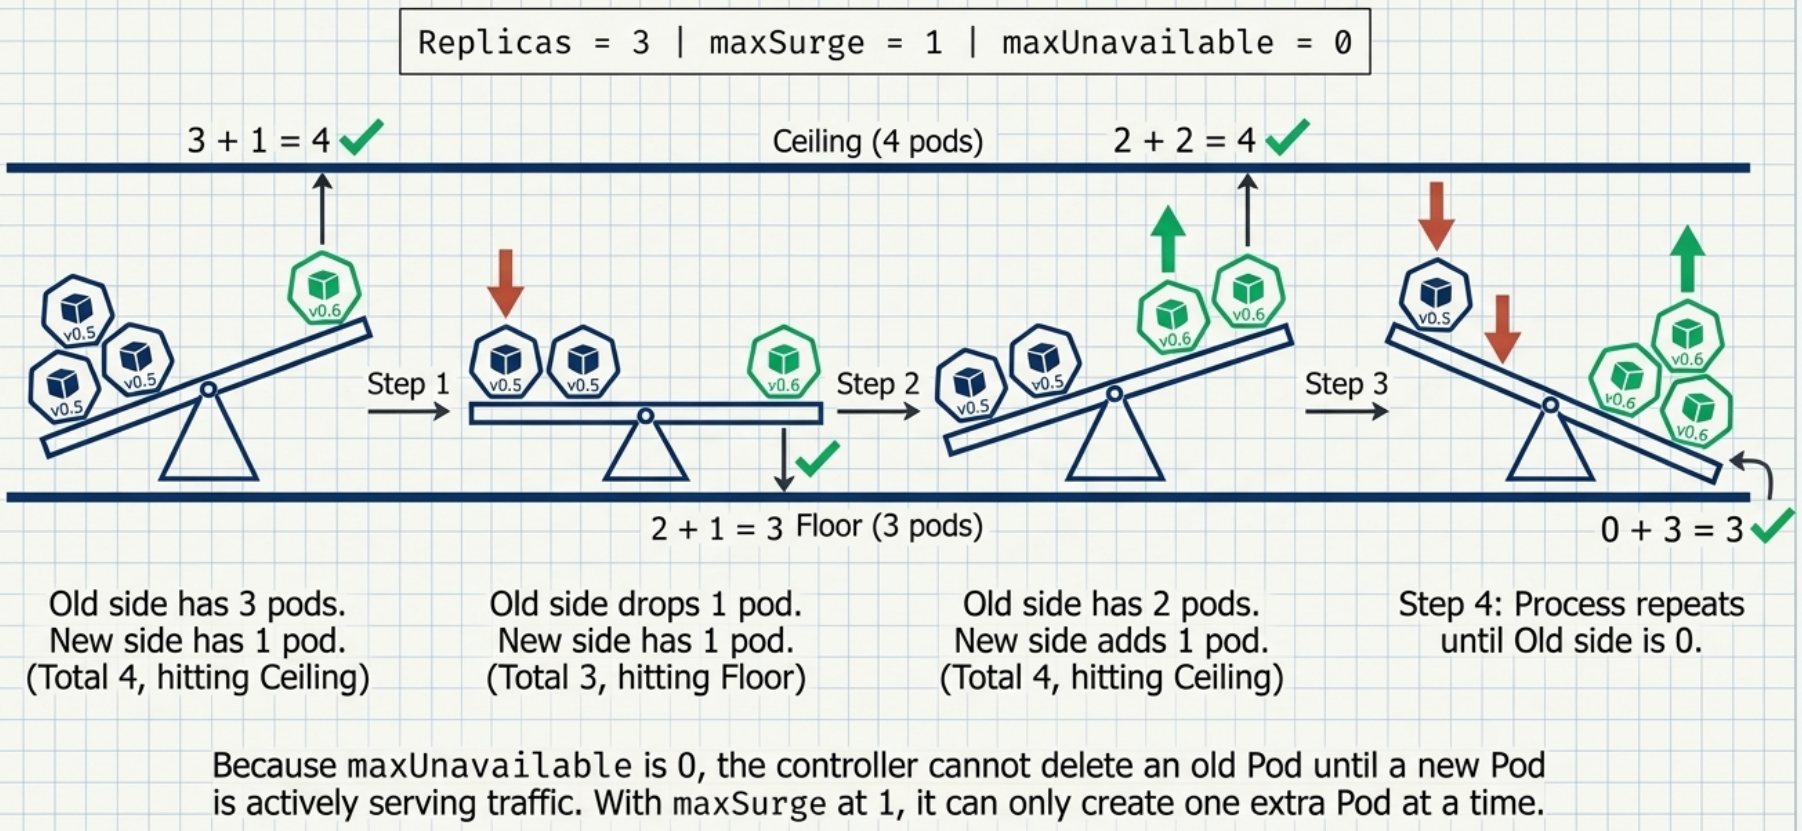
Concrete parameter combinations (assuming 3 desired replicas):
maxSurge | maxUnavailable | Behaviour |
|---|---|---|
0 | 1 | Delete first, then create. Never exceeds 3 Pods; at least 2 available at any time. |
1 | 0 | Create first, then delete. Always ≥ 3 Pods available; temporary 4-Pod state. |
1 | 1 | Create and delete in parallel. Fastest; 2–4 Pods simultaneously. |
minReadySeconds — The Airbag
Section titled “minReadySeconds — The Airbag”By default a new Pod is marked available the instant its readiness probe passes, and the rollout immediately continues to the next Pod. minReadySeconds enforces a mandatory wait between “ready” and “available”:
spec: minReadySeconds: 60 # pod must stay ready for 60 s before it counts as available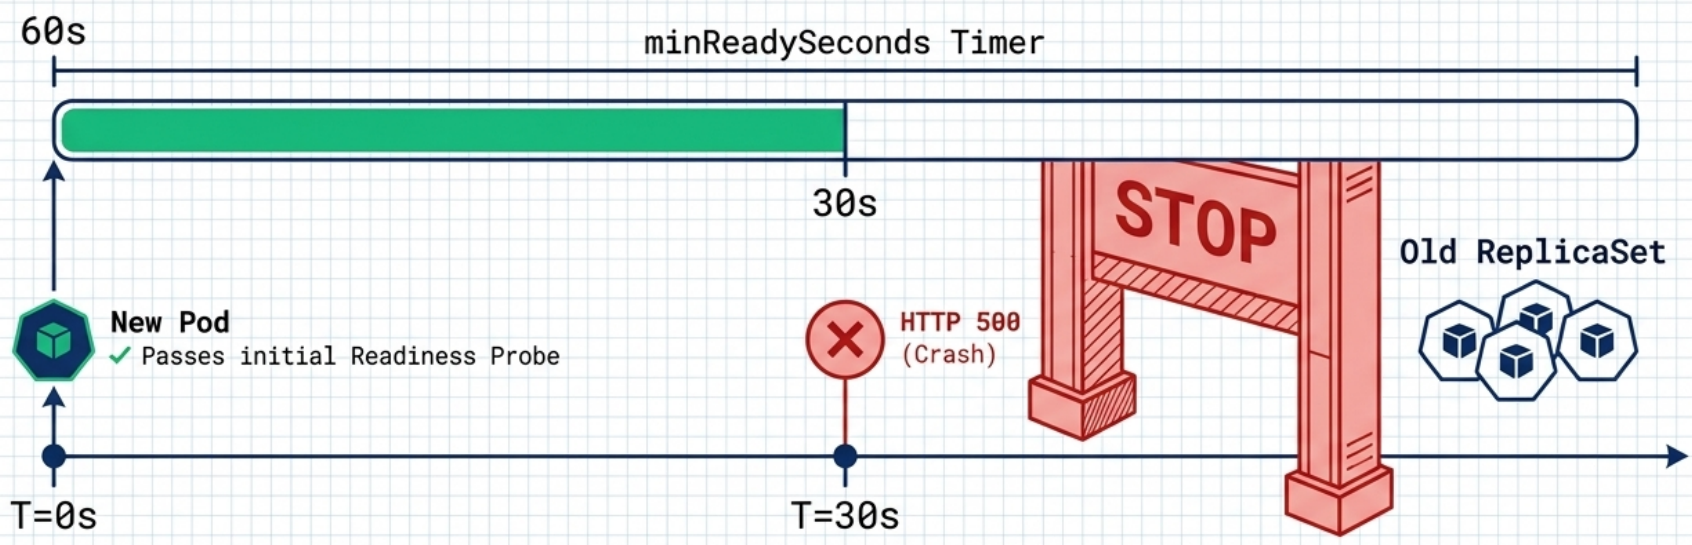
If the Pod’s containers crash or fail their readiness probe at any point during the wait window, the timer resets and the Pod never becomes available — the rollout halts and no further old Pods are replaced.
progressDeadlineSeconds — Stall Detection
Section titled “progressDeadlineSeconds — Stall Detection”If a rolling update makes no progress for longer than progressDeadlineSeconds (default: 600 s), the Progressing condition changes to False with reason ProgressDeadlineExceeded. Kubernetes takes no automated action — the rollout simply stops.
kubectl rollout status deployment <name> # shows "error: deployment exceeded its progress deadline"Monitoring, Pausing, and Resuming
Section titled “Monitoring, Pausing, and Resuming”# Watch rollout progress in real timekubectl rollout status deployment <name>
# Wait until the Deployment is fully available (useful in CI/CD scripts)kubectl wait --for condition=Available deployment/<name>
# Pause mid-rollout (e.g., to observe the first new Pod before continuing)kubectl rollout pause deployment <name>
# Resumekubectl rollout resume deployment <name>Use cases for pausing:
| Use case | How |
|---|---|
| Manual canary check | Trigger update → pause → verify the first new Pod → resume |
| Batch multiple changes | Pause before editing → apply several changes → resume once (single rollout) |
Caveats when paused:
- Split traffic — client requests are served by both old and new versions simultaneously. A user’s browser may receive HTML from one version and CSS from another, causing rendering issues unless backward compatibility is strict.
- Rollback is blocked —
kubectl rollout undodoes nothing while a Deployment is paused. Resume first, then undo. - Autoscaler distribution — if the HPA requests more Pods while paused, they are split across both ReplicaSets proportionally until the rollout resumes.
Updating Methods
Section titled “Updating Methods”# Declarative (preferred for production)kubectl apply -f deployment.yaml
# Interactive editkubectl edit deployment <name>
# Quick image-only updatekubectl set image deployment <name> <container-name>=<new-image>
# Force replace (deletes and recreates)kubectl replace -f deployment.yaml --forceRollbacks
Section titled “Rollbacks”Revision History
Section titled “Revision History”Every change to the Pod template creates a new revision. Old ReplicaSets are kept (at zero replicas) as a documented history. The number of retained revisions is controlled by spec.revisionHistoryLimit (default: 10).
# View revision historykubectl rollout history deployment <name>
# Inspect a specific revisionkubectl rollout history deployment <name> --revision=2
Documenting change causes — the CHANGE-CAUSE column in rollout history is blank unless you annotate manually:
kubectl annotate deployment <name> kubernetes.io/change-cause="Image updated to 1.2.0"Executing a Rollback
Section titled “Executing a Rollback”# Roll back to the immediately previous revisionkubectl rollout undo deployment <name>
# Roll back to a specific revisionkubectl rollout undo deployment <name> --to-revision=2
# Monitor the rollback (it follows the same pace as a rollout)kubectl rollout status deployment <name>What a Rollback Does and Does Not Change
Section titled “What a Rollback Does and Does Not Change”| Reverted | Not reverted |
|---|---|
spec.template (container image, env, mounts) | spec.replicas |
| — | Persistent data |
History reordering: when you roll back to revision 1 while on revision 2, Kubernetes promotes the revision 1 configuration to become the newest revision (revision 3) and removes the original revision 1 entry.
rollout undo vs. Reapplying an Old Manifest
Section titled “rollout undo vs. Reapplying an Old Manifest”These two rollback approaches are not equivalent:
| Method | What it reverts | What it preserves |
|---|---|---|
kubectl rollout undo | Pod template only (spec.template) | Replica count, strategy, all other settings |
kubectl apply with old manifest | Everything in the file | Nothing — blindly overwrites all live settings |
Use rollout undo for surgical version rollbacks. Avoid applying old manifests as a rollback mechanism — you risk overwriting live operational changes (e.g., a scaled-up replica count) with outdated values.
Deployment Strategies
Section titled “Deployment Strategies”Beyond the built-in RollingUpdate and Recreate modes, more advanced release patterns can be implemented using combinations of standard Kubernetes objects.
At a Glance
Section titled “At a Glance”| Strategy | Downtime | Traffic control | Native K8s | Key implementation | Use when |
|---|---|---|---|---|---|
RollingUpdate | ❌ None | Gradual — all users see old or new | ✅ Yes | strategy.type: RollingUpdate + maxSurge / maxUnavailable | Standard zero-downtime deployments |
Recreate | ✅ Yes | Gap between versions | ✅ Yes | strategy.type: Recreate | Versions cannot coexist (schema migrations) |
| Canary | ❌ None | Partial slice (e.g., ~10% via replica ratio) | ✅ Yes | Two Deployments sharing one Service selector | Validate stability on a small traffic segment before full rollout |
| Blue/Green | ❌ None | Instant full switch — atomic cutover | ✅ Yes | kubectl patch service -p '{"spec":{"selector":{"col":"green"}}}' | Zero-risk cutover with instant rollback by flipping the selector back |
| A/B Testing | ❌ None | Per-user via header / cookie / region | ❌ Ingress required | Ingress conditional routing → two Services → two Deployments | Measure behavioural differences between user segments; statistical comparison |
| Traffic Shadowing | ❌ None | Mirror only — users always see stable | ❌ Ingress / service mesh required | Proxy mirrors requests; shadow responses are discarded | Validate under real production load with zero user impact |
Canary
Section titled “Canary”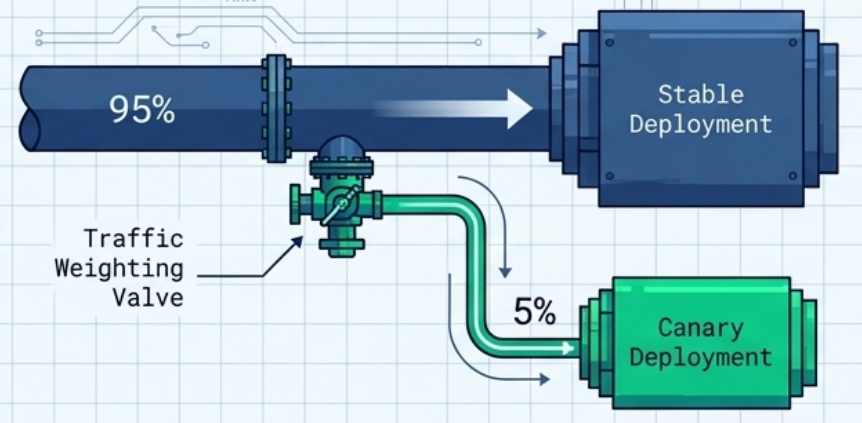
Route a small slice of traffic to a new version before committing to a full rollout.
Partial canary (single Deployment):
- Set a high
minReadySecondsto slow the rollout — gives time to observe stability at each step - Or: trigger an update → immediately
kubectl rollout pauseafter the first new Pod starts → inspect → resume
True canary (dual Deployments):
- Maintain two separate Deployments: stable (e.g., 9 replicas) and canary (e.g., 1 replica)
- Configure a single Service whose selector matches Pods from both — traffic is split ~90/10
- Once confident, perform a rolling update on the stable Deployment and delete the canary Deployment
Setting it up:
# 1. Stable Deployment — carries majority of trafficapiVersion: apps/v1kind: Deploymentmetadata: name: my-app-stablespec: replicas: 9 selector: matchLabels: app: my-app rel: stable template: metadata: labels: app: my-app # shared label — Service routes to both stable and canary rel: stable spec: containers: - name: app image: my-app:1.0---# 2. Canary Deployment — ~10% of traffic (1 of 10 total replicas)apiVersion: apps/v1kind: Deploymentmetadata: name: my-app-canaryspec: replicas: 1 selector: matchLabels: app: my-app rel: canary template: metadata: labels: app: my-app # shared label — Service also selects this rel: canary spec: containers: - name: app image: my-app:2.0---# 3. Single Service — selects ALL pods with app=my-app (~90% stable, ~10% canary)apiVersion: v1kind: Servicemetadata: name: my-appspec: selector: app: my-app ports: - port: 80 targetPort: 8080# Promote: once canary is stable, roll v2 into the main Deployment and remove canarykubectl set image deployment/my-app-stable app=my-app:2.0kubectl delete deployment my-app-canaryA/B Testing
Section titled “A/B Testing”Route specific user segments to a different version based on request attributes (headers, cookies, location, user-agent).
| Component | Role |
|---|---|
| Two Deployments | Version A (stable) + Version B (new) |
| Two Services | One targeting each Deployment |
| Ingress with conditional routing | Evaluates request attributes and directs traffic to Service-A or Service-B |
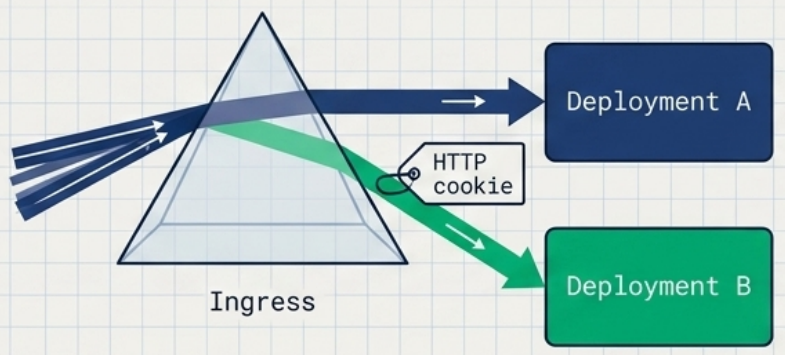
- A single user is always routed to the same version (session consistency required)
- Requires a Layer-7 Ingress controller that supports header/cookie-based routing — standard Kubernetes Services route randomly across all matching Pods
Setting it up (NGINX Ingress):
# Primary Ingress — all traffic goes to v1 by defaultapiVersion: networking.k8s.io/v1kind: Ingressmetadata: name: my-appspec: rules: - host: my-app.example.com http: paths: - path: / pathType: Prefix backend: service: name: my-app-v1 port: number: 80---# Canary Ingress — requests with matching header are routed to v2apiVersion: networking.k8s.io/v1kind: Ingressmetadata: name: my-app-v2 annotations: nginx.ingress.kubernetes.io/canary: "true" nginx.ingress.kubernetes.io/canary-by-header: "X-Beta-User" nginx.ingress.kubernetes.io/canary-by-header-value: "true"spec: rules: - host: my-app.example.com http: paths: - path: / pathType: Prefix backend: service: name: my-app-v2 port: number: 80# Requests with X-Beta-User: true header reach v2; all others reach v1curl -H "X-Beta-User: true" https://my-app.example.comBlue/Green
Section titled “Blue/Green”Deploy a complete parallel environment, test it, then switch all traffic at once with zero incremental rollout.
# Switch traffic from Blue to Green by patching the Service selectorkubectl patch service my-app -p '{"spec":{"selector":{"col":"green"}}}'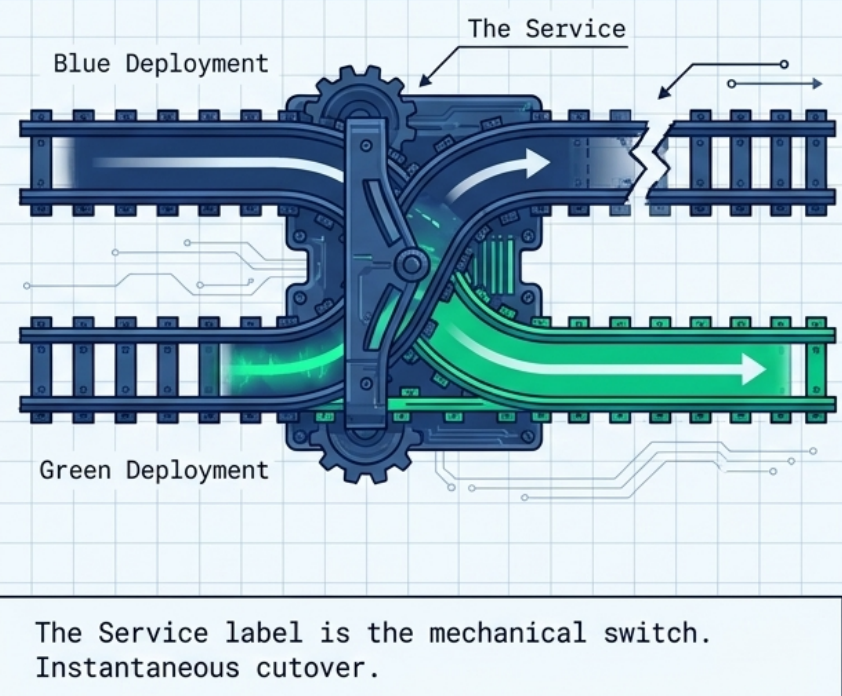
| Aspect | Detail |
|---|---|
| Setup | Two Deployments with distinct labels (e.g., col: blue, col: green) + one Service |
| Switch | Update the Service selector — atomic, instant cutover |
| Rollback | Revert the Service selector to Blue |
| Native support | ✅ No third-party tools required — works with standard Deployments and Services |
Setting it up:
# blue-deployment.yaml — current production (v1)apiVersion: apps/v1kind: Deploymentmetadata: name: my-app-bluespec: replicas: 3 selector: matchLabels: { app: my-app, col: blue } template: metadata: labels: { app: my-app, col: blue } spec: containers: - name: app image: my-app:1.0---# green-deployment.yaml — new version (v2); deploy and verify before switchingapiVersion: apps/v1kind: Deploymentmetadata: name: my-app-greenspec: replicas: 3 selector: matchLabels: { app: my-app, col: green } template: metadata: labels: { app: my-app, col: green } spec: containers: - name: app image: my-app:2.0---# service.yaml — points to blue initially; change col: green to cut overapiVersion: v1kind: Servicemetadata: name: my-appspec: selector: app: my-app col: blue ports: - port: 80 targetPort: 8080# 1. Deploy green and verify it is healthy before touching the Servicekubectl apply -f green-deployment.yamlkubectl get pods -l col=green
# 2. Atomic cutover — zero downtimekubectl patch service my-app -p '{"spec":{"selector":{"col":"green"}}}'
# 3. Instant rollback if issues arisekubectl patch service my-app -p '{"spec":{"selector":{"col":"blue"}}}'
# 4. Clean up blue after a successful releasekubectl delete deployment my-app-blueTraffic Shadowing (Dark Launch)
Section titled “Traffic Shadowing (Dark Launch)”Test a new version under real production load without affecting any users.
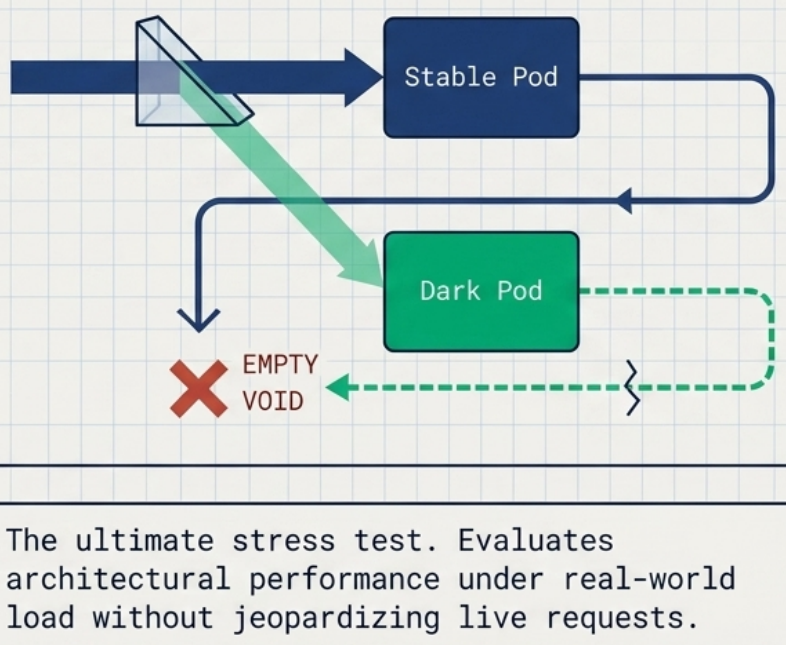
- Deploy the new version as a separate Deployment with labels that do not match the primary Service selector
- A proxy/Ingress mirrors each incoming request to both the stable and shadow Pods simultaneously
- Only the stable response is returned to the user — the shadow response is silently discarded
- Requires an Ingress controller or service mesh that supports traffic mirroring (not available natively in Kubernetes)
Setting it up (NGINX Ingress):
apiVersion: networking.k8s.io/v1kind: Ingressmetadata: name: my-app annotations: # Mirror all incoming requests to the shadow service; shadow responses are discarded nginx.ingress.kubernetes.io/mirror-target: http://my-app-shadow.default.svc.cluster.localspec: rules: - host: my-app.example.com http: paths: - path: / pathType: Prefix backend: service: name: my-app-stable # real users always receive the stable response port: number: 80Troubleshooting Deployments
Section titled “Troubleshooting Deployments”When Pods fail to appear after creating or updating a Deployment, the cause is almost always in the underlying ReplicaSet, not the Deployment itself.
| Where to look | What you find |
|---|---|
kubectl describe deploy <name> → Conditions | ReplicaFailure: True with reason FailedCreate — tells you something is wrong |
kubectl describe rs <name> → Events | The exact error: “forbidden”, “service account not found”, “insufficient quota”, etc. |
# Step 1: check Deployment conditionskubectl get deploy <name> -o yaml | grep -A 10 conditions
# Step 2: find and inspect the failing ReplicaSetkubectl get rskubectl describe rs <rs-name>Network Access
Section titled “Network Access”A Deployment manages Pods but does not expose them to network traffic. To route requests to your Pods, create a separate Service object:
apiVersion: v1kind: Servicemetadata: name: my-appspec: type: LoadBalancer selector: app: my-app # must match Deployment's Pod template labels ports: - protocol: TCP port: 80 targetPort: 8080kubectl apply -f service.yaml
# Find the assigned external IPkubectl get svc my-appThe Service discovers Pods via label selector — it has no direct reference to the Deployment itself. Changing the Service’s selector is how blue/green cutover works.
Deleting Deployments
Section titled “Deleting Deployments”kubectl delete deployment <name>Deletion cascades: the Deployment, its ReplicaSets, and all managed Pods are removed automatically by the garbage collector.
# Verify full cleanupkubectl get deployments,replicasets,pods