
Object Organization
Kubernetes provides four built-in tools for organising and targeting objects in a cluster. They work as a layered system from coarse boundaries down to fine-grained metadata:
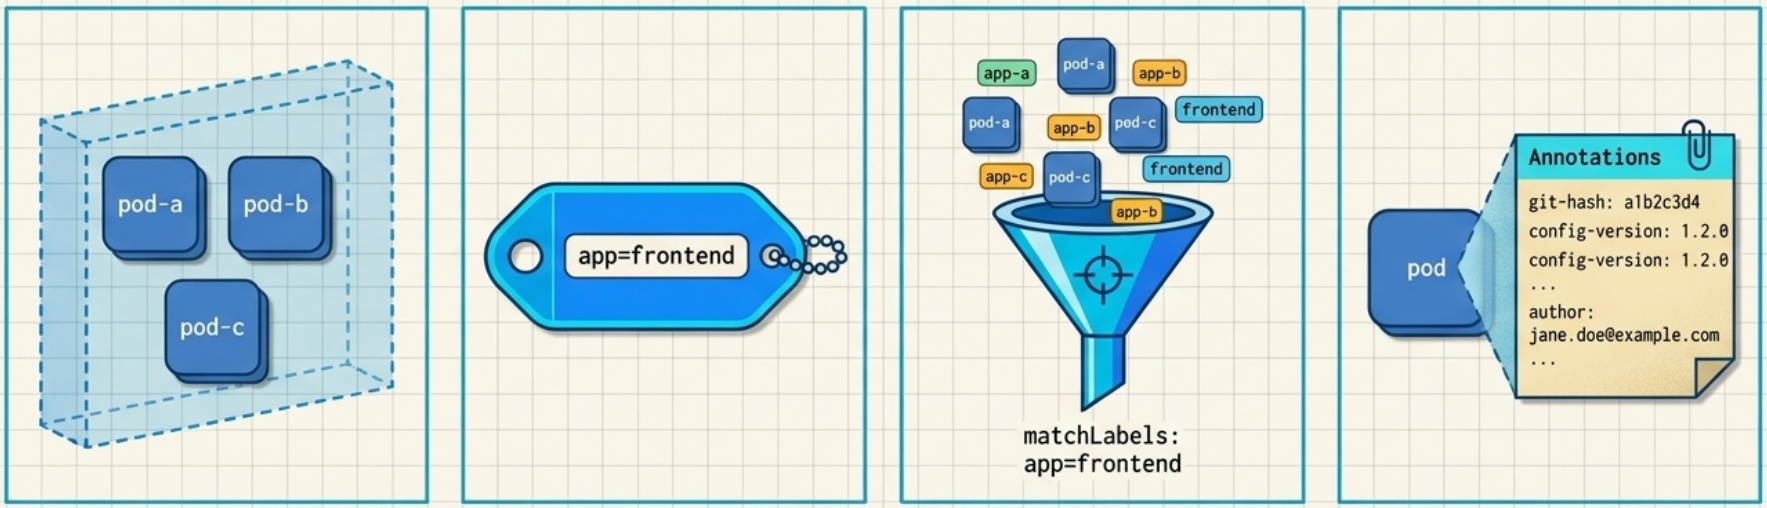
| Concept | Role | What it does |
|---|---|---|
| Namespaces | The Boundary | Partitions a cluster into virtual segments, scoping names, RBAC rules, and resource quotas |
| Labels | The Organisational Glue | Key-value pairs attached to objects to identify attributes like app type or release stage |
| Selectors | The Targeting Engine | Filter and query objects by label; used by Services, Deployments, and kubectl commands |
| Annotations | The Metadata Layer | Non-identifying key-value store for tooling config, Git hashes, and human-readable context |
Namespaces
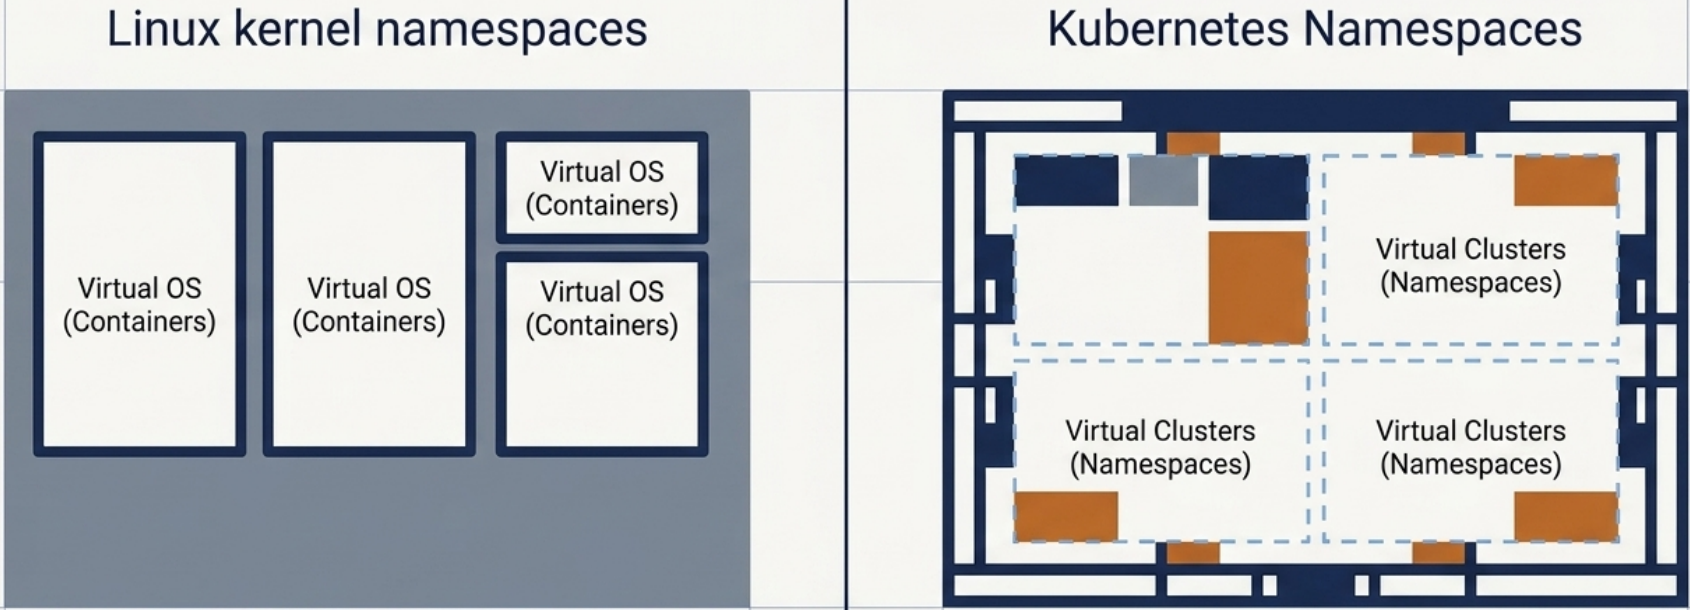
Section titled “Namespaces”A Kubernetes Namespace divides a single physical cluster into multiple virtual clusters, each with its own scope for object names, RBAC rules, resource quotas, and policies.
Isolation Level
Section titled “Isolation Level”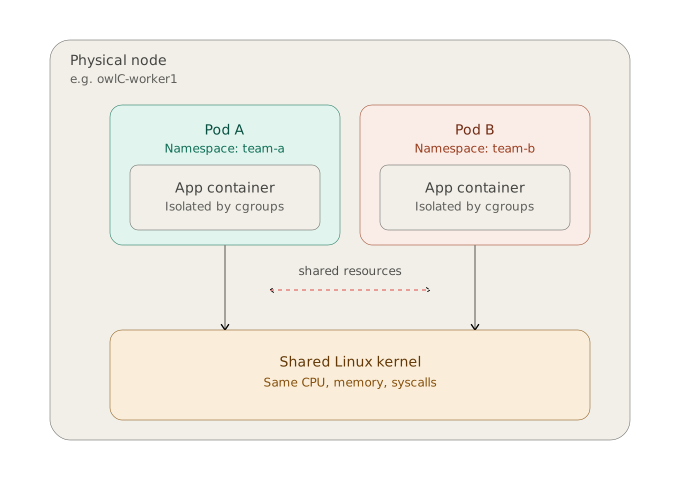
Namespace isolation is soft, not hard:
| Isolation type | Mechanism | Limitation |
|---|---|---|
| Namespace (soft) | Scopes names, RBAC, and quotas | Pods share the same nodes and kernel. A compromised workload can still affect others. No network isolation by default - requires a NetworkPolicy |
| Separate cluster (hard) | Separate control plane, separate nodes | Strong isolation but higher cost and management overhead |
Because of soft isolation, namespaces are suitable for internal teams or projects - not for separating external customers. For production-grade multi-tenancy between untrusted parties, use separate clusters.
Namespaced vs. Cluster-Scoped Resources
Section titled “Namespaced vs. Cluster-Scoped Resources”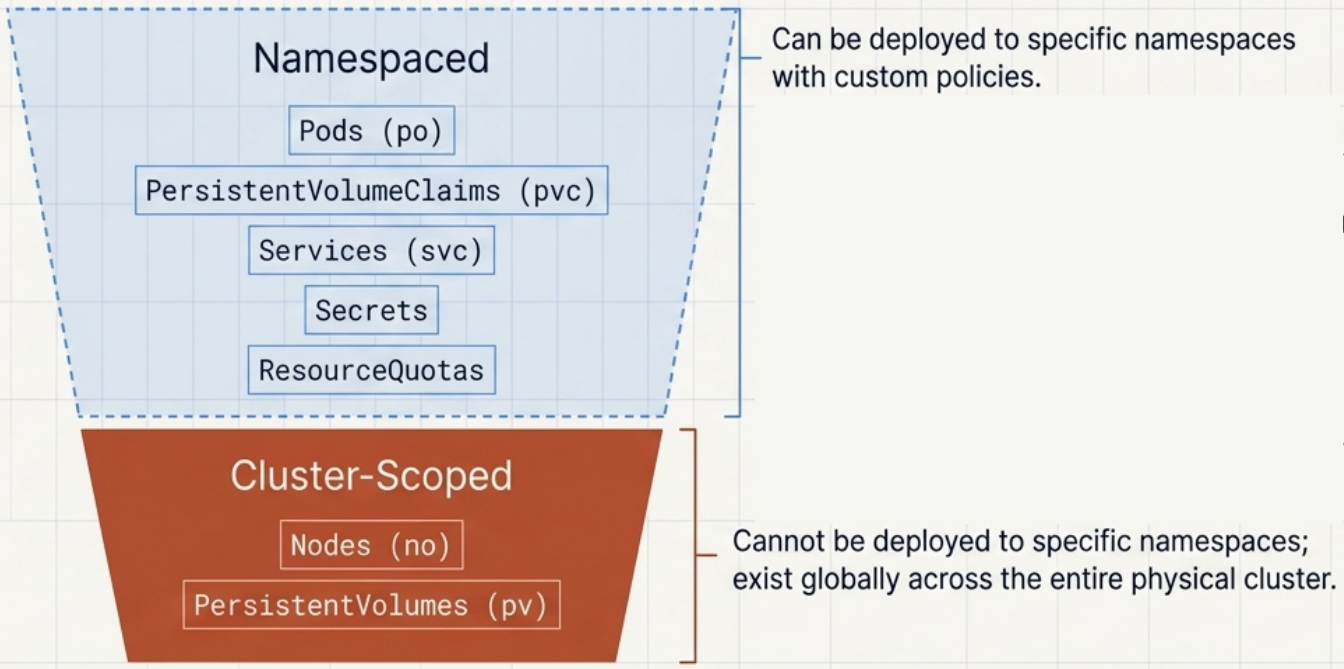
Not all Kubernetes objects belong to a namespace:
| Scope | Examples |
|---|---|
| Namespaced | Pods, Deployments, Services, ConfigMaps, Secrets, PersistentVolumeClaims, Events, ServiceAccounts |
| Cluster-scoped | Nodes, PersistentVolumes, StorageClasses, Namespaces themselves |
kubectl api-resources # NAME column shows shortnames, NAMESPACED column shows true/falseNAME SHORTNAMES APIVERSION NAMESPACED KINDnodes no v1 false Nodepersistentvolumeclaims pvc v1 true PersistentVolumeClaimpersistentvolumes pv v1 false PersistentVolumepods po v1 true Podpodtemplates v1 true PodTemplatereplicationcontrollers rc v1 true ReplicationControllerresourcequotas quota v1 true ResourceQuotasecrets v1 true Secretserviceaccounts sa v1 true ServiceAccountservices svc v1 true ServiceDefault Namespaces
Section titled “Default Namespaces”Every cluster is initialised with four predefined namespaces:
| Namespace | Purpose |
|---|---|
default | Where objects land if no namespace is specified |
kube-system | Control plane components (CoreDNS, metrics-server, kube-proxy) |
kube-public | Objects that must be readable by anyone, including unauthenticated users |
kube-node-lease | Node lease objects used for node heartbeats and health tracking |
Namespaces prefixed with kube- are reserved for Kubernetes internals and should not contain end-user workloads.
Namespace Use Cases
Section titled “Namespace Use Cases”- Team or project separation - a single cluster divided into
finance,hr, andopsnamespaces, each with its own RBAC and quotas - Preventing naming collisions - two teams can both deploy an object named
apiwithout conflict, as long as they use separate namespaces - Applying different policies - different resource quotas, network policies, or admission rules per namespace
Namespace Naming Rules
Section titled “Namespace Naming Rules”- Lowercase alphanumeric characters and hyphens only
- Must start and end with an alphanumeric character
- Cannot contain dots (unlike most DNS subdomains)
Managing Namespaces
Section titled “Managing Namespaces”Creating
Section titled “Creating”Imperatively:
kubectl create namespace <name>kubectl create ns <name> # ns is the shorthand aliasDeclaratively:
apiVersion: v1kind: Namespacemetadata: name: my-teamkubectl apply -f namespace.yamlDeploying to a Namespace
Section titled “Deploying to a Namespace”Objects not given a namespace go to default. To target a specific namespace:
Imperatively (flag):
kubectl run my-pod --image=nginx -n my-teamkubectl apply -f my-pod.yaml -n my-team # deploy a manifest into a specific namespacekubectl get pods -n my-teamkubectl get pods -A # across all namespacesDeclaratively (in the manifest):
apiVersion: v1kind: Podmetadata: name: my-pod namespace: my-teamSetting a Default Namespace Context
Section titled “Setting a Default Namespace Context”Appending -n <namespace> to every command is repetitive. Set a persistent default for the current kubeconfig context:
kubectl config set-context --current --namespace=my-team
# Verifykubectl config view --minify | grep namespace:
# Revert to defaultkubectl config set-context --current --namespace=defaultDeleting Namespaces
Section titled “Deleting Namespaces”kubectl delete ns <name>The kubectl delete ns command blocks until the namespace and all its objects are fully removed. If you interrupt it and list namespaces, you will see the namespace in Terminating status:
kubectl get ns# NAME STATUS AGE# default Active 2h# my-team Terminating 2h ← deletion in progressUse --wait=false to return immediately without waiting for full deletion:
kubectl delete ns <name> --wait=falseIf a namespace is stuck in Terminating:
The most common cause is a custom resource whose controller did not process the deletion and failed to remove the object’s finalizer. Kubernetes will not delete an object that still has finalizers. Diagnose it:
kubectl get ns <name> -o yaml # check status.conditions for the blocking resourceLabels
Section titled “Labels”A label is a key-value pair attached to a Kubernetes object that identifies it within the system. Labels enable the core Kubernetes mechanisms for object grouping, selection, and scheduling.
Both the key and value are strings. An object can have multiple labels; each key must be unique within that object.
Why Labels?
Section titled “Why Labels?”In a microservices system, the number of running services can easily exceed 100. With replicas and simultaneous canary/stable releases, a single cluster can contain thousands of pods. Without a way to organise them, understanding what’s running becomes nearly impossible.
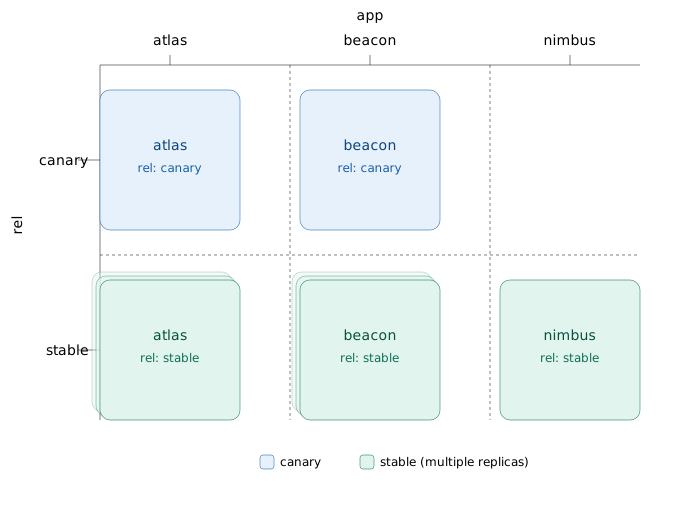
Labels solve this by letting you express identity on each object. For example, two labels are enough to classify any pod in a multi-service deployment:
| Label | Value examples | Purpose |
|---|---|---|
app | atlas, beacon, nimbus | Which application this pod belongs to |
rel | stable, canary | Which release track it’s running |
With these two labels, you can instantly answer questions like “show me all canary pods for the atlas service” using a selector — no manual tracking required.
Kubernetes does not enforce any specific label keys or values. You define the schema; Kubernetes provides the querying machinery.
Syntax Rules
Section titled “Syntax Rules”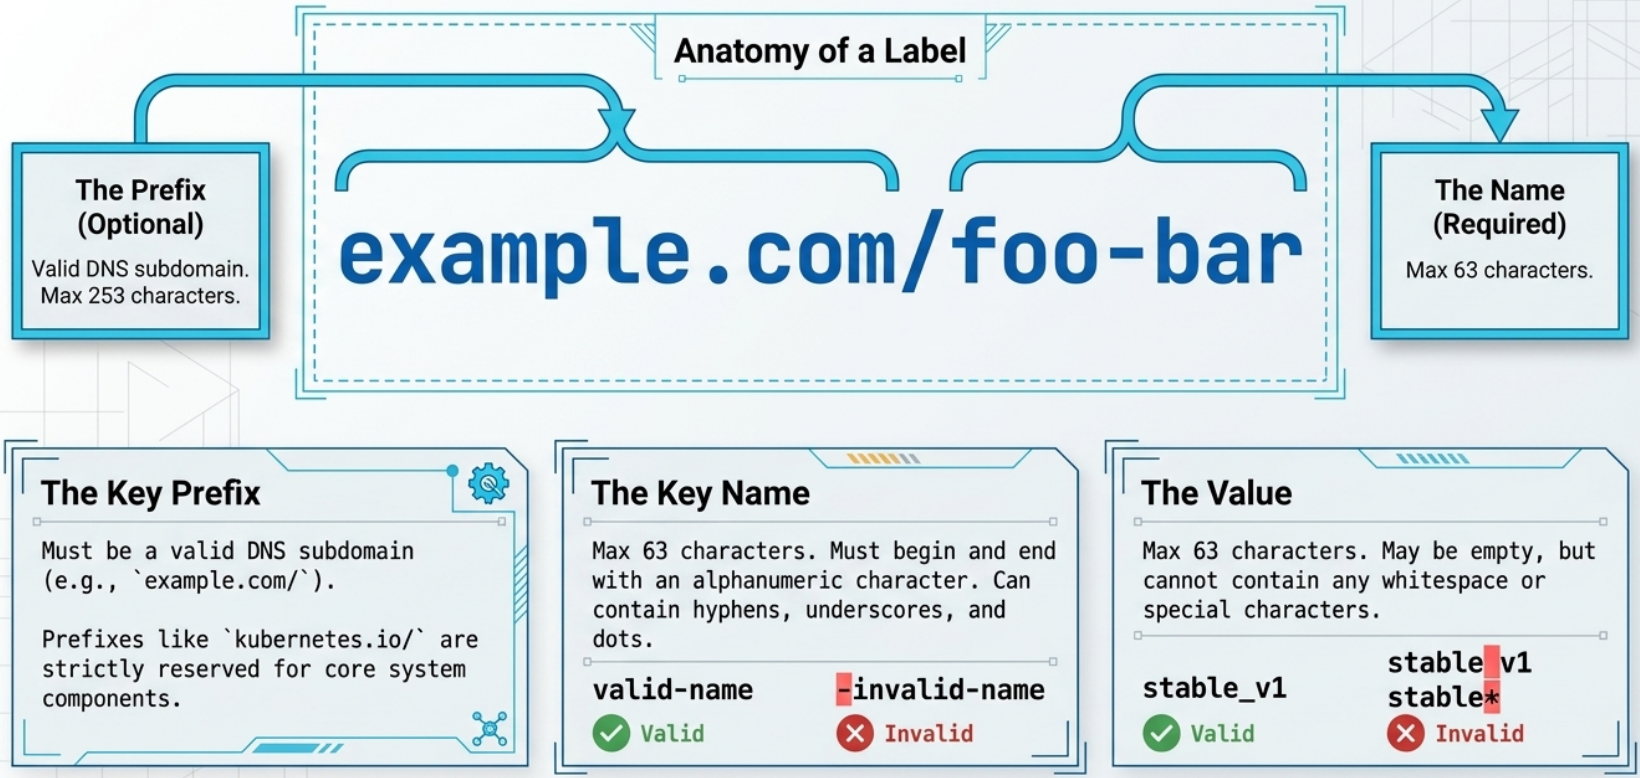
Keys have two parts: an optional prefix (must be a valid DNS subdomain) and a mandatory name:
- Name: max 63 characters; alphanumeric, hyphens, underscores, dots; must start and end with alphanumeric
Values:
- Max 63 characters; no whitespace; alphanumeric, hyphens, underscores, dots; must start with alphanumeric (or empty string)
If your data violates these rules (long text, special characters, URLs), use annotations instead.
Standard Labels
Section titled “Standard Labels”System labels (applied automatically by Kubernetes to nodes and infrastructure objects):
| Key | Meaning |
|---|---|
kubernetes.io/arch | CPU architecture (amd64, arm64) |
kubernetes.io/os | Operating system (linux, windows) |
kubernetes.io/hostname | Node hostname |
Recommended application labels (app.kubernetes.io/ prefix):
| Key | Meaning | Example |
|---|---|---|
app.kubernetes.io/name | Application name | my-api |
app.kubernetes.io/instance | Unique instance identifier | my-api-prod |
app.kubernetes.io/component | Architectural role | database, frontend |
app.kubernetes.io/version | Current version | 1.4.2 |
Using the app.kubernetes.io/ prefix ensures compatibility with Kubernetes tooling and dashboards.
Defining Labels in Manifests
Section titled “Defining Labels in Manifests”metadata: name: my-pod labels: app.kubernetes.io/name: my-api app.kubernetes.io/component: frontend rel: stableViewing Labels
Section titled “Viewing Labels”kubectl describe pod <name> # labels visible in metadata sectionkubectl get pods --show-labels # adds a LABELS column to outputkubectl get pods -L app,rel # shows only specified keys as columnsManaging Labels with kubectl
Section titled “Managing Labels with kubectl”# Add a label# kubectl label pod <name> <key>=<value>kubectl label pod my-pod env=prod
# Update an existing label (requires --overwrite as a safety check)# kubectl label pod <name> <key>=<new-value> --overwritekubectl label pod my-pod rel=stable --overwrite
# Apply a label to all pods in the namespace# kubectl label pods --all <key>=<value>kubectl label pods --all tier=backend --overwrite
# Remove a label (append - to the key)# kubectl label pod <name> <key>-kubectl label pod my-pod env-Label Selectors
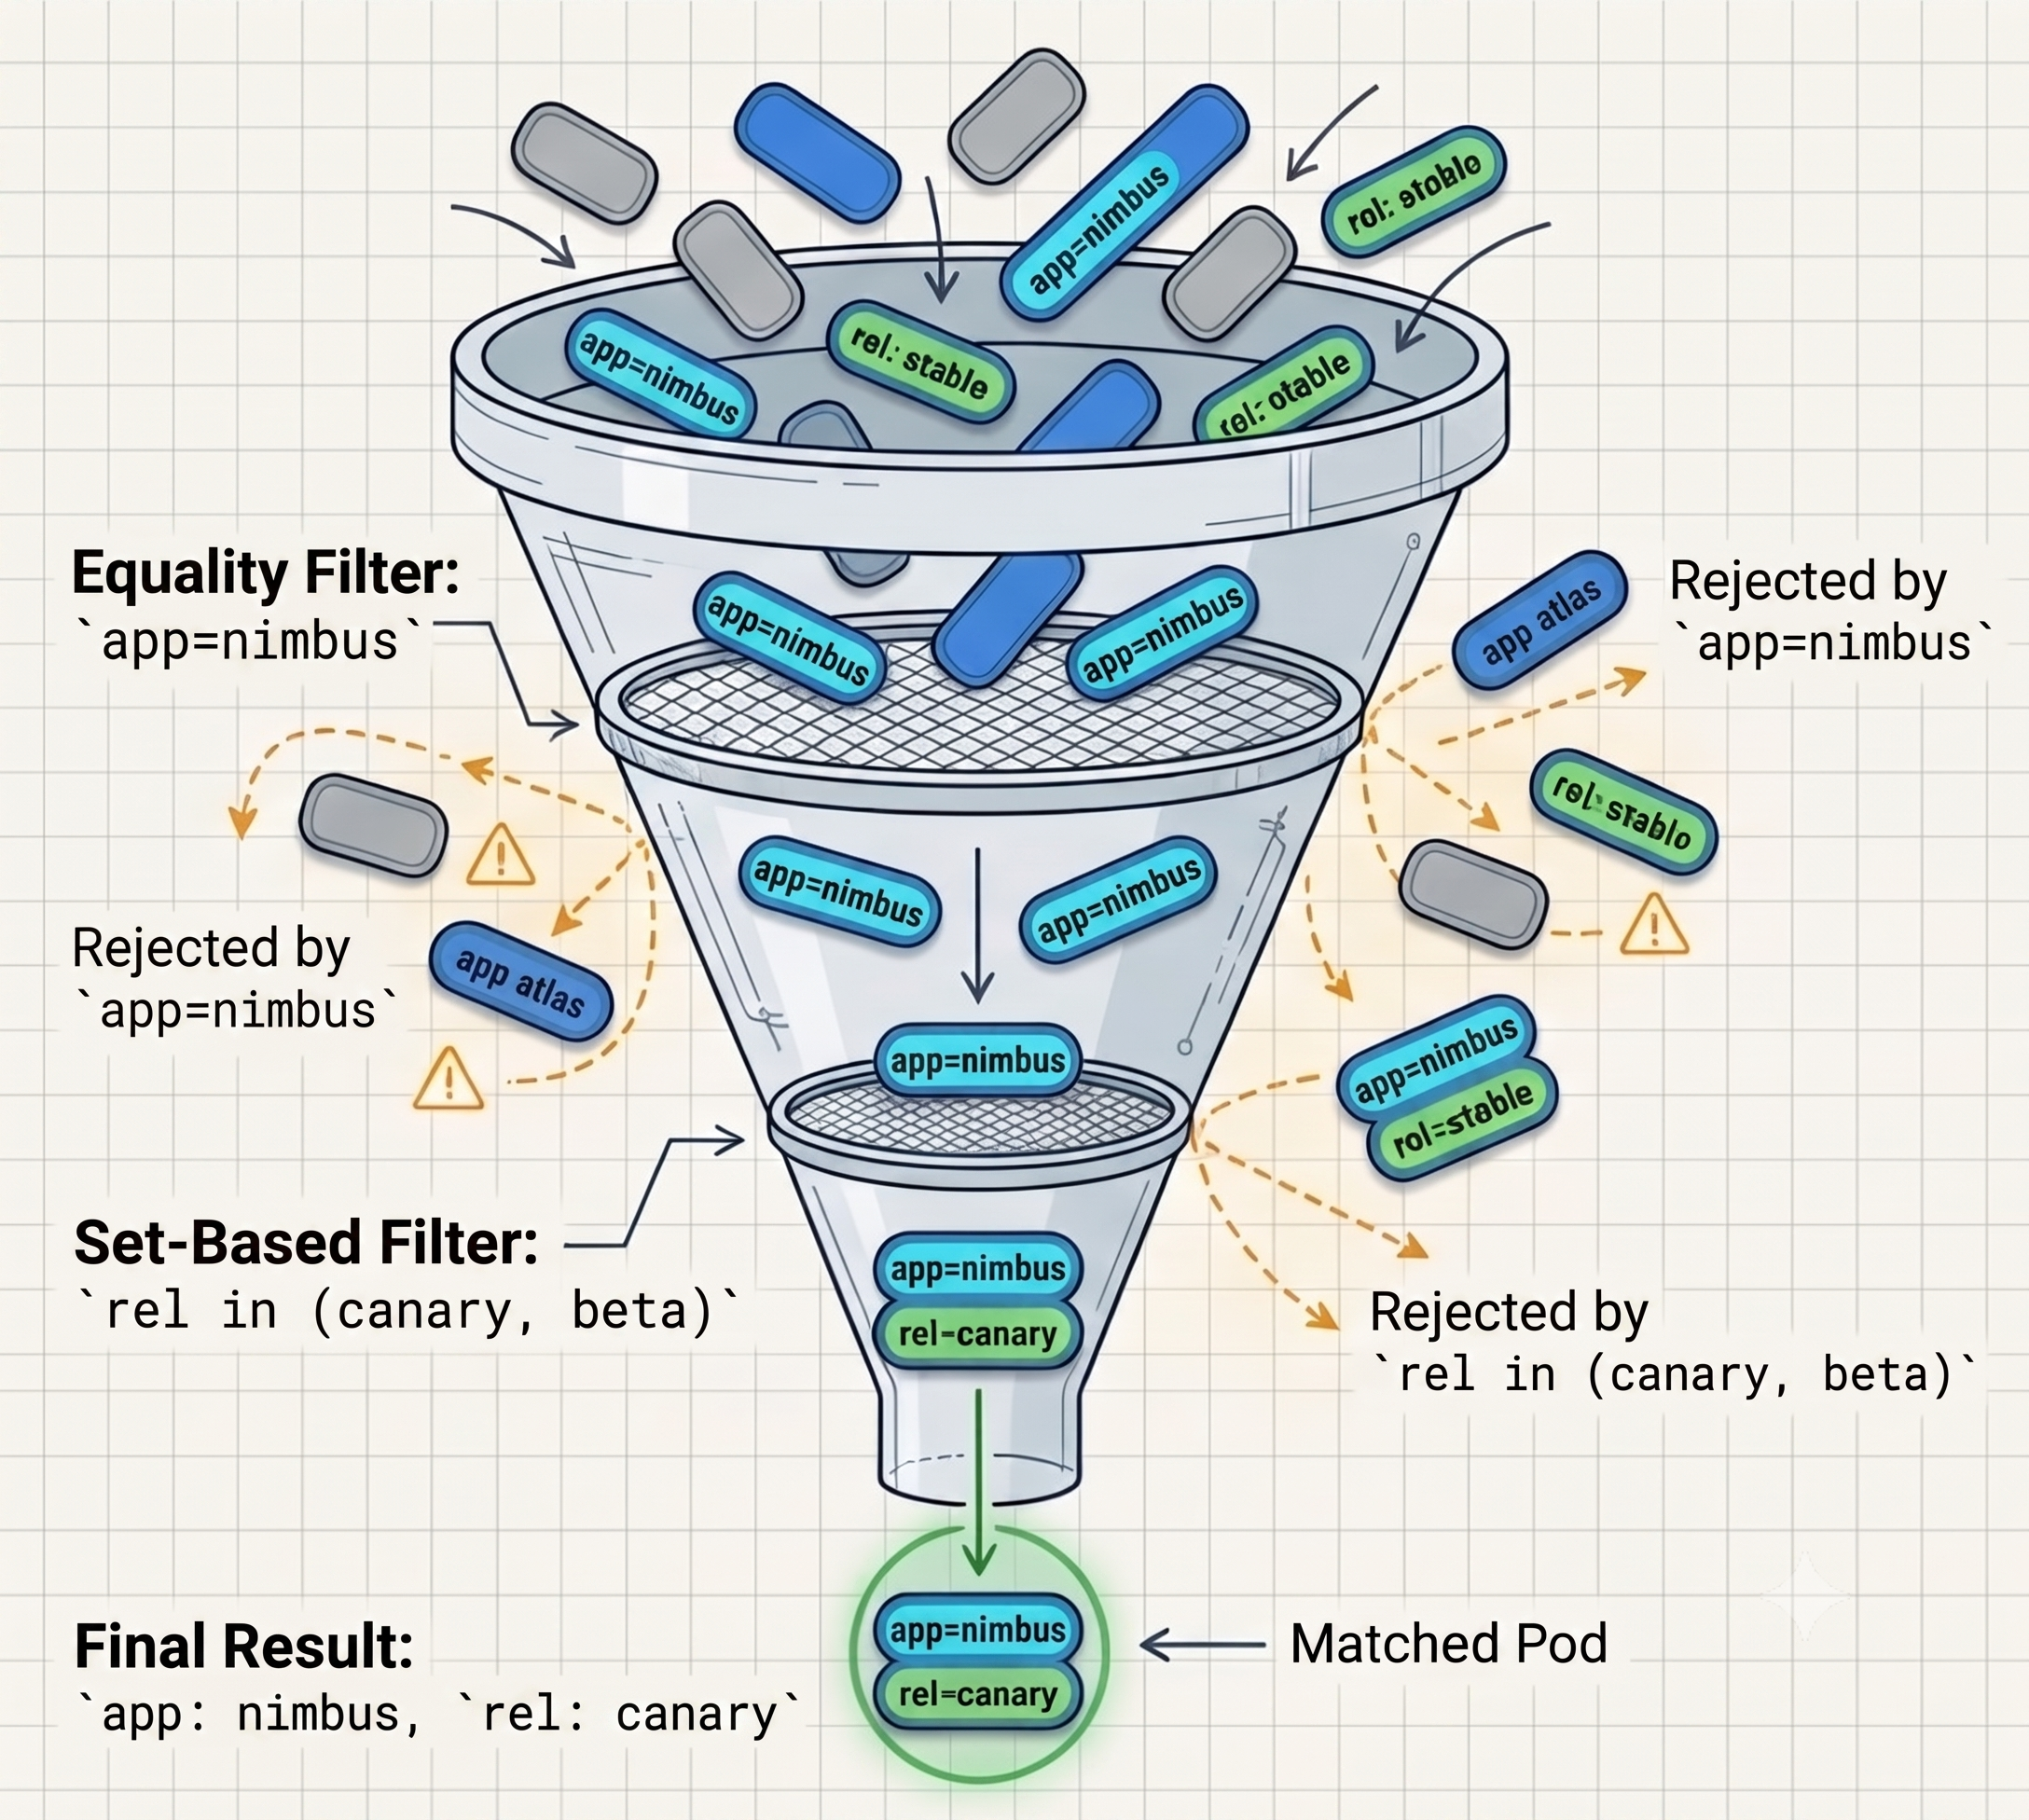
Section titled “Label Selectors”A label selector filters objects based on their labels. Selectors are used in two directions: by higher-level resources to target the objects they manage, and by Pods themselves to constrain which nodes they can be scheduled on.
Equality-Based Selectors
Section titled “Equality-Based Selectors”Filter on exact key-value matches:
| Expression | Matches |
|---|---|
app=nginx | Objects where app equals nginx |
app!=nginx | Objects where app is anything but nginx |
Set-Based Selectors
Section titled “Set-Based Selectors”More expressive filtering using sets:
| Expression | Matches |
|---|---|
app in (atlas, nimbus) | Objects where app is either atlas or nimbus |
app notin (legacy) | Objects where app is not legacy |
app | Objects that have the app key (any value) |
!app | Objects that do not have the app key |
Combining Selectors
Section titled “Combining Selectors”Multiple selectors are AND-ed - an object must match all of them:
kubectl get pods -l app=quote,rel=canary # must satisfy bothCLI Usage
Section titled “CLI Usage”kubectl get pods -l app=web # equalitykubectl get pods -l 'rel in (stable, beta)' # set-based (quote in shell)kubectl get pods -l '!deprecated' # key absence
# Delete all matching objects (no confirmation - use with care)kubectl delete pods -l app=legacyInternal Usage in Manifests
Section titled “Internal Usage in Manifests”Selectors are the glue that holds Kubernetes resources together. Rather than hardcoding references by name, resources use label selectors to discover and target their dependants dynamically. This decoupling is intentional — it means you can replace, scale, or swap the underlying Pods without touching the resources that depend on them.
Common coupling patterns:
| Resource | Uses selector to find | Why it matters |
|---|---|---|
| Service | Pods to route traffic to | Swap pods underneath a Service with zero downtime |
| Deployment | ReplicaSets it owns | Enables rolling updates and rollbacks without service interruption |
| NetworkPolicy | Pods the policy applies to | Enforce network rules per workload, not per node |
Production scenario — blue/green with a Service selector:
You run two Deployments: rel: blue and rel: green. The Service points to rel: blue. To cut over, you change the selector to rel: green — traffic shifts instantly with no pod restarts:
# Service selecting pods by labelspec: selector: app.kubernetes.io/name: my-api # routes traffic only to pods with this label rel: blue # change to 'green' to cut overNode Scheduling with Labels
Section titled “Node Scheduling with Labels”By default, the Kubernetes scheduler places a Pod on any node with sufficient resources. Node scheduling lets you add placement constraints — restricting or preferring specific nodes based on their labels. This is essential in production clusters that have heterogeneous hardware.
When to use it:
| Scenario | Node label | What it achieves |
|---|---|---|
| Mixed storage tiers | disk-type: ssd / disk-type: hdd | Pin databases to SSD nodes; batch jobs to cheaper HDD nodes |
| Multi-arch clusters | kubernetes.io/arch: amd64 | Run legacy x86-only workloads only on amd64 nodes in an arm64 cluster |
| GPU workloads | accelerator: nvidia-v100 | Ensure ML training pods land only on GPU-equipped nodes |
| Compliance/regulatory | region: eu-west | Keep GDPR-sensitive workloads on nodes in a specific data-centre zone |
| Spot vs on-demand | node.kubernetes.io/lifecycle: spot | Pin fault-tolerant batch jobs to cheaper spot instances |
nodeSelector (equality-based, simple — use when a single label match is enough):
spec: nodeSelector: kubernetes.io/arch: amd64 # only schedule on amd64 nodes disk-type: ssdnodeAffinity (set-based, expressive — use when you need In, NotIn, or soft preferences):
spec: affinity: nodeAffinity: requiredDuringSchedulingIgnoredDuringExecution: nodeSelectorTerms: - matchExpressions: - key: kubernetes.io/arch operator: In values: [amd64, arm64] - key: disk-type operator: ExistsAvailable operators for matchExpressions: In, NotIn, Exists, DoesNotExist, Lt, Gt.
Labelling nodes — kubectl label works on any object type, including nodes. You must label a node before a nodeSelector or nodeAffinity rule referencing that label can match:
# Add a custom label to a nodekubectl label node kind-worker node-role=front-end
# Overwrite an existing node labelkubectl label node kind-worker node-role=back-end --overwrite
# Remove a label from a nodekubectl label node kind-worker node-role-
# Verify node labelskubectl get nodes --show-labelskubectl get nodes -L node-role,disk-type    # show only specific label columns
Field Selectors
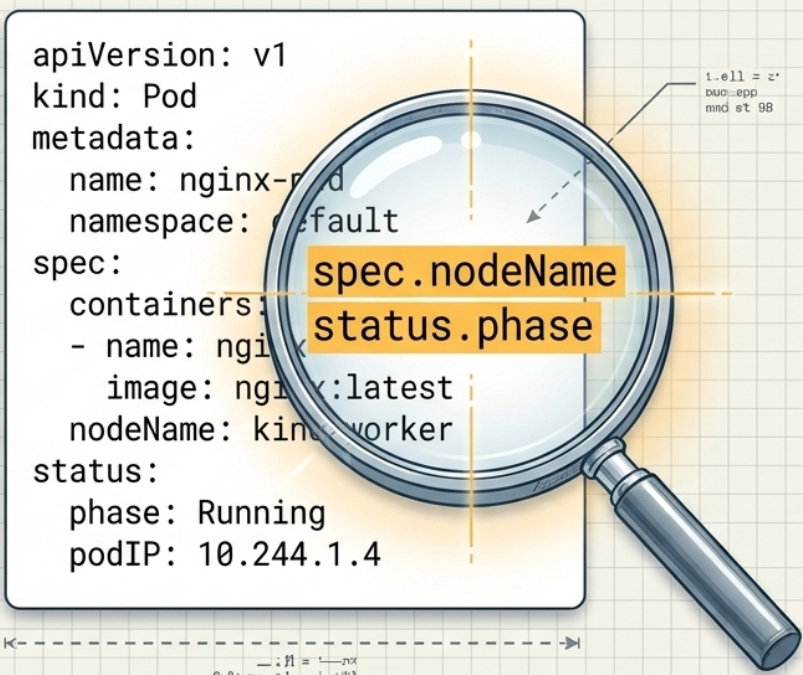
Section titled “Field Selectors”Field selectors filter objects based on their built-in manifest fields rather than labels. They cannot be used with annotations.
Labels answer “what is this object?” — but they only contain metadata you deliberately attach. Many useful filtering questions are about Kubernetes-managed state that you never define as a label: which node is a pod currently running on? What phase is it in? What is its exact name? Field selectors were introduced to fill that gap — letting you query the structural and runtime fields that Kubernetes itself writes into every object.
Universally Supported Fields
Section titled “Universally Supported Fields”metadata.name and metadata.namespace work across all object types. Other fields depend on the resource kind - use kubectl explain to inspect available fields, then test; kubectl returns an error if a field does not support selection.
CLI Usage
Section titled “CLI Usage”# All pods running on a specific nodekubectl get pods --field-selector spec.nodeName=node-1
# Pods not in the Running phase (across all namespaces)kubectl get pods --field-selector status.phase!=Running -A
# Combine with label selectorkubectl get pods -l app=web --field-selector spec.nodeName=node-1In Manifests
Section titled “In Manifests”Field selectors used for node affinity require matchFields instead of matchExpressions:
spec: affinity: nodeAffinity: requiredDuringSchedulingIgnoredDuringExecution: nodeSelectorTerms: - matchFields: - key: metadata.name operator: NotIn values: [node-a] # never schedule on node-aAnnotations
Section titled “Annotations”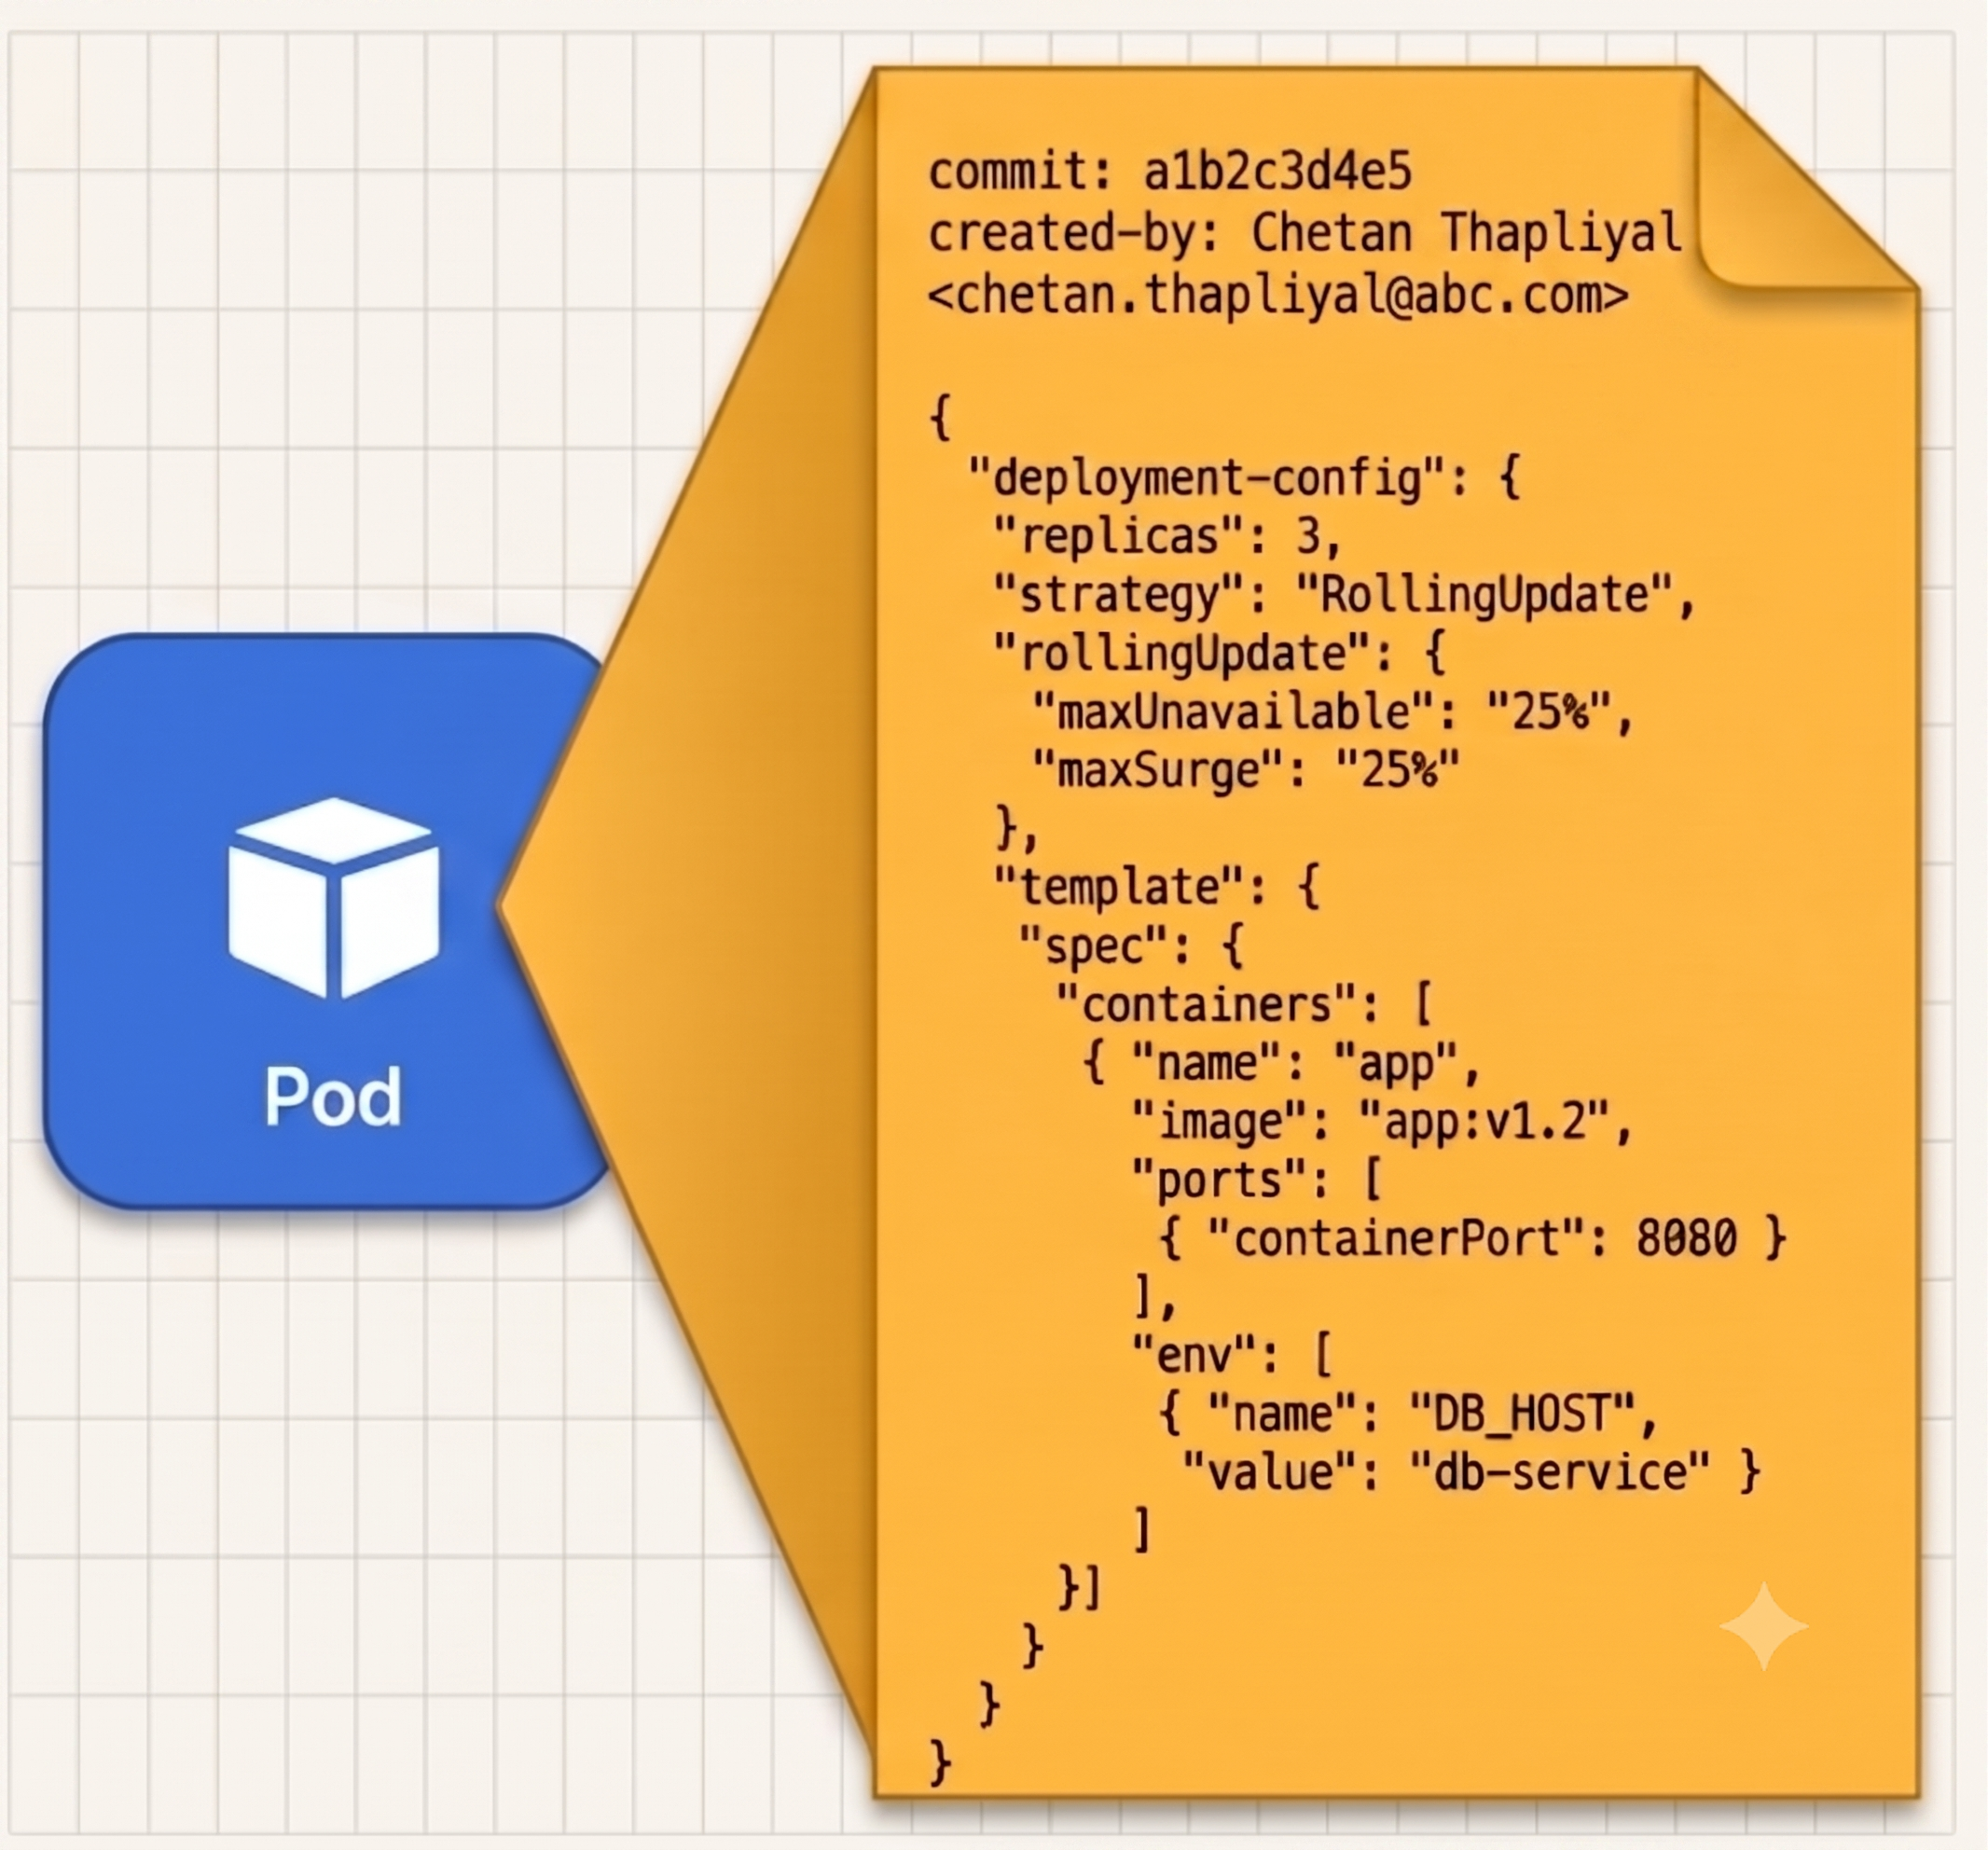
Annotations are also key-value pairs, but unlike labels they are not for identification or selection. They store larger amounts of arbitrary metadata attached to an object.
| Labels | Annotations | |
|---|---|---|
| Used for | Identification and grouping | Descriptive metadata and tooling |
| Can filter with selector | Yes | No |
| Value size limit | 63 characters | Up to 256 KB |
| Value character restrictions | Strict (no whitespace, limited chars) | Almost none |
Common Use Cases
Section titled “Common Use Cases”- Kubernetes feature rollout - the Kubernetes project uses annotations to trial new fields before they graduate into the formal API schema; once proven, a proper field is added and the annotation is deprecated
- Human context - creator name, team contact, Jira ticket, architecture notes
- CI/CD metadata - Git commit SHA, build timestamp, image tag, registry URL
- Tool configuration - configuration instructions for external tools (Prometheus scrape settings, Argo CD sync policies, cert-manager directives)
Syntax Rules
Section titled “Syntax Rules”Annotation keys follow the same rules as label keys (optional DNS subdomain prefix + name component). Annotation values have no character restrictions.
Defining Annotations in Manifests
Section titled “Defining Annotations in Manifests”metadata: name: my-pod annotations: commit-sha: "abc123def456" build-timestamp: "2026-07-24T08:00:00Z" owner: "platform-team"Viewing Annotations
Section titled “Viewing Annotations”Annotations are not shown in kubectl get output. Use:
kubectl describe pod <name> # annotations section in outputkubectl get pod <name> -o json | jq .metadata.annotationsManaging Annotations with kubectl
Section titled “Managing Annotations with kubectl”# Add an annotationkubectl annotate pod <name> my-tool/owner='platform-team'
# Update an existing annotation (requires --overwrite)kubectl annotate pod <name> my-tool/owner='infra-team' --overwrite
# Remove an annotation (append - to the key)kubectl annotate pod <name> my-tool/owner-