
Pods
The Pod is the fundamental building block of Kubernetes. It is the smallest deployable unit and the atomic unit of scheduling. Every workload - whether a container, a WebAssembly app, or a virtual machine via KubeVirt - must be wrapped in a Pod to run on the cluster.
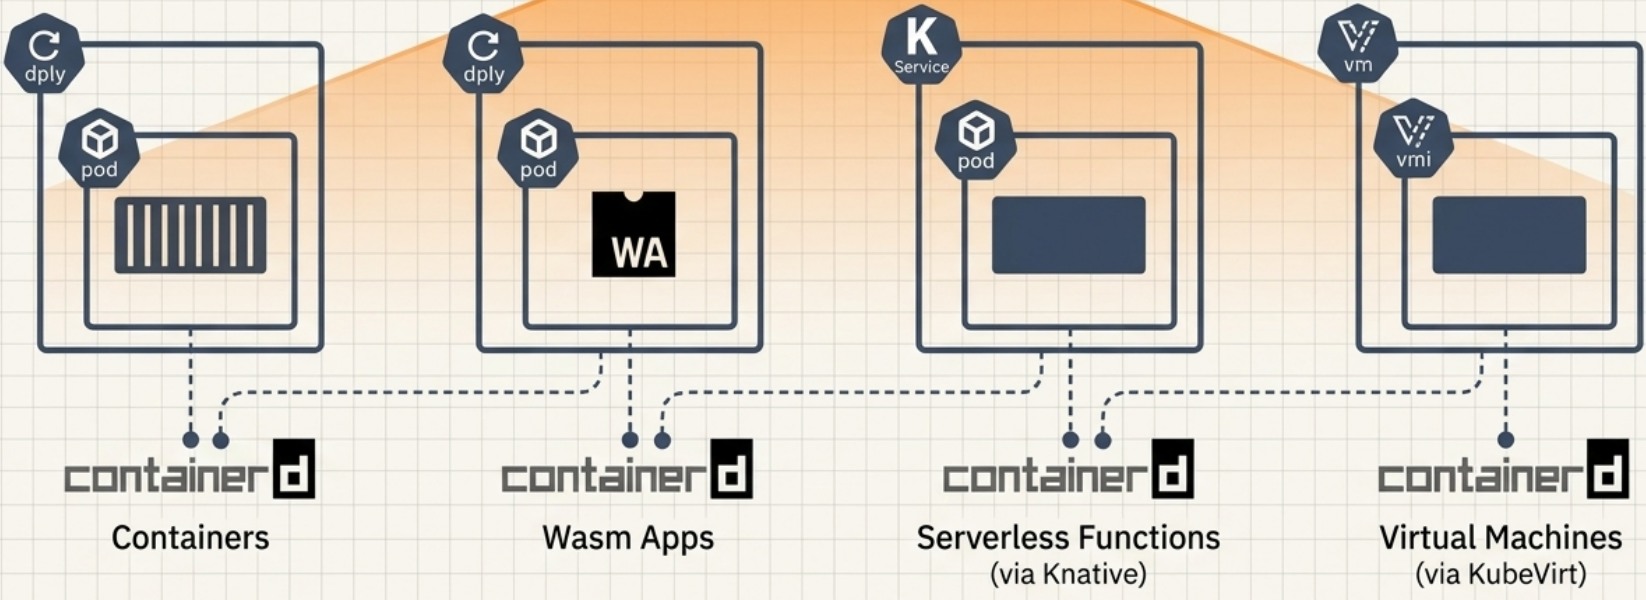
Pods exist as an abstraction layer: Kubernetes does not care what is running inside them. This allows heterogeneous workloads to run side by side on the same cluster and leverage the same declarative API.
Pod Anatomy
Section titled “Pod Anatomy”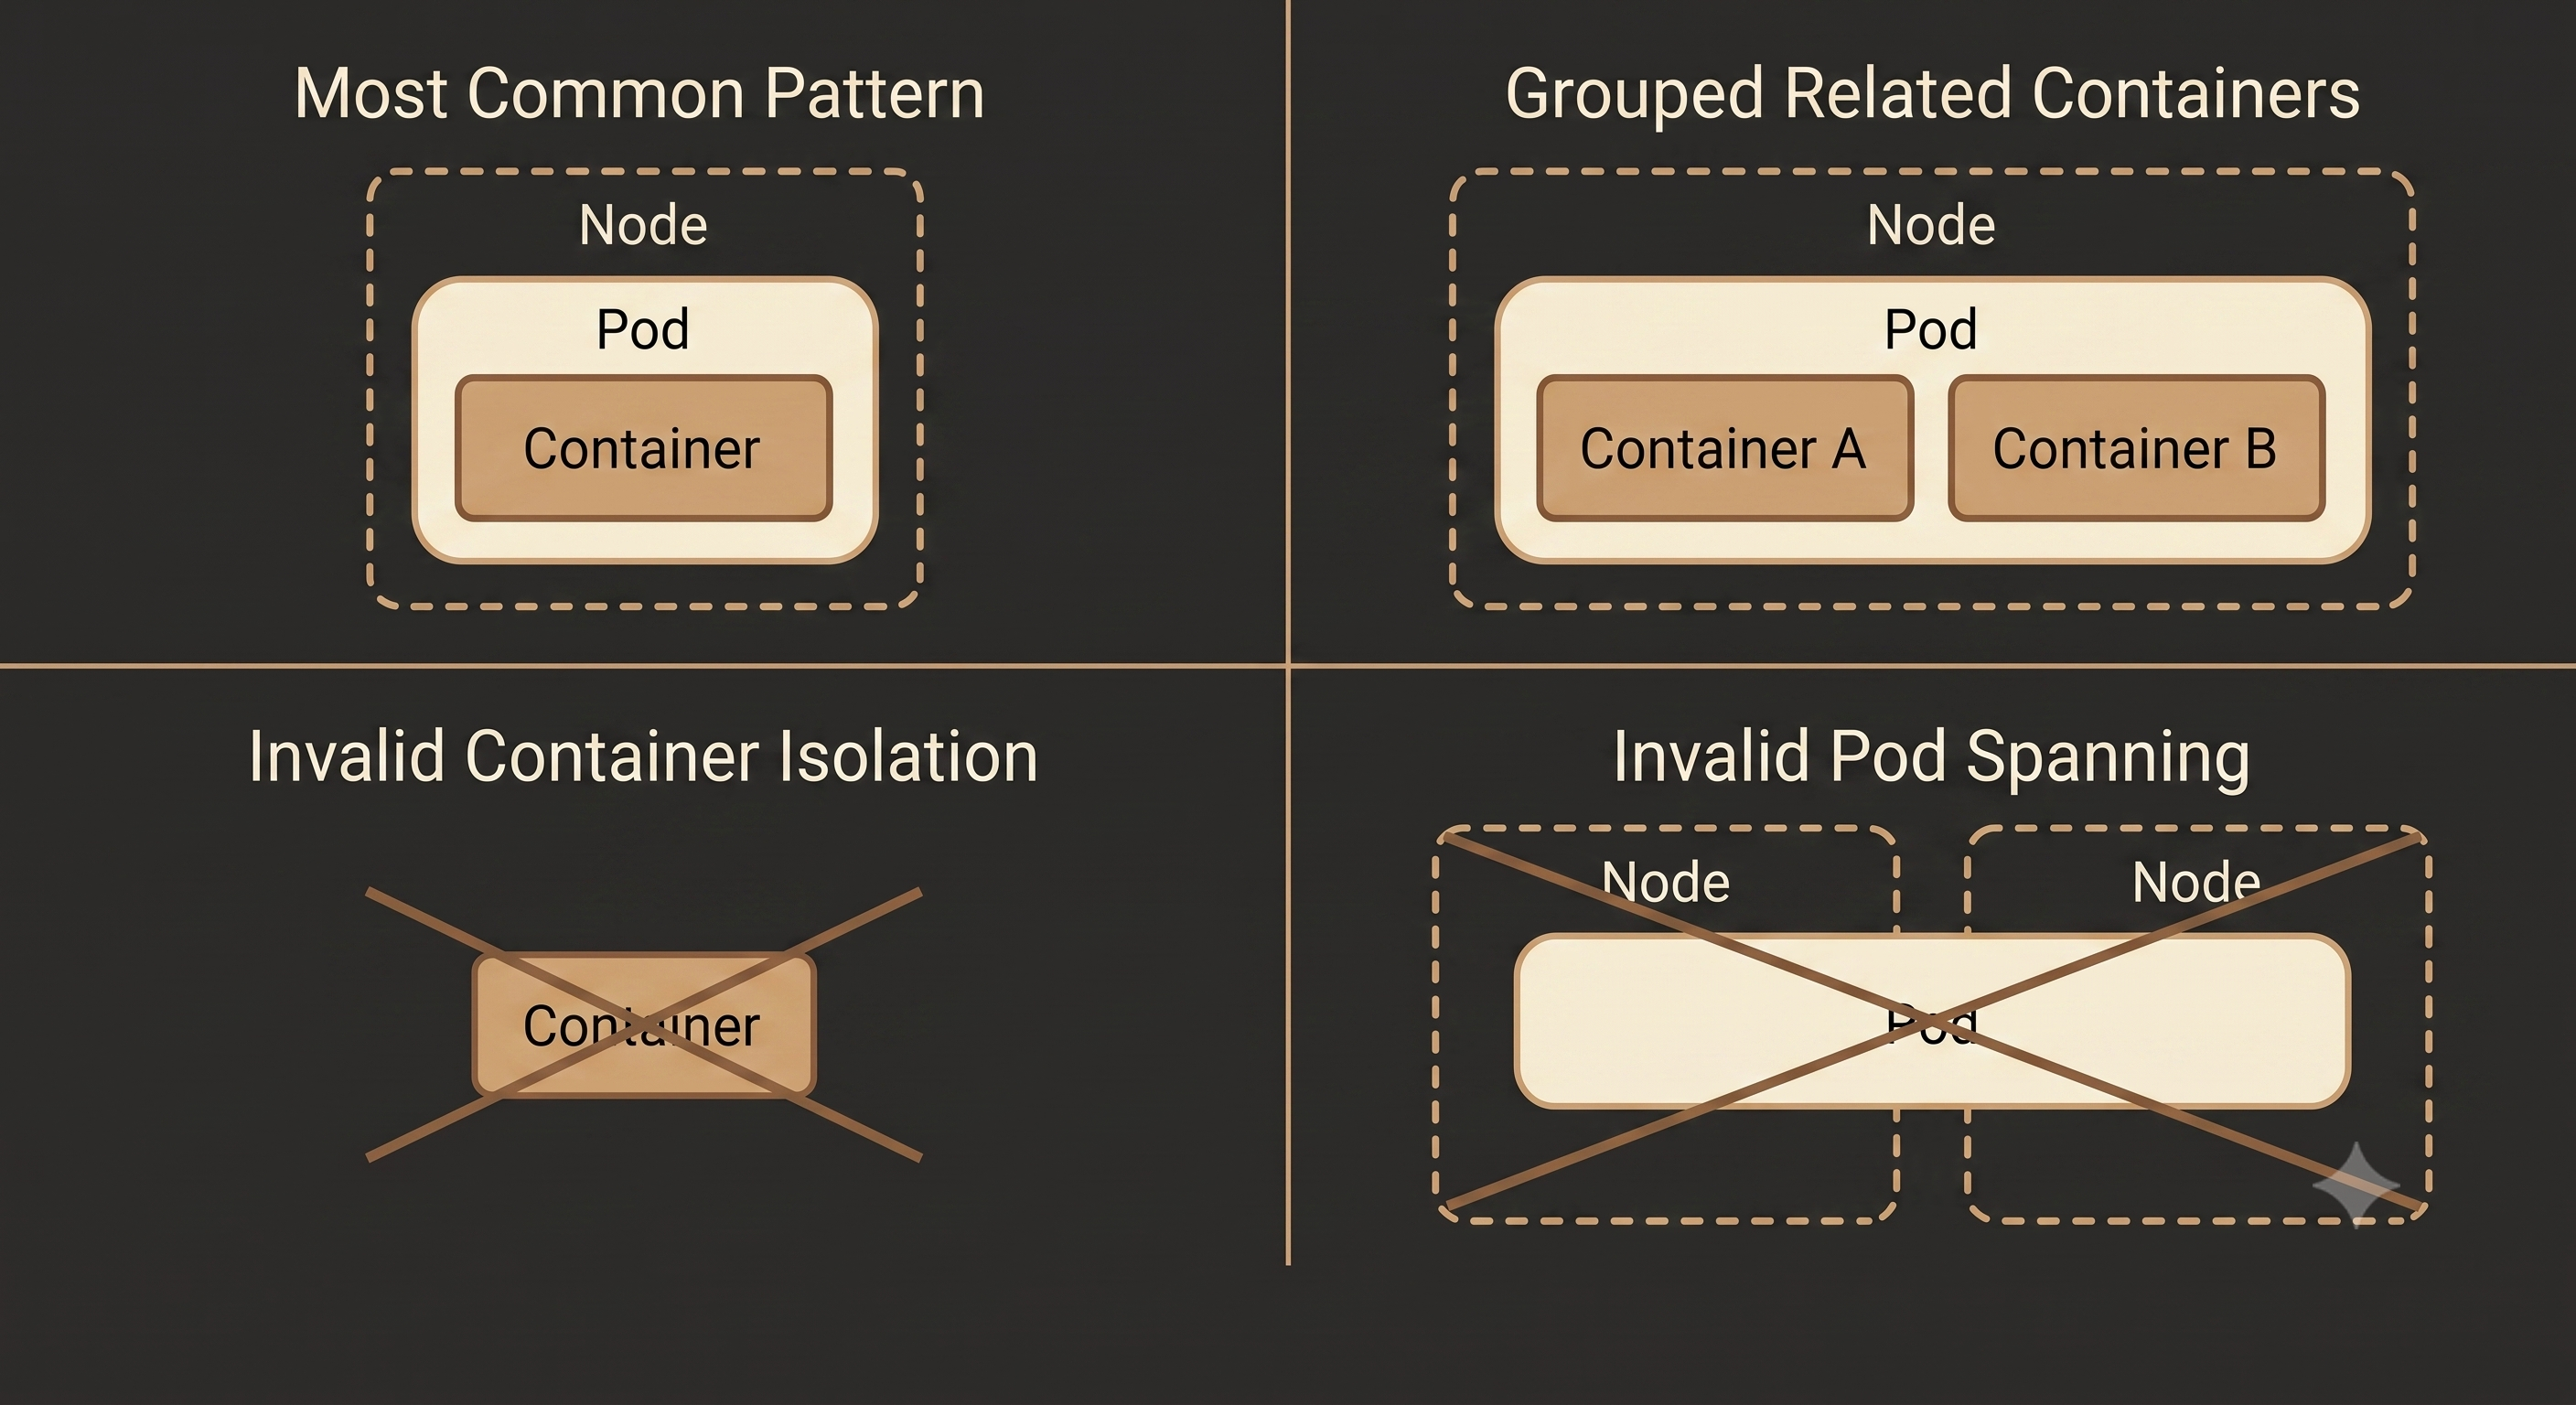
A Pod is not a single container - it is a group of one or more co-located containers managed as a single unit. A single Pod instance never spans multiple nodes; all of its containers always run on the same node.
Beyond containers, Pods add essential operational features to workloads:
- Health probes - liveness, readiness, and startup checks
- Restart policies - controlling what happens when a container exits
- Security policies - at both the pod and container level
- Termination control - graceful shutdown hooks
- Volumes - shared storage accessible to all containers in the pod
Despite these additions, Pods are lightweight and introduce very little overhead.
Minimal Pod Manifest and Deployment Process
Section titled “Minimal Pod Manifest and Deployment Process”apiVersion: v1kind: Podmetadata: name: my-appspec: containers: - name: app image: nginx:1.25 ports: - containerPort: 80kubectl apply -f pod.yaml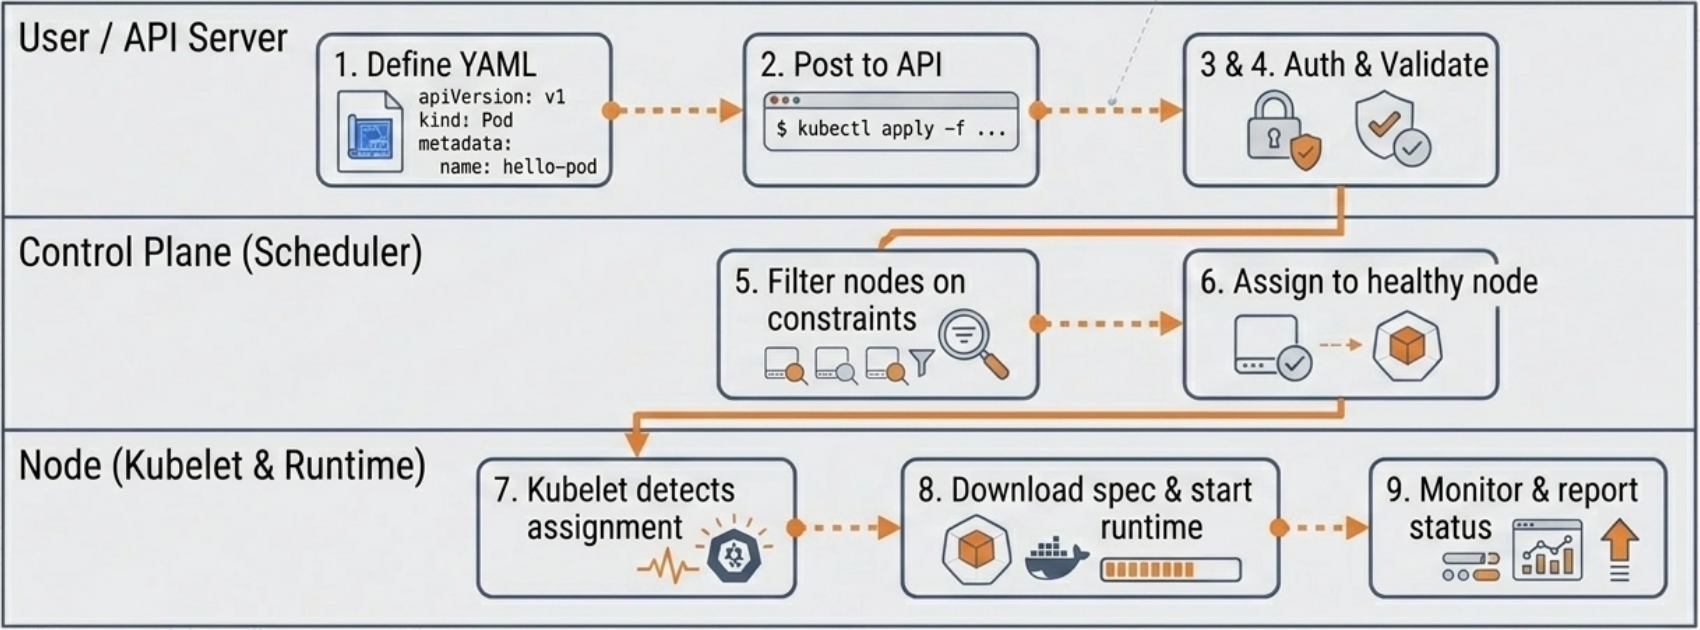
The One Process per Container Rule
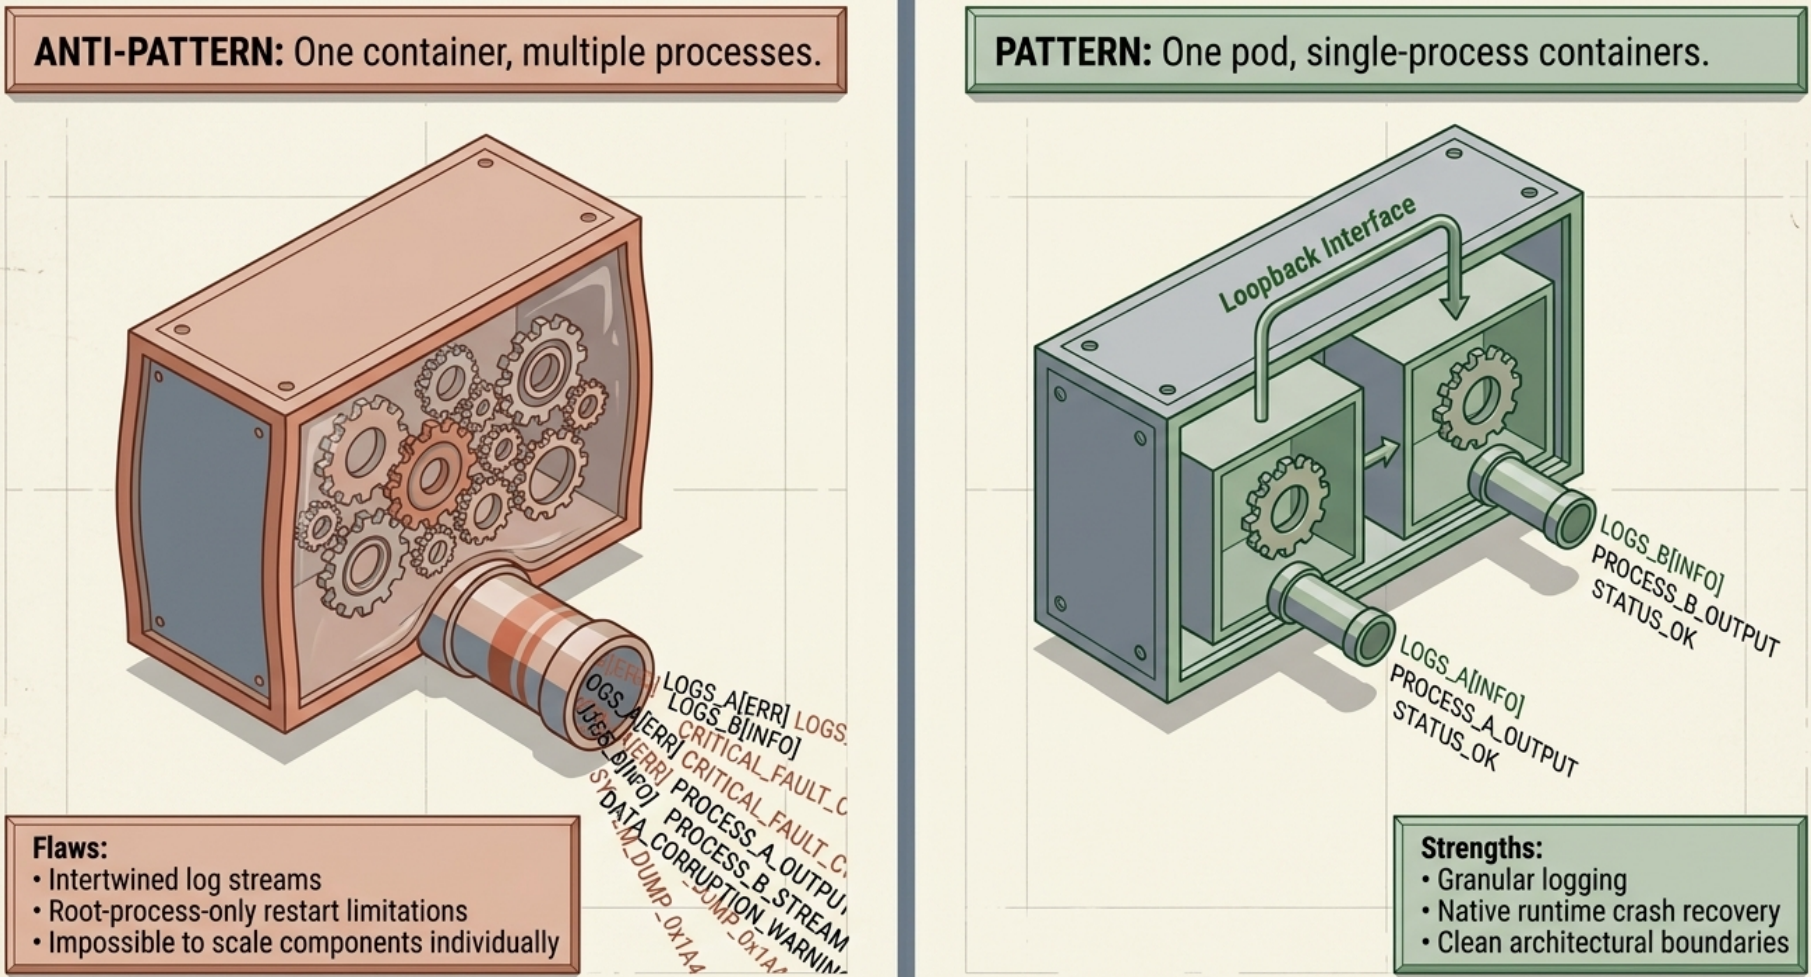
Section titled “The One Process per Container Rule”While it is technically possible to run multiple processes within a single container, it is an anti-pattern. Both containers and Kubernetes are designed around the expectation that each container hosts one primary process.
| Problem | Why it matters |
|---|---|
| Log interleaving | The container runtime captures logs from stdout. Multiple processes mix their output into a single unstructured stream. |
| Process monitoring | The runtime only monitors the root process. If a child process crashes, the runtime does not detect it and will not restart the container. |
Kubernetes solves this by grouping multiple containers into a single Pod, giving them shared resources while keeping their processes isolated.
Shared Execution Environment
Section titled “Shared Execution Environment”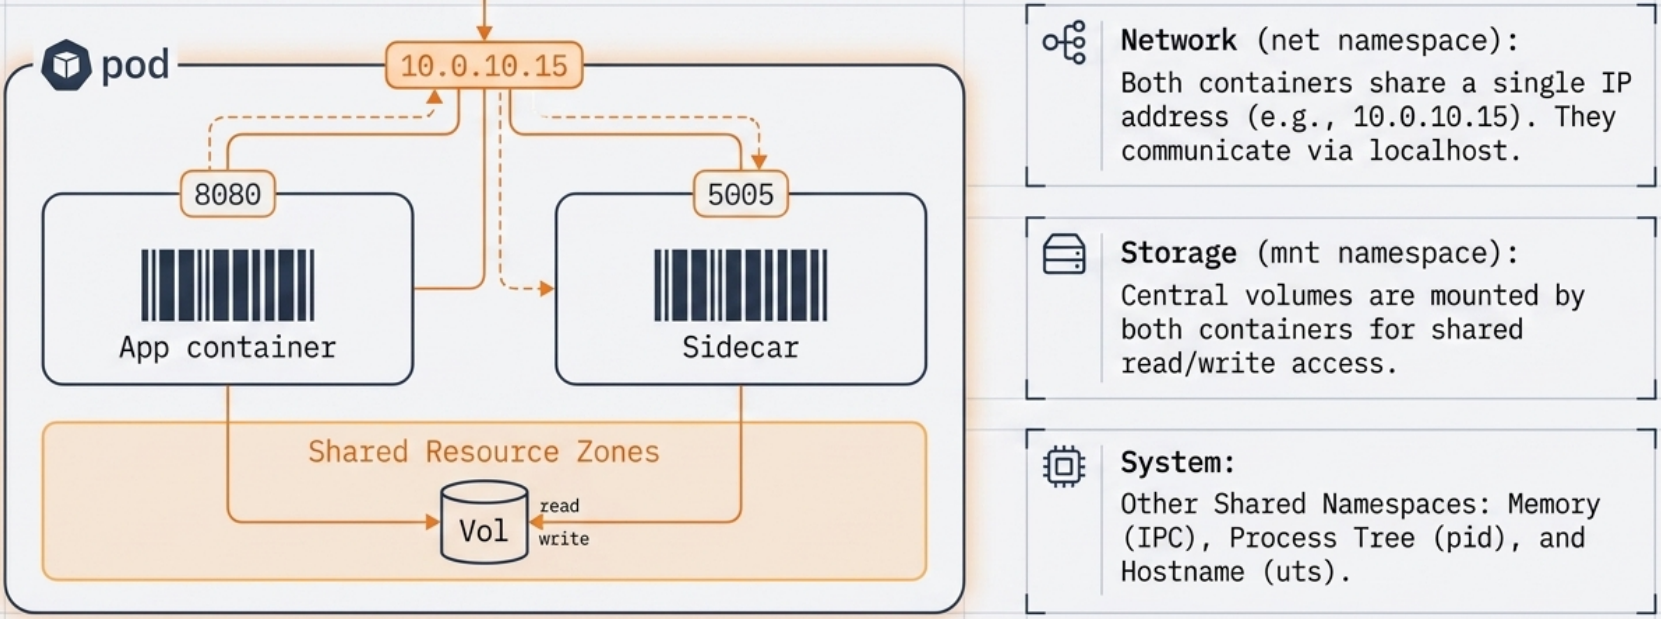
All containers in a Pod share the Pod’s execution environment via Linux namespaces:
| Namespace | Shared resource | Effect |
|---|---|---|
| net | Network stack | All containers share the same IP address and port space; they reach each other via localhost but cannot bind to the same port |
| uts | Hostname | All containers see the same hostname |
| ipc | IPC mechanisms | Containers can communicate via shared memory and semaphores |
| pid | Process tree | Disabled by default; enable with shareProcessNamespace: true to let containers see each other’s processes |
| mnt | Filesystem | Not shared by default - each container has its own isolated filesystem; sharing requires mounting a common Volume |
- How pods are formed - Kubernetes instructs the runtime to have containers join existing namespaces rather than create isolated ones. It is this joining of
net,uts, andipcthat makes containers in a pod appear to run on the same machine. - Inter-pod isolation - Containers in different Pods each get their own independent network namespace. Port numbers can be freely reused across Pods - two Pods can both listen on port 8080 without conflict.
The Pod Network
Section titled “The Pod Network”Every Pod receives a unique IP address that is routable across all nodes in the cluster. This is guaranteed by the cluster’s Pod network - typically a flat Layer-2 overlay that spans every node - implemented via a Container Network Interface (CNI) plugin such as Cilium or Calico.
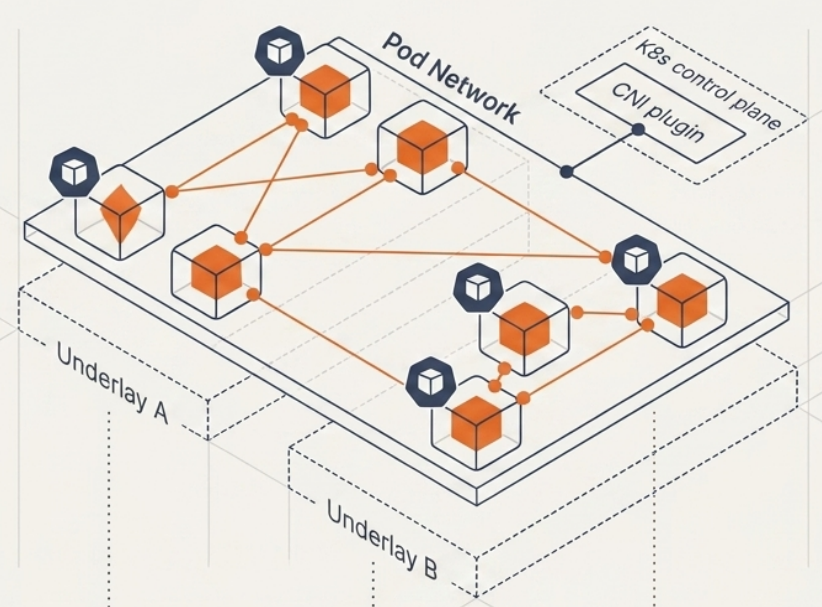
Key properties:
- Pod IP addresses are unique across all nodes and all namespaces in the cluster — two Pods in different namespaces cannot share an IP
- Each node is assigned a dedicated subnet when it joins the cluster; when a Pod is scheduled to that node, its IP is leased from that subnet. This is coordinated by kube-proxy, the cluster DNS service, and the CNI plugin
- Any Pod can reach any other Pod directly by IP, regardless of which node they are on
- Pod IPs are ephemeral — they change whenever a Pod is replaced
- Because Pod networks are often open by default, they should be secured using Network Policies
Static Pods vs. Controller-Managed Pods
Section titled “Static Pods vs. Controller-Managed Pods”There are two ways to run a Pod:
| Method | How | Self-healing | Scaling | Use case |
|---|---|---|---|---|
| Static Pod | Manifest file on a node, managed by kubelet alone | No - dies with the node | No | Control plane components (etcd, api-server, scheduler) |
| Controller-managed | Deployment, StatefulSet, DaemonSet, Job | Yes - controller replaces failed Pods | Yes | All application workloads |
Control plane components (etcd, kube-apiserver, kube-scheduler, kube-controller-manager) run as static Pods by design - they need to exist before the full control plane is operational.
Multi-Container Pods
Section titled “Multi-Container Pods”When to Group Containers
Section titled “When to Group Containers”Use a single Pod only when containers are tightly coupled - they must share resources and cannot function independently. Otherwise, separate them into individual Pods to allow independent scheduling and scaling.
Decision criteria - all answers should be yes before grouping:
- Do they have to run on the same node and form a unified whole?
- Do they have to be scaled together?
- Can a single node meet their combined resource needs?
- Do they genuinely need to share a volume or communicate via localhost?
Why Splitting Matters
Section titled “Why Splitting Matters”| Concern | Same Pod | Separate Pods |
|---|---|---|
| Hardware utilisation | Both containers forced to the same node | Scheduler places them on any available node |
| Independent scaling | Must scale together | Each scaled on its own demand curve |
| Fault isolation | One crash can affect all containers | Failures are contained |
Architecture Decision Matrix
Section titled “Architecture Decision Matrix”| Criteria | Single-Container Pod | Multi-Container (Sidecar) | Multi-Pod Architecture |
|---|---|---|---|
| Scaling | Scales as a single unit | Scales as a single unit | Each pod scales independently |
| Resource match | Combined needs on one node | Combined needs on one node | Distributed across the cluster |
| Lifecycle | Isolated | Tightly coupled | Loosely coupled |
| Network location | Single IP / localhost | Single IP / localhost | Distinct IPs |
| Primary use case | Standard standalone apps | Primary app + augmenting utility | Multi-tier stacks (e.g., web + DB) |
Multi-Container Patterns
Section titled “Multi-Container Patterns”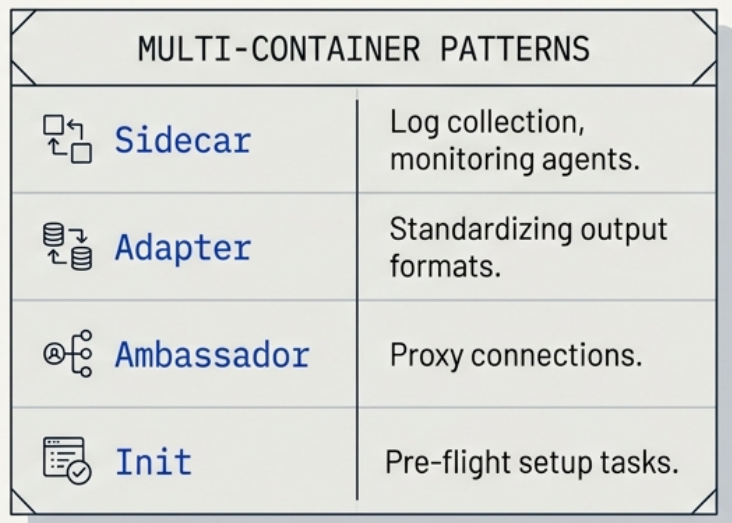
Sidecar Pattern
Section titled “Sidecar Pattern”A sidecar container augments the main application with a complementary, continuously-running service. The sidecar runs alongside the main container for the full lifetime of the Pod.
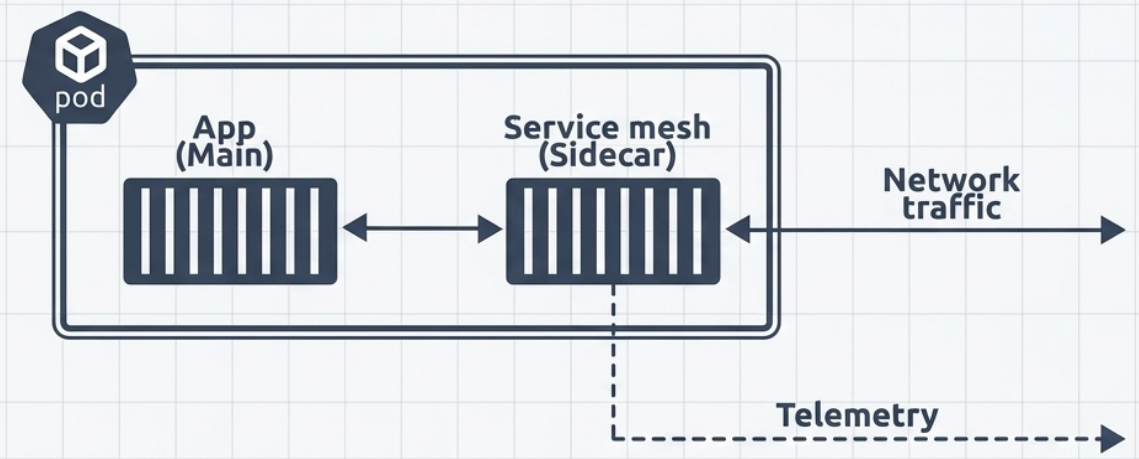
Common sidecars:
| Sidecar type | Role |
|---|---|
| Reverse proxy | An Envoy or nginx sidecar handles TLS termination, forwarding plain HTTP to the main app via localhost |
| Content agent | Continuously syncs files into a shared volume that the main web server reads from |
| Log collector | Scrapes logs from a shared volume or the main container’s stdout and ships them to a central store |
| Service mesh proxy | Intercepts all inbound and outbound network traffic for mTLS, tracing, and traffic shaping |
Adapter Pattern
Section titled “Adapter Pattern”An adapter container transforms the main container’s output into a standardised format. For example, converting a proprietary metrics format to Prometheus exposition format so that a cluster-wide scraper can collect it without modification.
Ambassador Pattern
Section titled “Ambassador Pattern”An ambassador container proxies connections to external services on behalf of the main container. It abstracts the complexity of service discovery, retries, or protocol translation, presenting a simple localhost endpoint to the main app.
Init Containers
Section titled “Init Containers”Init containers run sequentially before any regular containers start. Each must complete successfully before the next begins. Once all init containers have finished, the Pod’s regular containers are launched simultaneously.
spec: initContainers: - name: wait-for-db image: busybox command: ["sh", "-c", "until nc -z postgres 5432; do sleep 2; done"] containers: - name: app image: my-app:latestCommon init container use cases:
| Use case | Example |
|---|---|
| Dependency check | Block startup until a database or external API is reachable |
| File initialisation | Retrieve certificates or seed configuration files onto a shared volume |
| Network configuration | Modify the pod’s network namespace (affects all containers since they share it) |
| One-time data clone | Pull a dataset into a volume before the main app reads it |
Security advantage: Placing sensitive tokens or initialisation tooling in an init container reduces the attack surface. Even if the main application is compromised, the attacker cannot access credentials that existed only during initialisation.
Init containers are defined under initContainers in the pod spec and share the same structure as regular containers. Container names must be unique across both lists.
# View an init container's logs (available even after it completes)kubectl logs <pod-name> -c <init-container-name>Init vs. Native Sidecar: Quick Comparison
Section titled “Init vs. Native Sidecar: Quick Comparison”| Init Container | Native Sidecar Container | |
|---|---|---|
| Primary purpose | Bootstrap and prepare the environment | Augment and enhance the running application |
| Execution timing | Runs and must complete before the main app starts | Starts before the main app, then runs continuously alongside it |
| Lifetime | Exits after completing its task (one-shot) | Runs for the full lifetime of the Pod |
| YAML definition | spec.initContainers (no restartPolicy) | spec.initContainers + restartPolicy: Always |
| Restart behaviour | Restarted on failure (per pod restartPolicy); never restarted after success | Always restarted on exit (regardless of exit code) |
| Liveness probe support | No | Yes |
| Use case examples | Poll DB until ready; one-time Git clone; generate TLS certificates | Service mesh proxy; log shipper; metrics exporter |
Native Sidecar Containers (Kubernetes 1.28+)
Section titled “Native Sidecar Containers (Kubernetes 1.28+)”Standard sidecars defined in containers start after all init containers finish. This creates a gap: if an init container needs the sidecar’s services (e.g., a service mesh proxy for mTLS), the standard model breaks down.
Native sidecars solve this. They are defined in initContainers but with restartPolicy: Always, which signals to Kubernetes that this is a long-running sidecar, not a one-shot init task.
spec: initContainers: - name: proxy # native sidecar image: envoy:latest restartPolicy: Always # this is the key distinction - name: wait-for-db # regular init container (runs after proxy is ready) image: busybox command: ["sh", "-c", "until nc -z postgres 5432; do sleep 2; done"] containers: - name: app image: my-app:latestLifecycle behaviour:
| Phase | Behaviour |
|---|---|
| Startup | Native sidecar starts; Kubernetes does not wait for it to exit - it immediately moves on to the next init container |
| Runtime | Sidecar runs continuously alongside all init and regular containers |
| Shutdown | Regular containers receive SIGTERM first; native sidecars are terminated only after all regular containers have stopped, in reverse order of their initContainers declaration |
Use native sidecars when the sidecar’s services are required for the pod to work at all, or when init containers need to use those services. If the sidecar only needs to run alongside the main app, a regular container entry is sufficient.
Ephemeral Containers
Section titled “Ephemeral Containers”Production images are intentionally minimal - no shell, no debugging tools. Ephemeral containers allow you to attach a temporary debug container to a running Pod without rebuilding or restarting it.
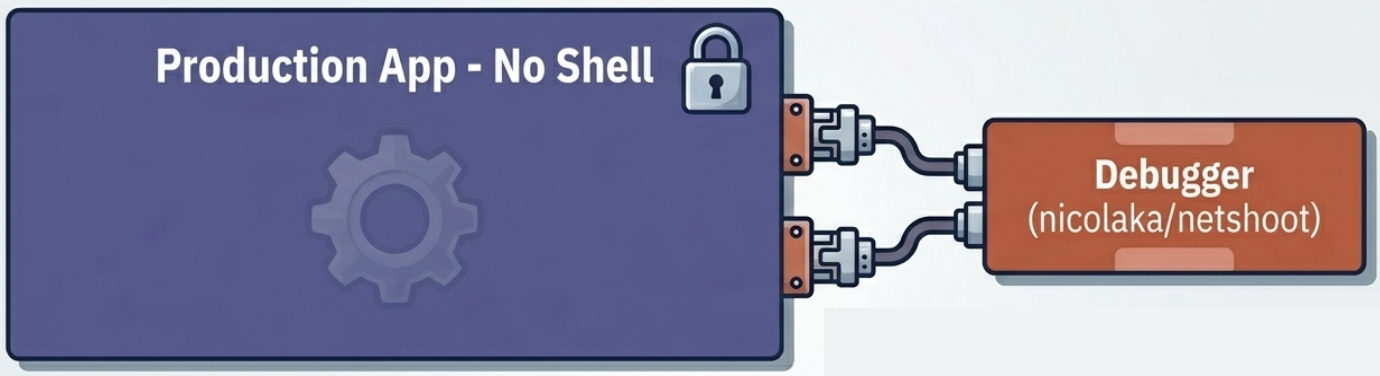
# Attach a netshoot debug container to a running podkubectl debug <pod-name> -it --image=nicolaka/netshoot
# Share the main container's process namespace for process-level debugging# (requires shareProcessNamespace: true in the pod spec)kubectl debug <pod-name> -it --image=nicolaka/netshoot --target=<main-container-name>
Ephemeral containers cannot be reconfigured or removed once added. They terminate when you exit the shell session.
Sharing the process namespace for debugging
By default every container in a pod has its own PID namespace — an ephemeral debug container sees only its own processes and cannot inspect those of other containers. To debug cross-container process issues, enable a shared PID namespace:
spec: shareProcessNamespace: true # all containers share a single process tree containers: ...With this set, running ps aux inside the debug container shows all processes from every container in the pod, including the pause container (PID 1) — a no-op infrastructure process that holds the pod’s shared namespaces alive even when no other containers are running. The --target flag in kubectl debug is a lighter alternative that shares only the target container’s namespace without requiring the pod spec change.
kubectl debug has two additional modes beyond ephemeral containers:
- Pod copy with swapped image — creates a copy of a pod with one or more container images replaced, useful when you need a debug build of your app without modifying the original pod:
Terminal window kubectl debug <pod-name> -it --copy-to=debug-pod --set-image=app=my-app:debug - Node debugging — runs a privileged pod on a specific node inside the node’s own network and host namespaces, giving full access to the node’s processes and filesystem:
Terminal window kubectl debug node/<node-name> -it --image=nicolaka/netshoot
Pod Lifecycle
Section titled “Pod Lifecycle”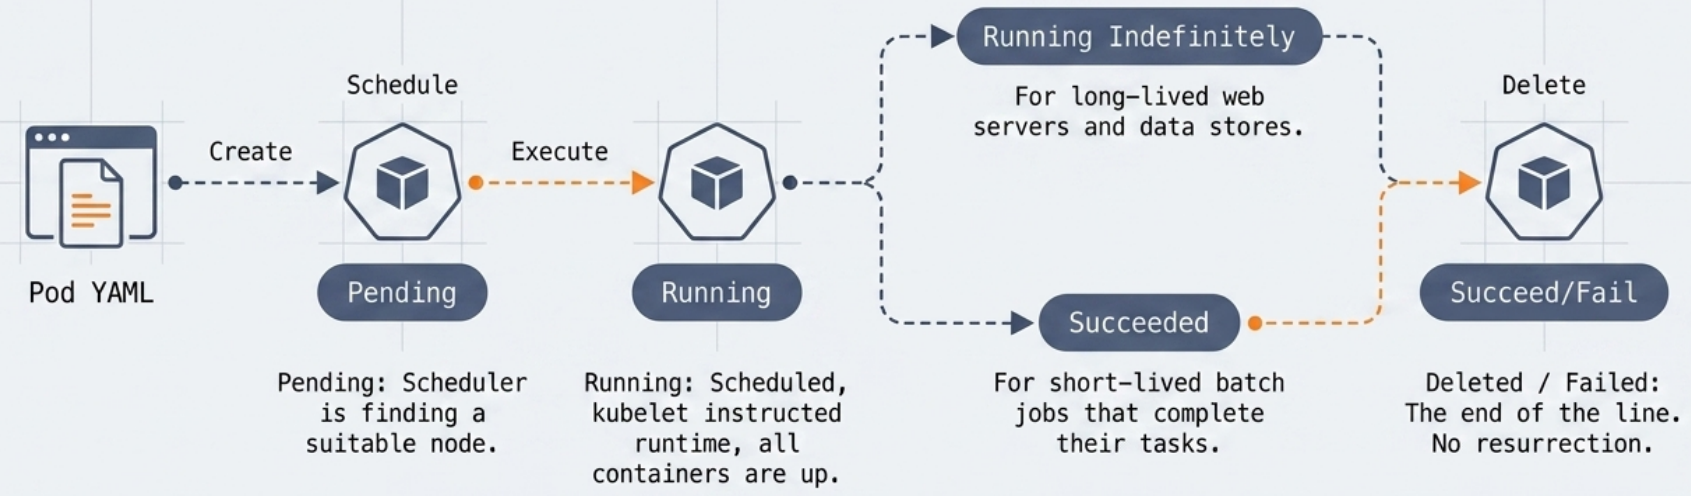
Deployment is Atomic
Section titled “Deployment is Atomic”Starting a Pod is an atomic operation. Kubernetes only marks a Pod as ready once every container inside it is running. No traffic is routed to it until then.
Lifecycle Phases
Section titled “Lifecycle Phases”
Pods transition through well-defined phases:
| Phase | Meaning |
|---|---|
| Pending | The Pod has been accepted by the API server but images have not yet been pulled and containers have not started |
| Running | At least one container is starting, running, or restarting |
| Succeeded | All containers have terminated successfully (exit code 0) |
| Failed | All containers have terminated, and at least one exited with an error |
| Unknown | The node is unreachable and the state cannot be determined |
Pod Conditions
Section titled “Pod Conditions”While the phase gives a high-level summary, conditions provide granular insight into a pod’s readiness and initialization. A pod holds multiple conditions simultaneously; each evaluates to True, False, or Unknown:
| Condition | Meaning | Persists? |
|---|---|---|
| PodScheduled | The pod has been assigned to a worker node | Yes - remains True once fulfilled |
| Initialized | All init containers have completed successfully | Yes - remains True once fulfilled |
| ContainersReady | All individual containers are reporting ready | Can fluctuate |
| Ready | The pod is fully ready to serve traffic (all containers + readiness gates) | Can fluctuate |
When a condition is False, inspect status.conditions in the pod’s JSON for a reason (machine-facing short string) and message (human-readable detail):
kubectl get pod <name> -o json | jq '.status.conditions'Container States
Section titled “Container States”Kubernetes tracks each container independently via status.containerStatuses and status.initContainerStatuses. Each container can be in one of four states:
| State | Meaning |
|---|---|
| Waiting | Container is not yet running. The reason field explains why - e.g., CrashLoopBackOff, ContainerCreating, ImagePullBackOff |
| Running | Container processes are active. Includes a startedAt timestamp |
| Terminated | Processes have stopped. Includes startedAt, finishedAt, and exitCode (0 = success, non-zero = error/crash) |
| Unknown | State could not be determined |
Kubernetes also maintains a lastState field on each container status, preserving the previous container instance’s state - critical for diagnosing why a container crashed before a restart replaced it.
Mortal and Immutable
Section titled “Mortal and Immutable”Pods have two fundamental design properties:
- Mortal - Pods cannot be restarted once they fail or are deleted. A controller will replace a failed Pod with a new one (new UID, new IP), but it never resurrects the original.
- Immutable - A Pod’s configuration cannot be changed once it is running. To apply a change, delete the old Pod and deploy a new one with the updated spec.
Restart Policies
Section titled “Restart Policies”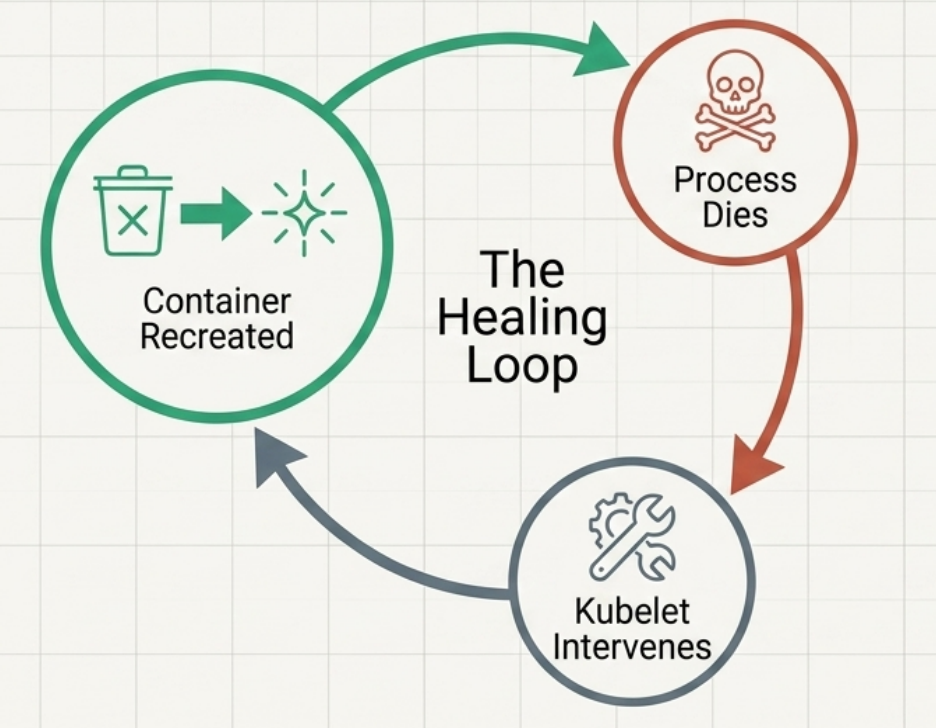
Kubernetes never restarts Pods. It can, however, restart individual containers within a Pod. Container restarts are managed by the local kubelet and governed by the pod-wide spec.restartPolicy:
| Policy | Behaviour | Typical use |
|---|---|---|
| Always | Restarts after any termination (default) | Long-running workloads: web servers, databases, APIs |
| OnFailure | Restarts only on non-zero exit code | Batch jobs, one-off tasks |
| Never | Never restarts, regardless of exit reason | Auditable, fire-and-forget tasks |
Exponential Back-off
Section titled “Exponential Back-off”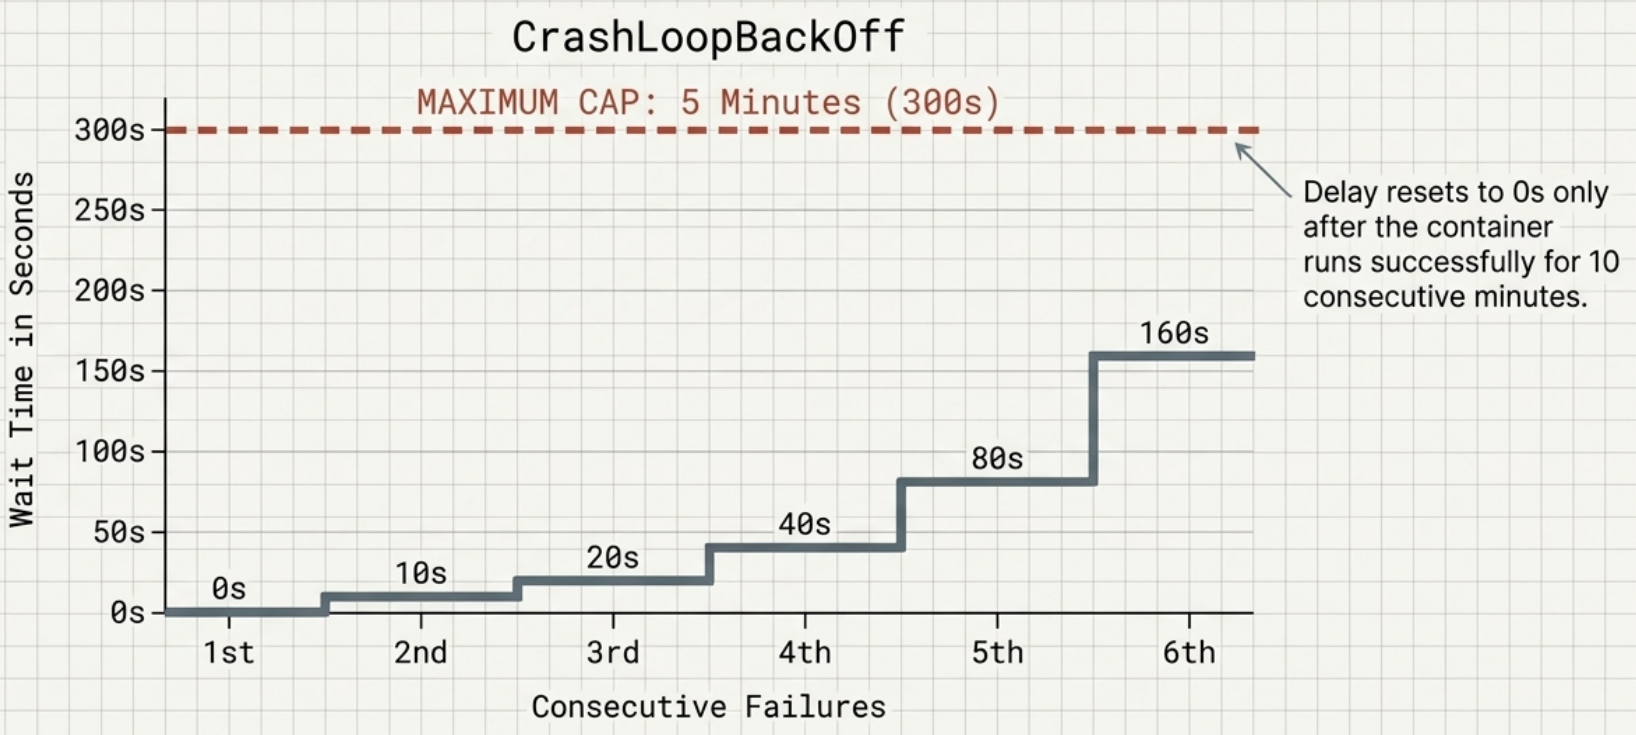
To prevent a failing container from consuming resources in a tight restart loop, Kubernetes introduces a progressively longer delay before each restart:
| Failure count | Delay before restart |
|---|---|
| 1st | Immediate |
| 2nd | 10 seconds |
| 3rd | 20 seconds |
| 4th | 40 seconds |
| 5th+ | Doubles each time, capped at 5 minutes |
While waiting to be restarted, the container’s state is Waiting with a reason of CrashLoopBackOff. Once a container runs successfully for 10 minutes without crashing, the back-off delay resets to zero.
Health Probes
Section titled “Health Probes”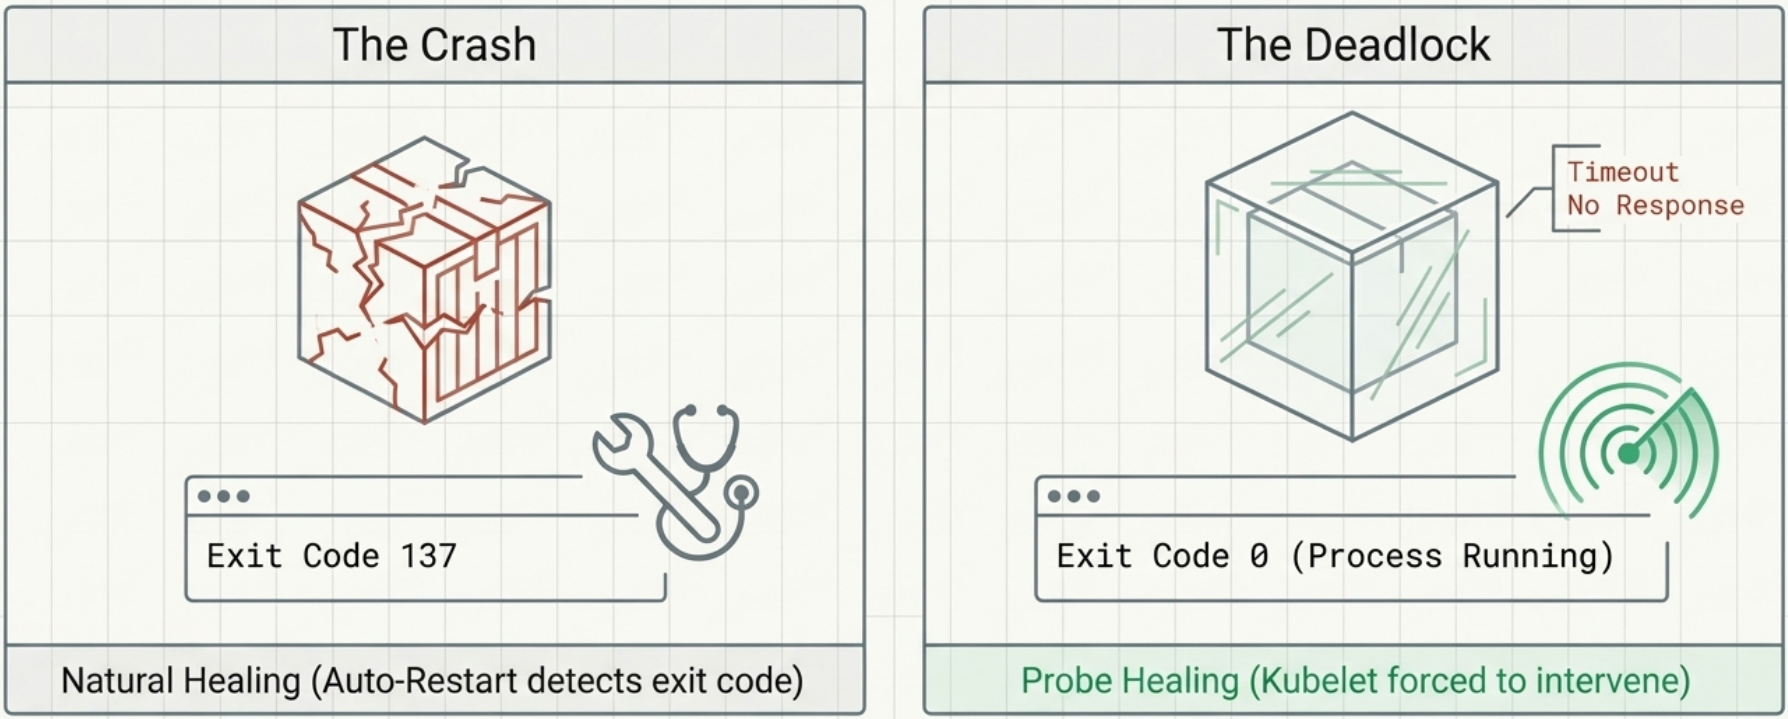
Kubernetes uses probes to detect application failures that the runtime cannot observe on its own (e.g., deadlocks, where the process is running but no longer responsive). Three probe types are available:
| Probe | Purpose | On failure |
|---|---|---|
| Liveness | Is the application still healthy and responsive? | Container is terminated and restarted |
| Readiness | Is the application ready to accept traffic? | Pod is removed from Service endpoints (not restarted) |
| Startup | Has the application finished initialising? | Container is terminated if threshold is exceeded; liveness probe is blocked until this succeeds |
Probe Mechanisms
Section titled “Probe Mechanisms”All three probe types share the same three mechanisms:
| Mechanism | How it works | Best for |
|---|---|---|
httpGet | Sends an HTTP GET to a specified port and path. 2xx/3xx = success; anything else or timeout = failure | Web applications with a health endpoint |
tcpSocket | Attempts to open a TCP connection on a specified port | Non-HTTP services (databases, message queues) |
exec | Runs a command inside the container. Exit code 0 = success | Custom health checks; avoid for JVM apps (spawns a new process) |
Common Configuration Parameters
Section titled “Common Configuration Parameters”All three probe types share the same timing parameters:
# HTTP endpoint checklivenessProbe:  httpGet:    path: /healthz    port: 8080  initialDelaySeconds: 15 # wait before first probe  periodSeconds: 10        # how often to probe  timeoutSeconds: 1        # how long to wait for a response  failureThreshold: 3      # consecutive failures before acting
# TCP connection check (non-HTTP services)livenessProbe:  tcpSocket:    port: 5432  initialDelaySeconds: 10  periodSeconds: 15
# Command execution checklivenessProbe:  exec:    command:      - /bin/sh      - -c      - cat /tmp/healthy  initialDelaySeconds: 5  periodSeconds: 10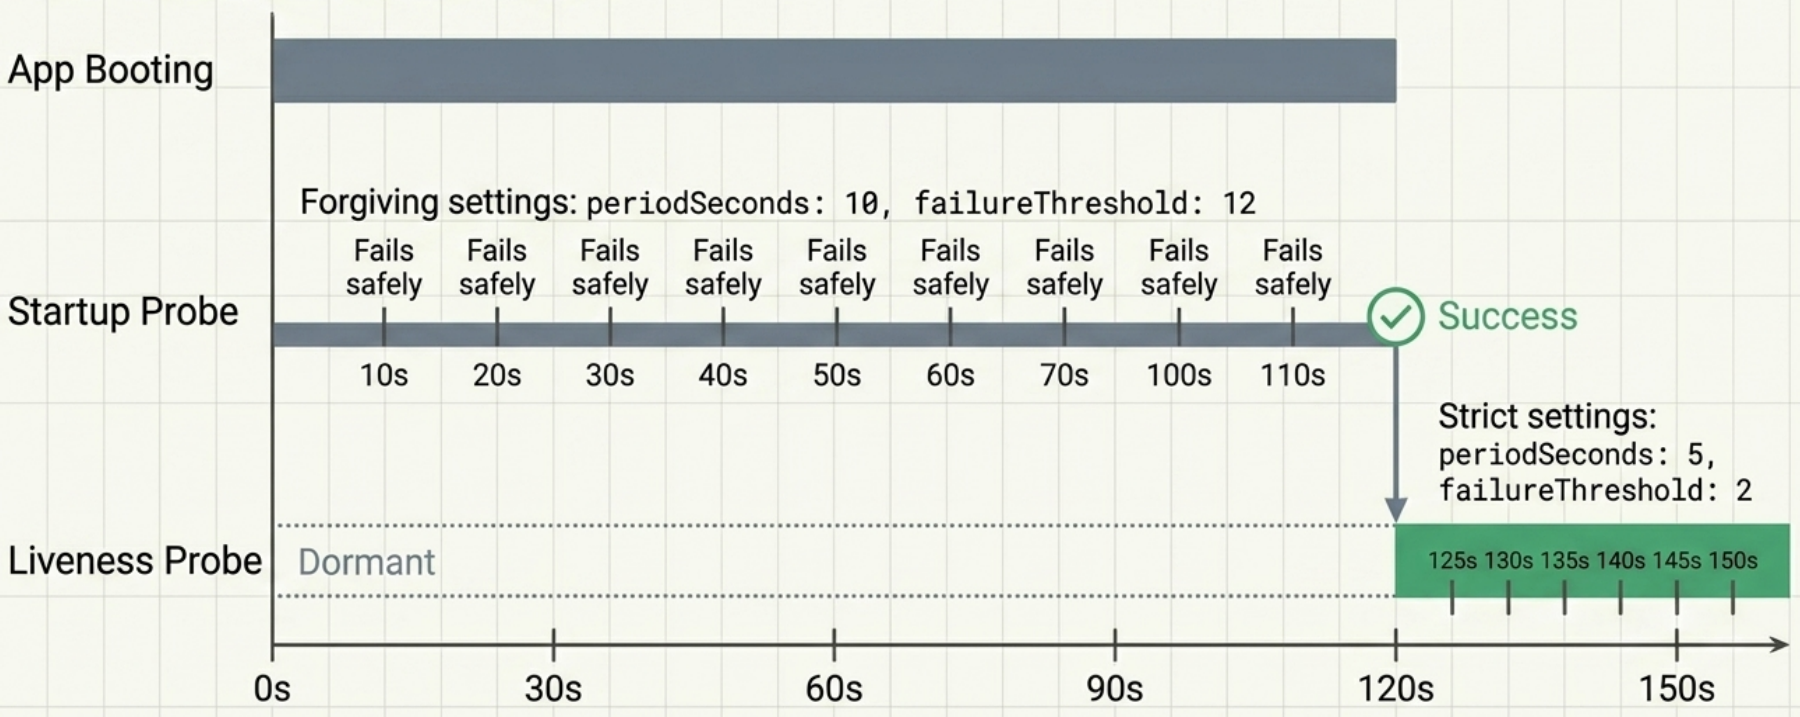
Liveness Probes
Section titled “Liveness Probes”A liveness probe detects applications that are alive but internally broken - deadlocks, memory leaks, infinite loops. The process has not crashed, so Kubernetes has no other way to know it is unhealthy.
Best practices:
- Dedicate an unauthenticated health endpoint (
/healthz) — ensure the endpoint does not require authentication (e.g., HTTP 401/403), or the probe will consistently fail and trigger continuous restart loops. - Simple checks are better than none — even probing a root endpoint (
/) for a basic HTTP response prevents a container from hanging indefinitely in a deadlocked state. - Never fail on external dependencies — if a probe fails because a downstream database or API is unreachable, restarting the local container will not resolve the issue and will cause cascading failures across the cluster.
- Caution with poorly written probes — a buggy probe that reports failure on healthy workloads causes unnecessary restarts. If an application naturally self-terminates when unhealthy, it may be safer to omit a liveness probe entirely.
- Keep it lightweight — probe execution overhead counts against the container’s CPU and memory resource quota. Avoid resource-heavy checks (e.g., running
execscripts on JVM applications). - Use
failureThresholdfor retries — rely on native Kubernetes retry thresholds instead of implementing custom retry loops inside your health handler. - Container scope — liveness probes only apply to regular containers, not init containers.
Startup Probes
Section titled “Startup Probes”A startup probe addresses the conflict between slow-starting applications and responsive liveness probes. Without a startup probe, a liveness probe tuned for steady-state operation would kill a slow-starting app before it is ready.
How it works:
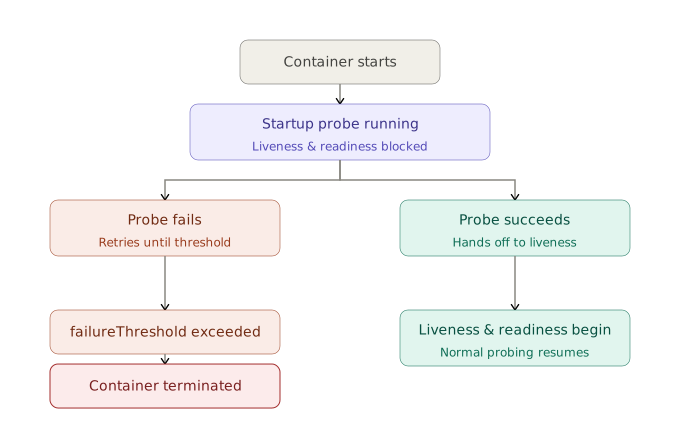
- When a container starts, only the startup probe runs - liveness and readiness are blocked
- Failures during startup are expected and do not cause immediate action
- Once the startup probe succeeds, it stops and hands off to the liveness probe
- If the startup probe exceeds its
failureThreshold, the container is terminated
Size the startup window using: maximum startup time = periodSeconds × failureThreshold
startupProbe: httpGet: path: /healthz port: 8080 periodSeconds: 10 failureThreshold: 12 # gives 120 seconds to startlivenessProbe: httpGet: path: /healthz port: 8080 periodSeconds: 10 failureThreshold: 3 # fast reaction once runningReadiness Probes
Section titled “Readiness Probes”A readiness probe controls whether a Pod receives traffic from a Service. A failed readiness probe removes the Pod from the Service’s endpoint list until it recovers - the container is not restarted. Use readiness probes when an application needs time to warm up after starting or may temporarily become unable to serve requests (e.g., a circuit breaker is open, or a cache is loading).
Lifecycle Hooks
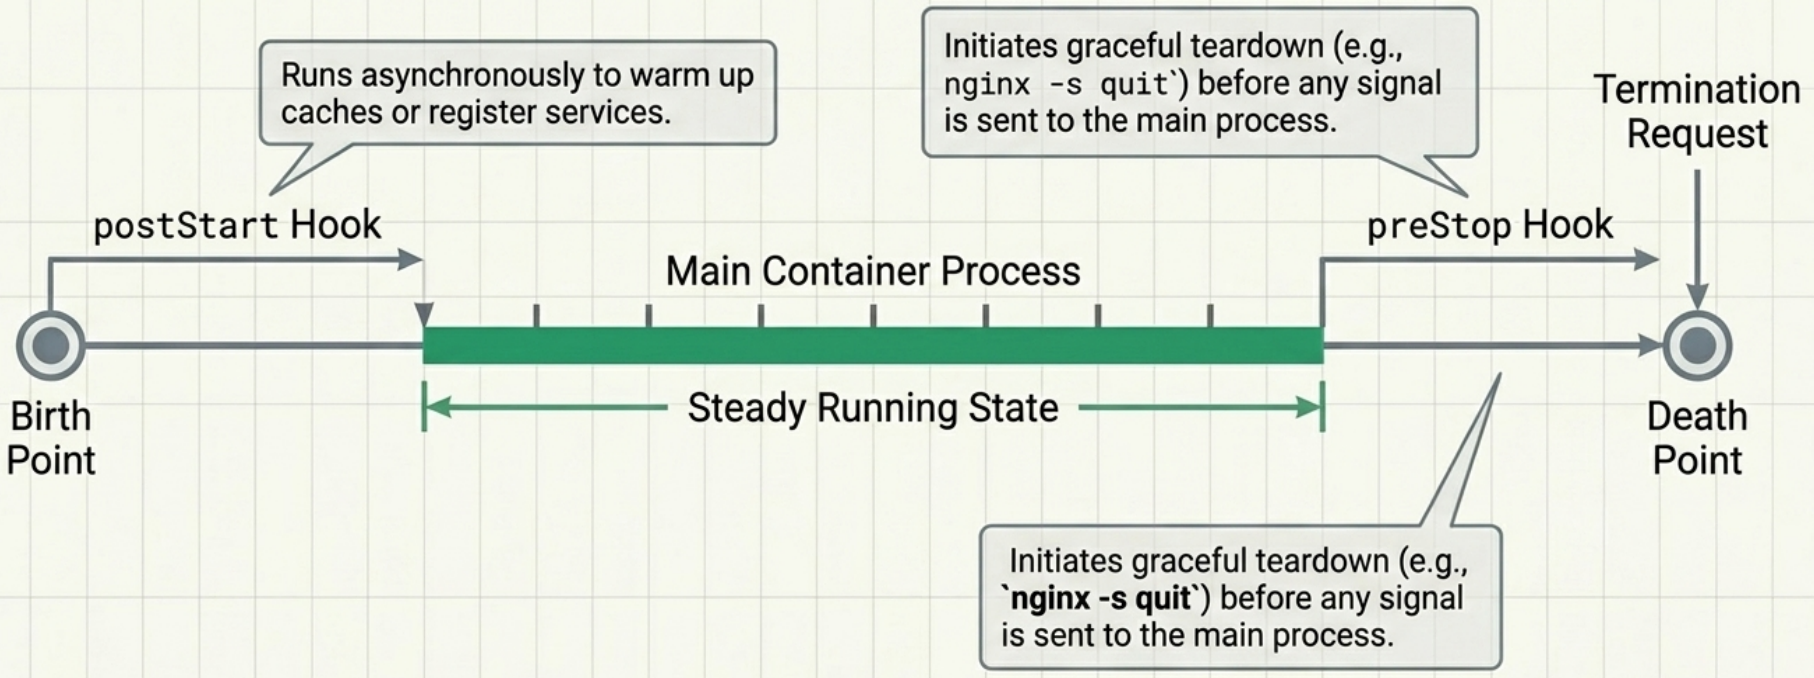
Section titled “Lifecycle Hooks”Lifecycle hooks let you run a command or send an HTTP request at two specific points in a container’s life. Unlike init containers (which are pod-level), hooks are defined per-container and support exec and httpGet handlers - not tcpSocket.
| Hook | When it runs | Typical use |
|---|---|---|
| Post-start | Immediately after the container is created | Warm-up, registration with a discovery service |
| Pre-stop | Before the container receives SIGTERM | Graceful drain, deregistration, cleanup |
Post-Start Hook
Section titled “Post-Start Hook”spec: containers: - name: app image: my-app:latest lifecycle: postStart: exec: command: ["/bin/sh", "-c", "register-with-discovery.sh"]Behaviour:
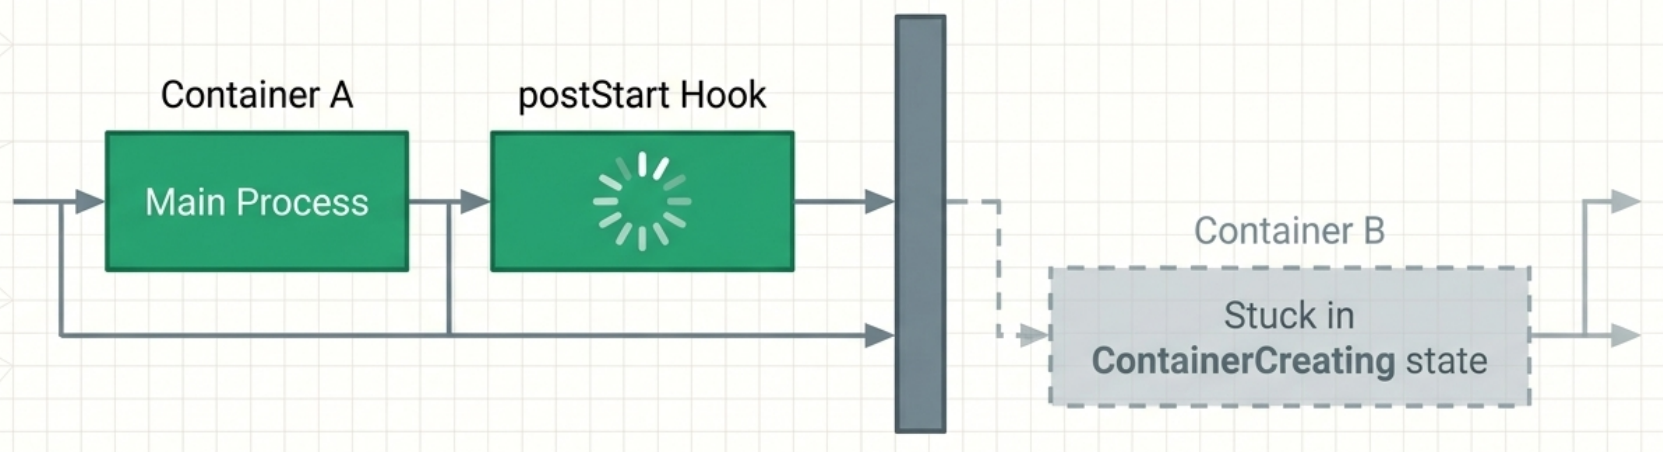
- Runs concurrently with the container’s main process - not after it has fully started
- The container stays in
Waiting / ContainerCreatinguntil the hook completes; logs and port-forwards are unavailable during this time - If the hook fails (non-zero exit code), the container is restarted and a
FailedPostStartHookevent is recorded - Because the kubelet starts containers sequentially, a long post-start hook delays the startup of subsequent containers in the same pod
Pre-Stop Hook
Section titled “Pre-Stop Hook”spec: containers: - name: app image: nginx:latest lifecycle: preStop: exec: command: [ "/bin/sh", "-c", "nginx -s quit; while killall -0 nginx; do sleep 1; done", ]Behaviour:
- Invoked before SIGTERM is sent - the container gets a chance to drain in-flight requests
- If the hook fails, it is ignored and termination continues; a
FailedPreStopHookevent is logged - Does not block other containers in the pod from terminating in parallel
sleep handler (Kubernetes v1.29+)
Kubernetes v1.29 introduced a sleep handler type for lifecycle hooks, a simpler alternative to running a shell sleep command via exec. It is most commonly used in a preStop hook to introduce a short delay before SIGTERM, giving load balancers and service meshes time to deregister the pod before it stops accepting traffic:
lifecycle: preStop: sleep: seconds: 5 # pause for 5 seconds before SIGTERM is sentCommon pitfall - the SIGTERM shell problem: Applications often appear not to respond to SIGTERM because their Dockerfile uses the shell form of ENTRYPOINT (e.g., ENTRYPOINT /myapp). This runs a shell as PID 1, which absorbs SIGTERM without forwarding it to the child process. The fix is the exec form (ENTRYPOINT ["/myapp"]), not a pre-stop hook.
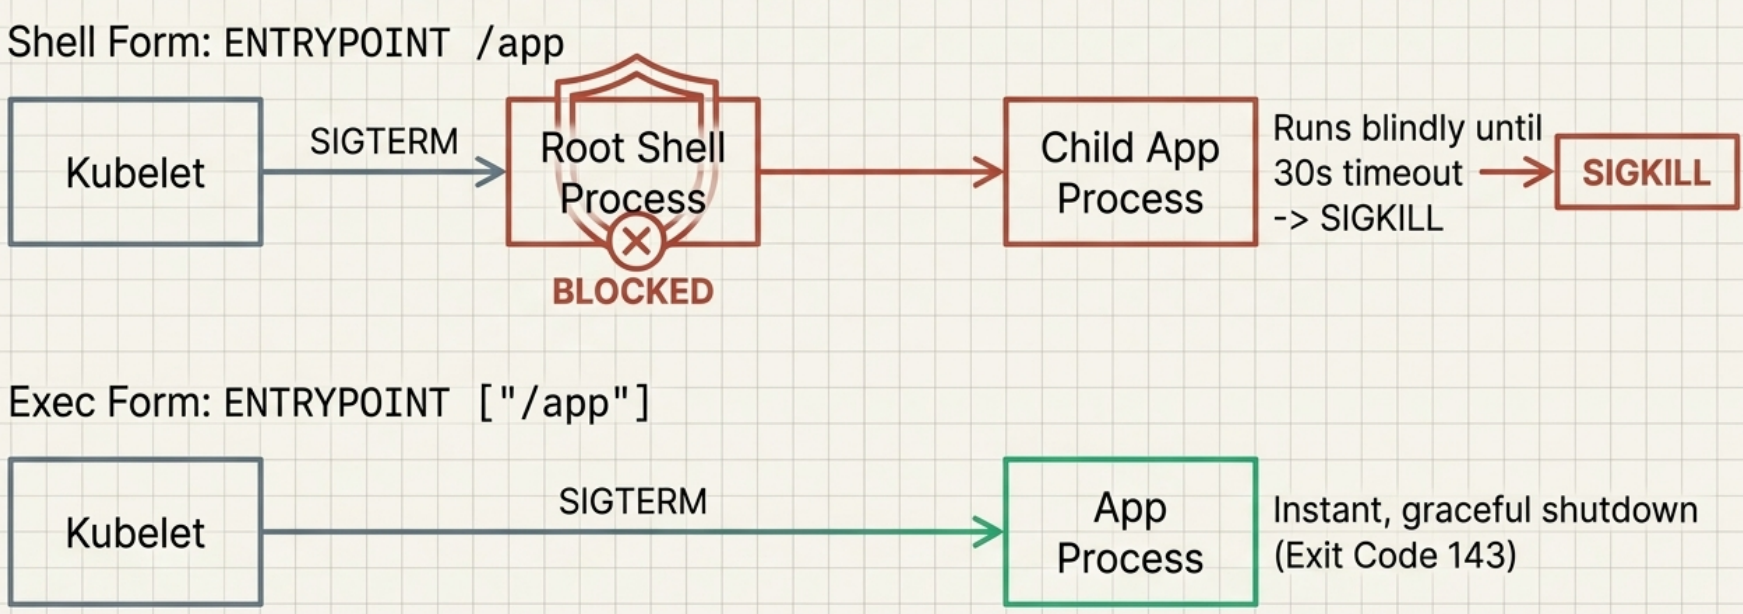
Image Pull Policy
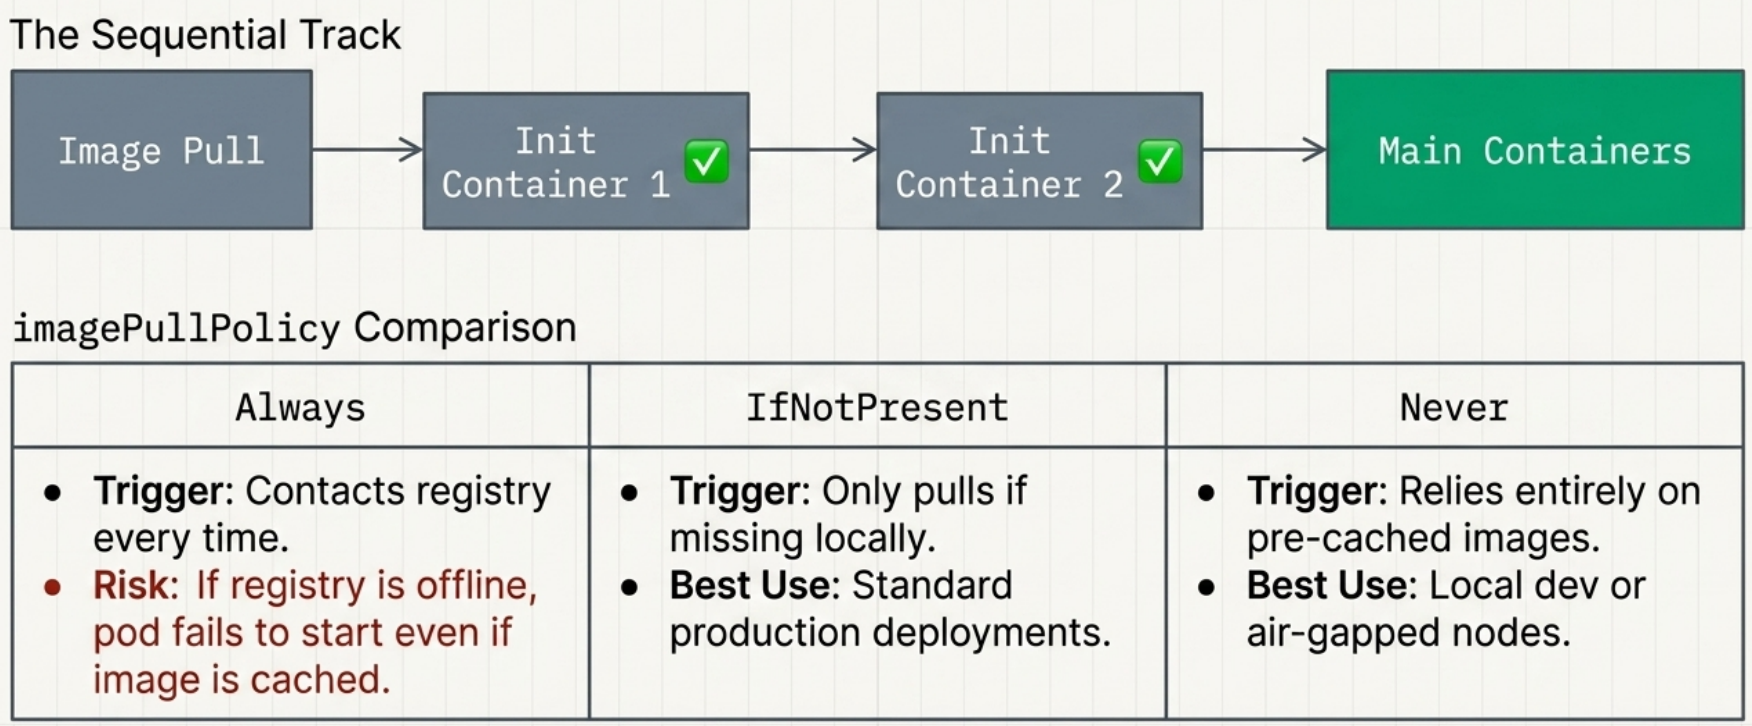
Section titled “Image Pull Policy”imagePullPolicy is a per-container field in the pod spec that controls when Kubernetes pulls a container image from the registry:
| Policy | Behaviour |
|---|---|
Always | Image is pulled on every container start or restart. If the locally cached image matches the registry digest, the image is not re-downloaded, but the registry must be reachable to verify it |
IfNotPresent | Image is pulled only if not already present on the node. Subsequent starts use the local cache without contacting the registry |
Never | Image is never pulled. The image must already exist on the node (pre-pulled or built locally). Fails if not present |
| Not specified | Defaults to Always when the image tag is :latest; defaults to IfNotPresent for all other tags |
The policy applies not only to the initial start but also to every container restart including restarts triggered by liveness probe failures or crashes.
When is an image actually re-pulled?
Even with the same image tag (e.g. my-app:1.2.3), a re-pull may occur:
- Digest mismatch: The registryDigest is different, even if the tag is identical (e.g. you re-pushed
my-app:1.2.3with new content) - Orphaned layers: A node’s image storage is full, and the kubelet deletes a layer needed for that image, forcing a re-pull on next use
- Image GC pressure: Cluster-level image garbage collection frees layers, potentially requiring a re-pull on restart
- Node storage constraints: Low disk space on the node may trigger cleanup that invalidates the local cache
Why Always is still recommended:
- Guarantees latest image on restart — crucial for security patches and bug fixes
- Catches corrupted layers or storage-related image degradation
- Simplifies CI/CD — push and forget, the cluster handles updates automatically
IfNotPresentcan lead to subtle bugs where stale images persist across redeploys
For air-gapped or offline clusters, use a private registry and configure image pre-pulling rather than relying on Never or unreliable caching.
Interaction with init containers:
- Init container images are pulled sequentially, just before each init container starts
- If an init container fails and is restarted, its image is re-pulled according to its
imagePullPolicy - If
imagePullPolicy: Alwaysis set and you push a fixed image with the same tag, the corrected image will be pulled automatically on the next restart, no pod recreation needed - If
restartPolicy: Never, a failed init container leaves the pod inInit:Errorpermanently; the pod must be deleted and recreated - Init containers are not re-executed when a regular container restarts. However, if Kubernetes must restart the entire pod, init containers will run again, init container operations must therefore be idempotent
Complete Pod Lifecycle
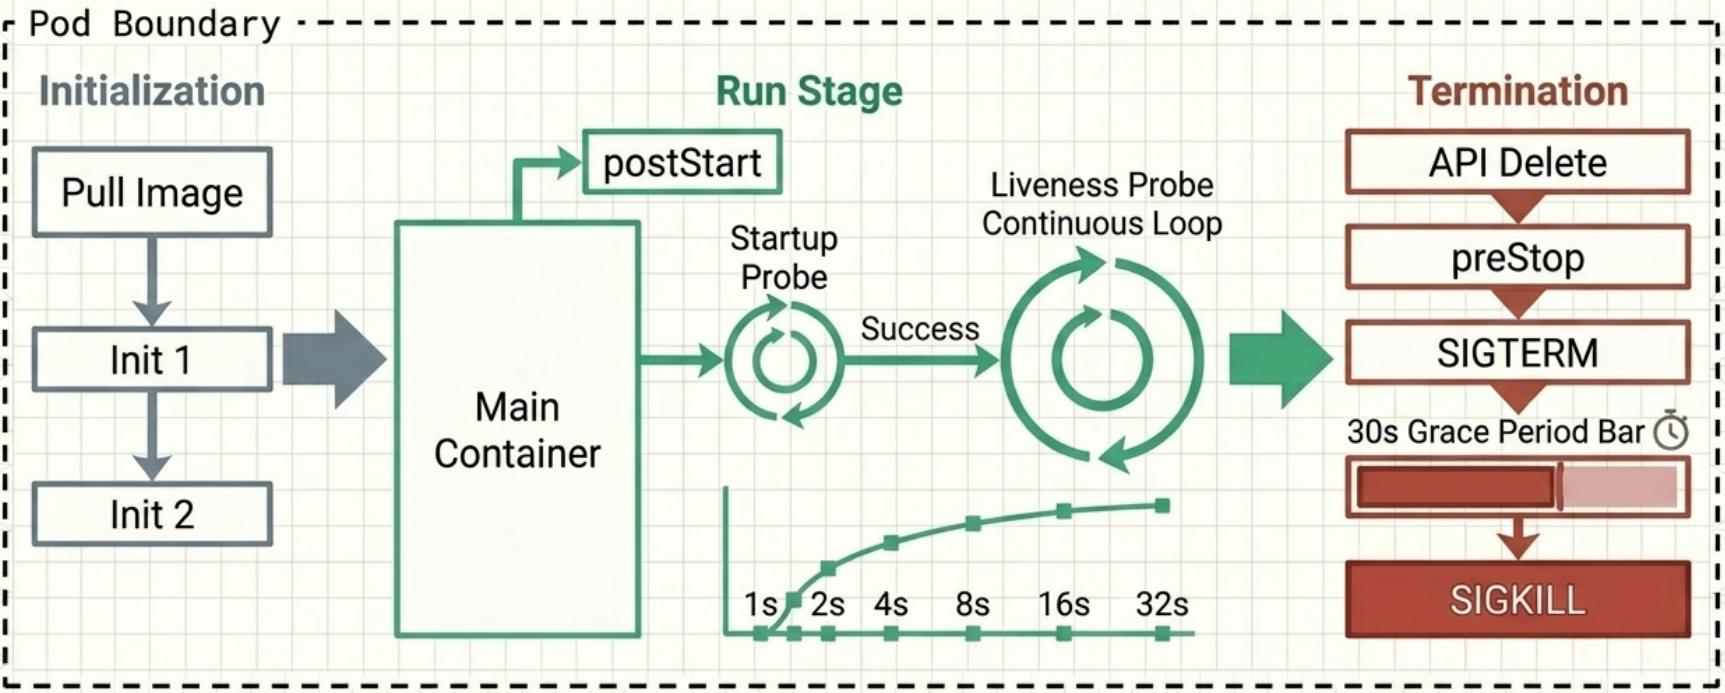
Section titled “Complete Pod Lifecycle”A pod moves through three main stages from creation to deletion.
Stage 1 - Initialization
Section titled “Stage 1 - Initialization”Init containers run sequentially in the order defined in initContainers. For each:
- Image pulled according to
imagePullPolicy(Always,IfNotPresent,Never) - Container runs to completion
- On failure: restarted if
restartPolicyisAlwaysorOnFailure; pod stays inInit:Errorif policy isNever
Init container logic must be idempotent - they may re-run in exceptional circumstances such as a full pod restart.
Stage 2 - Run
Section titled “Stage 2 - Run”Once all init containers complete, regular containers start with their images pulled in parallel. For each container:
- Image pulled, container created
- Post-start hook runs concurrently with the main process (blocks the next container from starting until complete)
- Startup probe runs until success - liveness and readiness are blocked
- Liveness probe takes over health monitoring; readiness probe controls Service endpoint inclusion
- If a liveness probe hits
failureThreshold: pre-stop hook runs → SIGTERM sent →terminationGracePeriodSecondscountdown → SIGKILL if still running; the pod’srestartPolicythen determines whether the container is restarted
Timing and image pull caveats:
- If an image cannot be pulled, that container does not start, but other containers in the pod start regardless — the pod does not halt for a failing image pull
- Containers do not necessarily start at the same moment; a slow image pull can cause one container to start significantly later than others — account for this if a container depends on a sibling being ready
Stage 3 - Termination
Section titled “Stage 3 - Termination”Triggered when the Pod object is deleted (status changes to Terminating). All regular containers terminate in parallel:
- Pre-stop hook runs (if configured)
- SIGTERM sent to the container’s main process
terminationGracePeriodSecondscountdown begins (default: 30 seconds)- SIGKILL sent if the process has not exited before the countdown expires
The grace period can be overridden per-delete: kubectl delete pod <name> --grace-period=10. Setting it to 0 skips pre-stop hooks entirely.
After all regular containers have terminated, native sidecar containers are signalled to stop in reverse order of their initContainers definition. Once all containers have stopped, the Pod object is removed from the API.
Pod Operations
Section titled “Pod Operations”Creating Pods
Section titled “Creating Pods”Imperatively:
kubectl run my-pod --image=nginx:1.25 --port=80kubectl run my-pod --image=nginx --env="ENV=prod" --labels="app=web"Declaratively (recommended):
kubectl apply -f pod.yamlGenerate a manifest without creating the pod:
kubectl run my-pod --image=nginx -o yaml --dry-run=client > pod.yamlEnvironment Variables
Section titled “Environment Variables”A common anti-pattern is building separate container images for each deployment environment (dev, staging, production) with configuration baked in. This violates the Twelve-Factor App principle and continuous delivery best practices, which state: build a deployable artifact once per commit, then control its runtime behaviour through configuration - not by rebuilding.
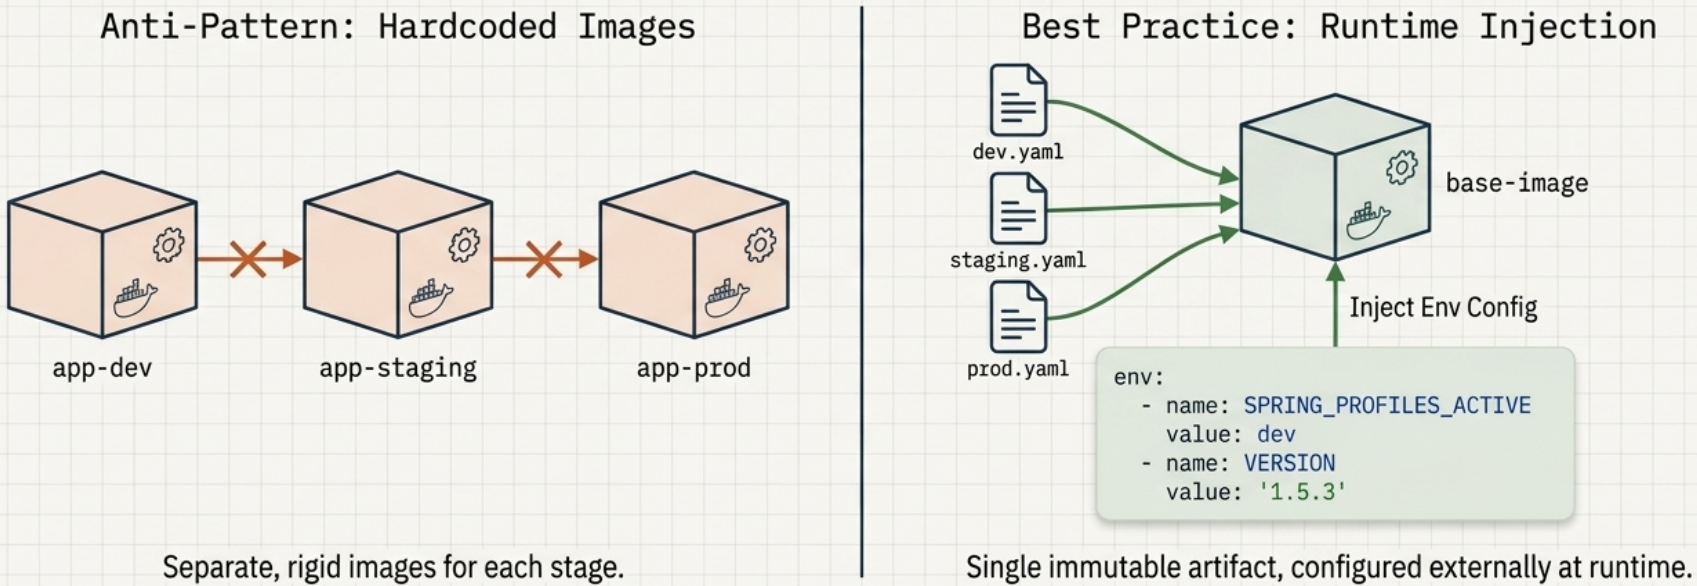
The correct approach is to build a single image and inject environment-specific values at runtime via environment variables:
spec: containers: - name: app image: my-app:1.0 env: - name: DB_HOST value: "postgres.default.svc.cluster.local" - name: APP_ENV value: "production"Use uppercase names with underscores by convention (e.g., SPRING_PROFILES_ACTIVE, DATABASE_URL). For secrets and configurable values, prefer ConfigMaps and Secrets over hardcoded value fields.
Commands and Arguments
Section titled “Commands and Arguments”Many container images already define an ENTRYPOINT or CMD instruction that runs automatically at startup. In a pod definition you can either redefine those instructions or assign a command to images that don’t specify one.
| Pod field | Overrides | When to use |
|---|---|---|
command | Image ENTRYPOINT | Change what executable is launched |
args | Image CMD | Keep the executable, change its arguments |
Using args only (image already has an ENTRYPOINT defined):
# Imperativelykubectl run mypod --image=busybox:1.36.1 -o yaml --dry-run=client \  > pod.yaml -- /bin/sh -c "while true; do date; sleep 10; done"
# this will result in below code in pod.yaml, command will be turned into args attributes.spec: containers: - name: app image: busybox args: - /bin/sh - -c - while true; do date; sleep 10; doneUsing command and args together (override both ENTRYPOINT and CMD):
spec: containers: - name: app image: busybox command: ["/bin/sh"] # overrides ENTRYPOINT args: ["-c", "while true; do date; sleep 10; done"] # overrides CMDInspecting Pods
Section titled “Inspecting Pods”kubectl get pod <name> # summary: status, restarts, agekubectl get pod <name> -o wide # adds node and IP columnskubectl get pod <name> -o yaml # full manifest from the APIkubectl describe pod <name> # human-readable detail + event log
# Filter by labelkubectl get pods -l app=webkubectl get pods -l app=web -A # across all namespaceskubectl logs <pod-name> # current stdout/stderrkubectl logs <pod-name> -f # stream (follow)kubectl logs <pod-name> --timestamps=true # include timestampskubectl logs <pod-name> --tail=50 # last 50 lineskubectl logs <pod-name> --since=5m # last 5 minuteskubectl logs <pod-name> -p # previous (crashed) container
# Multi-container podskubectl logs <pod-name> -c <container-name> # specific containerkubectl logs <pod-name> --all-containers # all containers combinedHow log files work:
- Kubernetes writes a separate log file per container at
/var/log/containers/on the node - When a container restarts, logs go to a new file -
kubectl logs -fterminates at that point and must be re-run to stream the new container’s output - Log files may be rotated when they reach a size limit; after rotation,
kubectl logsonly shows the current file and a streaming command must be restarted - Deleting a pod deletes all its log files - for persistent log access, set up a cluster-wide logging stack (e.g., Loki, Elasticsearch)
- If your application writes logs to a file instead of stdout, use
kubectl execto read the file inside the container, orkubectl cpto copy it out; for production, configure a log collector sidecar or centralized system instead
Exec and File Transfer
Section titled “Exec and File Transfer”# Interactive shellkubectl exec -it <pod-name> -- /bin/sh
# One-shot commandkubectl exec <pod-name> -- env
# Multi-container podkubectl exec -it <pod-name> -c <container-name> -- bash
# Copy files (requires tar inside the container)kubectl cp <pod-name>:/path/to/file ./local-filekubectl cp ./local-file <pod-name>:/path/to/fileCommunicating with Pods Directly
Section titled “Communicating with Pods Directly”| Method | Command | Notes |
|---|---|---|
| Port forward | kubectl port-forward <pod-name> 8080:80 | Recommended for local development and debugging |
| One-off client pod | kubectl run --image=curlimages/curl -it --restart=Never --rm test -- curl <pod-ip> | Tests pod-to-pod network reachability |
| API server proxy | kubectl get --raw /api/v1/namespaces/default/pods/<pod-name>/proxy/ | Routes HTTP through the API server |
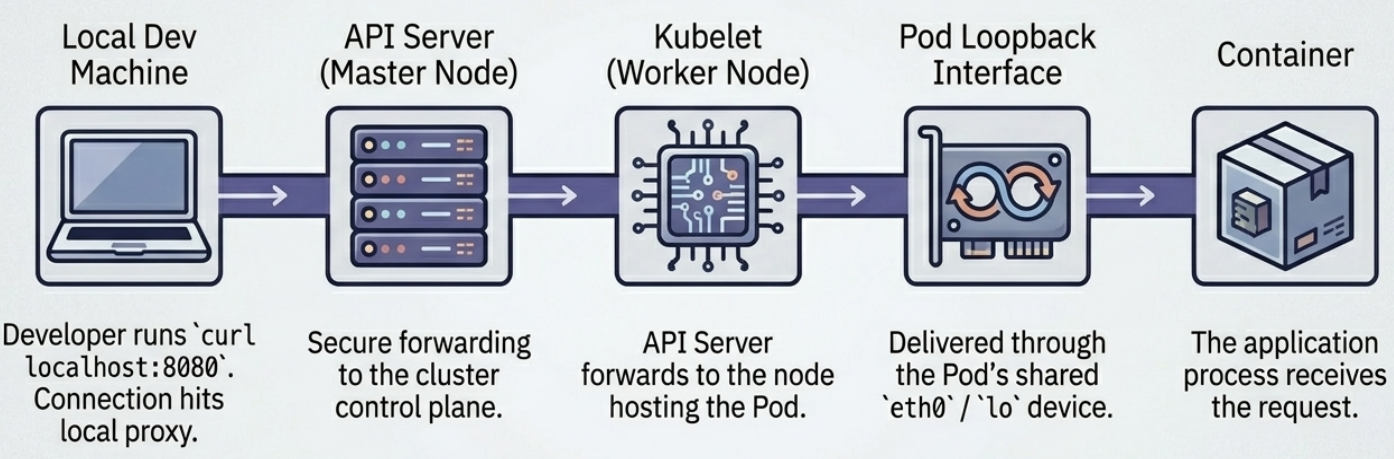
Port forwarding tunnels traffic from your local machine through the API server and kubelet to the container’s loopback interface - no Service required.
Temporary Pods
Section titled “Temporary Pods”Standard application Pods host long-running services intended to run indefinitely. However, for troubleshooting, network verification, or quick debugging (e.g., testing DNS or probing internal Service IPs), you only need a Pod for the duration of a single command. Temporary Pods allow you to spin up an ephemeral environment that automatically cleans itself up upon command completion.
# Run a one-off pod that auto-deletes (--rm) when the command exitskubectl run test-pod --image=curlimages/curl -it --restart=Never --rm -- curl http://my-serviceAttaching to a Container
Section titled “Attaching to a Container”# Attach to stdin/stdout of a running containerkubectl attach <pod-name> -iUnlike kubectl logs, attach gives you an interactive connection to the container’s stdio. The container must have stdin: true set in its spec to accept input.
Deleting Pods
Section titled “Deleting Pods”kubectl delete pod <name>kubectl delete pod <name> --now # skip grace period
# By manifest filekubectl delete -f pod.yamlkubectl delete -f ./manifests/ -R # recursive directory
# Bulk deletionkubectl delete pods --allkubectl delete all --all # Pods, Deployments, Services, ReplicaSets